 |
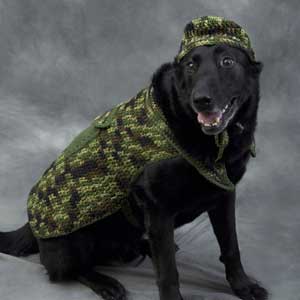
Hunter Dog WR1786
Designed by Darla Sims
Skill Level: EASY
Directions are for size Small. Changes for sizes Medium and Large are in parentheses.
RED HEART® "Super Saver": 1 skein each 971 Camouflage A and 406 Medium Thyme B
Crochet Hooks: 4mm [US G-6], 5mm [US H-8], 5.5mm [US I-9].
Stitch marker.
Yarn needle.
Two buttons, ⅞" diameter.
Two 1" D-rings.
GAUGE: 12 sts = 4" using 5.5mm [US I-9] hook. CHECK YOUR GAUGE. Use any size hook to obtain the specified gauge.
Finished Chest: 16-19 (20-25, 26-32)".
Finished Length: 10 (14, 17)".
NOTE: Different sizes of Cap are made by changing hook sizes.
LOWER BODY
With A and 5.5mm [US I-9] hook, ch 20 (38, 50).
Row 1 (RS): Dc in 4th ch from hook and in each ch across, turn - 18 (36, 48) dc.
Row 2: Ch 3 (counts as dc), 2 dc in first st, dc in each st to last st, 3 dc in last st, turn - 22 (40, 52) dc.
Row 3: Ch 3, dc in each st across, turn.
Row 4: Ch 3 (counts as dc), 2 dc in first st, dc in each st to last st, 3 dc in last st, turn - 26 (44, 56) dc.
Row 5: Ch 3, dc in each st across, turn.
Row 6: Ch 3 (counts as dc), 2 dc in first st, dc in each st to last st, 3 dc in last st, turn - 30 (48, 60) dc.
Rows 7-10 (12, 14): Ch 3, dc in each st across, turn.
Row 11 (13, 15)-14 (18, 20): Ch 2, dc in next st (counts as dc2tog), dc in each st to last 2 sts, dc2tog - 22 (36, 48) dc.
Rows 15 (19, 21)-16 (22, 28): Ch 3, dc in each st across.
Do not fasten off.
Shape Neck
Using separate length of A, join yarn to first st of last row, ch 8 (9, 9) for Collar.
Fasten off.
Row 1: With right side facing, insert hook in last st of last row worked, ch 9 (10, 10) for Collar, sc in 2nd ch from hook and each ch, sc in next 22 (36, 48) dc, sc in next 8 (9, 9) ch, turn - 38 (54, 66) sts.
Rows 2-2 (4, 4): Ch 1, sc in each st across, turn.
Shape Collar
Row 1: Ch 1, 2 sc in first st, sc in each st to last st, 2 sc in last st, turn - 40 (56, 68) sc.
Rows 2-6 (8, 8): Ch 1, 2 sc in first sc, sc in each st to last sc, 2 sc in last sc - 50 (70, 82) sc.
Fasten off.
With B and 5.5mm [US I-9] hook, ch 13 (15, 17).
Row 1: Sc in 2nd ch from hook and in each ch across, turn - 12 (14, 16) sc.
Rows 2-12 (14, 16): Ch 1, sc in each st across, turn.
Do not fasten off.
Edging
Round 1: With right side facing, ch 1, 2 sc in first sc, sc evenly spaced around, working 3 sc in each corner, sc in first corner, slip st to first st to join.
Fasten off.
Pocket Flap
With A and 5.5mm [US I-9] hook, ch 14 (16, 18).
Row 1: Sc in 2nd ch from hook and in each ch across, turn - 13 (15, 15) sc.
Row 2: Ch 1, sc in each st across, turn.
Row 3: Ch 1, sc3tog, sc in each st to last 3 sts, sc3tog - 9 (11, 11) sc.
Fasten off.
FINISHING
Body Edging
Row 1: With right side facing, join B at upper Body next to neck with sc, work 31 (43, 49) sc along side to lower corner, work 3 sc in corner, work 15 (34, 46) sc along lower edge, work 3 sc in corner, work 32 (44, 50) sc along edge to upper neck.
Fasten off.
Collar Edging
Round 1: With right side facing, join B in first sc of Body Edging, sc in next 7 (8, 8) sc, work 3 sc in corner of Collar, working in edges of neck rows, work sc, ch 4 for button loop, slip st in last sc made, sc in next 1 (2, 2) sc along edge of collar, work 3 sc in corner of Collar, work 48 (68, 80) sc to next Collar corner, work 3 sc in corner, work 5 (7, 7) sc along edges of Collar, work 3 sc in corner, work 7 (8, 8) sc to last st of Body Edging, slip st to first st to join.
Fasten off.
Flap Edging
Round 1: Working in opposite edge of beginning ch, join A in first ch with sc, sc again in same ch, sc in next 12 (14, 14) ch, work 3 sc in corner, work 3 sc along side edge, work 3 sc in corner, sc in next 3 (4, 4) sc, ch 4 for button loop, slip st in same st as last sc, sc in next 3 (4, 4) sc, sc in same st as beginning sc, slip st to first sc to join.
Fasten off.
Sew Pocket Flap on top edge of Pocket. Sew Pocket to center of Body.
Sew buttons opposite button loops.
D-Ring Tab
Row 1: Place marker on left side 6 (7, 8 ½)" from bottom edge. Using 5.5mm [US I-9] hook, join A with sc in 3rd st above marker, sc in next 2 sts, turn.
Rows 2-4: Ch 1, sc in each st across, turn.
Fasten off, leaving an 8" tail.
Fold tab over both D rings and sew end to inside edge of Body.
Strap
Row 1: With right side facing, join A with sc in opposite D-Ring Tab, sc in next 2 sts, turn.
Work even in sc until Strap measures 11 (12, 12)" or desired length.
Fasten off.
Weave in ends.
CAP
Note: Work Size Small using 4mm [US G-6] hook, Size Medium using 5mm [US H-8] hook, and Size Large using 5.5mm [US I-9] hook.
Round 1: With A, ch 2, work 8 sc in 2nd ch from hook. Do not join. Place marker for beginning of round.
Round 2: Work 2 sc in each sc around - 16 sc.
Round 3: [Sc in next sc, 2 sc in next sc] 8 times - 24 sc.
Round 4: [Sc in next 2 sc, 2 sc in next sc] 8 times - 32 sc.
Round 5: [Sc in next 3 sc, 2 sc in next sc] 8 times - 40 sc.
Round 6: Working in back loop only, sc in each sc around, sl st to first st to join.
Rounds 7-10: Ch 3 (counts as dc), working in both loops, dc in each st around, slip st to top of beginning ch. Fasten off.
Shape Bill
Row 1: With right side facing and working around bottom of Cap, join A in 16th sc after first st, sc in next st, hdc in next 3 sts, dc in next 2 sts, 3 dc in next st, dc in next 2 sts, hdc in next 3 sts, sc in next 2 sts, turn - 17 sts.
Row 2: Ch 1, sc in first 7 sts, 2 sc in each of next 3 sts, sc in last 7 sts, turn.
Row 3: Ch 1, work in sc around outer edge of Cap and Bill, slip st to first st to join.
Fasten off.
Ties (Make 2)
Join A at side of hat, ch 40.
Fasten off.
Weave in ends.
ABBREVIATIONS: ch = chain; dc = double crochet; dc2tog = double crochet 2 sts together; hdc = half double crochet; mm = millimeters; sc = single crochet; sc3tog = single crochet 3 sts together; st(s) = stitch(es); yo = yarn over needle; [ ] = work directions in brackets the number of times specified; * or ** = repeat whatever follows the * or ** as indicated.
Pattern © by Coats & Clark Inc. Reproduced with permission from Coats & Clark Inc. PurpleKittyYarns.com is not endorsed by Coats & Clark Inc. It is not permissible to contract production of projects made from designs published by Coats & Clark to a third party for sale or distribution.
| Pattern Categories Browse the categories to help you find the patterns you're looking for. |
||
|
|
    
|

|
Navigation

All contents © 2003-2022 Purple Kitty LLC. All rights reserved.
Privacy Policy | FAQ | About Me | Newsletters | Sitemap