 |
A Paper Plane That Flies
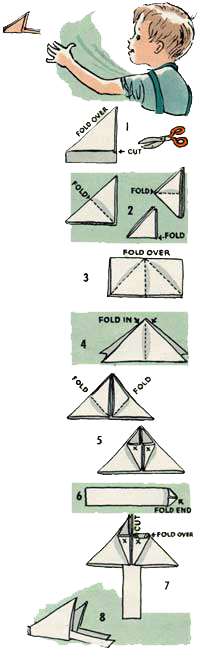
The first time you make this toy it seems complicated, but if you're patient and follow the steps carefully you'll get so you can turn out planes very easily.
Start with a piece of business-sized letter paper, about 8 ½ inches by 11 inches, folding over one corner to make a square and cutting off the remaining strip as in Picture 1. (Note: be sure to save the narrow strip of paper that you cut off.)
Now fold the paper diagonally two more times, making a fourfold triangle (Picture 2).
Unfold the paper and fold it to make a crease on it crossways (Picture 3).
Leaving the paper folded crossways, push in the sides to make a pyramid shape as shown (Picture 4).
Next fold two of the bottom points up to the peak of the pyramid shape, then turn the folded corners in to the center (see points marked "X," Picture 5).
Take the strip of paper which was cut off the square and fold over the corners of one end to make a pointed shape (Picture 6).
Insert the pointed end of the strip into the folded pyramid shape, then cut the nose of the plane down about an inch, or a little more, so that one point (Picture 7) and then the other point may be tucked into the folds which appear at "X" points.
Next fold the plane in half lengthwise as shown (Picture 8). Now the paper plane is ready to fly.
| Pattern Categories Browse the categories to help you find the patterns you're looking for. |
||
    
|
|
|


Navigation

All contents © 2003-2026 Purple Kitty LLC. All rights reserved.
Privacy Policy | FAQ | About Me