 |
Red Heart Super Saver
Visor Cap WR1844

Skill Level: EASY
Designed by Linda Cyr
One size fits most women. Cap Circumference = 20½".
RED HEART® "Super Saver®": 1 Skein 365 Coffee.
Crochet Hook: 5mm [US H-8].
Split lock stitch marker; 4" x 9" piece of plastic mesh canvas; sheet of paper; yarn needle.
GAUGE: 14 sts = 4" in sc. CHECK YOUR GAUGE. Use any size hook to obtain the gauge.
SPECIAL ABBREVIATIONS:
Inc (increase) = 2 sc in next sc.
Dec (decrease) = draw up a loop in each of next 2 sc, yarn over and draw through all 3 loops on hook.
NOTE: Unless otherwise directed, work in continuous rnds without joining. Place a marker in first st of first rnd and move up each rnd.
Ch 2.
Rnd 1: 6 Sc in 2nd ch from hook.
Rnd 2: [Inc in next sc] 6 times - 12 sc.
Rnd 3: [Inc in next sc] 12 times - 24 sc.
Rnd 4 (And All Even Rnds): Sc in each sc around.
Rnd 5: [Inc in next sc, sc in next sc] 12 times - 36 sc.
Rnd 7: [Inc in next sc, sc in next 2 sc] 12 times - 48 sc.
Rnd 9: [Inc in next sc, sc in next 3 sc] 12 times - 60 sc.
Rnd 11: [Inc in next sc, sc in next 4 sc] 12 times - 72 sc.
Rnd 13: [Inc in next sc, sc in next 5 sc] 12 times - 84 sc.
Rnd 15: [Inc in next sc, sc in next 6 sc] 12 times - 96 sc.
Rnds 16, 17, 18: Repeat Rnd 4.
Rnd 19: [Dec, sc in next 6 sc] 12 times - 84 sc.
Rnds 20, 21, 22: Repeat Rnd 4.
Rnd 23: [Dec, sc in next 5 sc] 12 times - 72 sc.
Rnd 24: Hdc in each sc around.
Rnd 25: Slip st in the center (through the fabric) of each hdc around.
Brim-Row 1: Working under the 2 top loops of the slip sts, sc in next 31 slip sts, slip st in next slip st; turn.
Row 2: Ch 2, skip 2 sc, sc in next 28 sc, slip st in next sc; turn.
Row 3: Ch 2, skip 2 sc, sc in next 26 sc, slip st in next st; turn.
Row 4: Ch 2, skip 2, sc in next 24 sc, slip st in next st; turn.
Row 5: Ch 2, skip 2, sc in next 22 sc, slip st in next st; turn.
Row 6: Ch 2, skip 2, sc in next 20 sc, slip st in next st; turn.
Row 7: Ch 2, skip 2, sc in next 18 sc, slip st in next st; turn.
Row 8: Ch 2, skip 2, sc in next 16 sc, slip st in next st; turn.
Row 9: Ch 2, skip 2, sc in next 14 sc, slip st in next st; turn.
Row 10: Ch 2, skip 2, sc in next 12 sc, slip st in next st; turn. Fasten off.
Brim Facing: With right side facing, attach yarn in the hdc above the first sc of Row 1 of brim and repeat Rows 1-10, working first row in hdc of Rnd 24.
FINISHING: Trace around brim onto paper. Use this paper pattern to cut out brim liner from plastic canvas. Place plastic liner between brim pieces, trim if necessary. Edging: With right side facing, attach yarn to back of cap; ch 1, sc around entire edge, encasing plastic liner between brim and brim facing; slip st in each sc around. Fasten off.
Strap: Ch 43; 3 sc in 2nd ch from hook, sc in each ch to last ch; 3 sc in last ch; pivot and work sc in remaining loop of each ch across; slip st in each sc around. Fasten off.
Buttons (Make 2): Ch 3; 8 hdc in 3rd ch from hook; slip st in each hdc around. Fasten off.
Place strap over front of cap. Sew buttons to ends of strap through all layers. Weave in ends.
ABBREVIATIONS: ch = chain; hdc = half double crochet; mm = millimeters; rnd = round; sc = single crochet; st = stitch; [ ] = work directions in brackets the number of times specified.
Pattern © by Coats & Clark Inc. Reproduced with permission from Coats & Clark Inc. PurpleKittyYarns.com is not endorsed by Coats & Clark Inc. It is not permissible to contract production of projects made from designs published by Coats & Clark to a third party for sale or distribution.
Easy Friendship Bracelets

Make matching bracelets with a friend or make bracelets with different colors. Braid your bracelet then make a wish as you have your friend tie on your bracelet. Rumor has it, that if you wear the bracelet until it falls off by itself, your wish will come true.
RED HEART® Super Saver®: small amount of any 3 colors
Color combinations shown in photograph:
385 Royal, 311 White & 319 Cherry Red
672 Spring Green, 381 Light Blue & 368 Paddy Green
324 Bright Yellow, 254 Pumpkin & 706 Perfect Pink
Notions: Scissors, tape or clipboard, and ruler.
BRACELETS
Cut two 16” strands of each color of yarn.
Hold all 6 strands together and tie a knot at one end of the bundle. Secure knot end of yarn to a table or desk with tape or place in clipboard. Separate yarn strands into three different groups, with 2 different colors in each group.
While holding all three groups of yarn, braid the groups together as follows. Move the left hand group over the middle group to the center. Move the right hand group over the new middle to the center. Keeping the groups tight, continue to alternate moving the outermost groups over the middle groups to the center until you reach the end of the yarn. Tie off end with a knot.
Pattern © by Coats & Clark Inc. Reproduced with permission from Coats & Clark Inc. PurpleKittyYarns.com is not endorsed by Coats & Clark Inc. It is not permissible to contract production of projects made from designs published by Coats & Clark to a third party for sale or distribution.
Special Olympics Easy Knit Scarf

Skill Level: EASY
Designed by Samantha Leaver.
Scarf measures: 7" x 60".
RED HEART® "Super Saver®": 1 skein each 512 Turqua A and 886 Blue B. (Please note: this scarf pattern was designed the first year of the Special Olympics Scarf Project and utilizes the colors for the 2009 Scarf Project. If you'd like to make scarves for the current year, please check at the Special Olympics Scarf Project website for current year colors.)
Knitting Needles: 5.5mm [US 9].
Yarn needle.
GAUGE: 16 sts = 4"; 28 rows = 4" in St st. CHECK YOUR GAUGE. Use any size needle to obtain the gauge.
SCARF
With A, cast on 27 sts. Knit 1 row even.
Begin Pattern
Rows 1 and 3 (right side): Knit.
Row 2: Purl.
Row 4: * K3, yo, k2tog, k1, k2tog, yo; repeat from * to last 3 sts, k3.
Repeat Rows 1 - 4 until piece measures 30" from beginning. Cut A, join B and repeat Rows 1 - 4 until scarf measures 60" from beginning, end by working Row 3 of pattern. Knit 1 row even. Bind off.
FINISHING
Weave in yarn ends.
ABBREVIATIONS: A, B = color A, B; k = knit; mm = millimeters; st(s) = stitch(es); tog = together; yo = yarn over; * or ** = repeat whatever follows the * or ** as indicated.
Pattern © by Coats & Clark Inc. Reproduced with permission from Coats & Clark Inc. PurpleKittyYarns.com is not endorsed by Coats & Clark Inc. It is not permissible to contract production of projects made from designs published by Coats & Clark to a third party for sale or distribution.
Quick and Easy Valentines

Skill Level: BEGINNER
Designed by Elizabeth Hill.
Cards can be any size, depending on your choice of paper.
RED HEART® "Super Saver®": 2 Ounces in colors of your choice.
Recommended colors: 724 Baby Pink; 722 Pretty 'n Pink; 319 Cherry Red; 905 Magenta; 311 White; 376 Burgundy; 786 Candy Print.
Construction paper, scrapbook paper, or stationery blanks; scissors; white craft glue, double-sided tape or glue sticks; cookie cutters in heart shapes.
Instructions:
1. Fold construction paper in half, and then fold in half again to make quarter size card.
2. Center heart cookie cutter in the center of the card front. Trace lightly with a pencil. Cut along pencil line and remove the heart shape.
3. While the card is folded, lightly trace around the inside of the cut heart pattern on the sheet of paper directly below the cut-out design. This will serve as a pattern for attaching yarn to the card.
4. Cut lengths of yarn long enough (without stretching) to cover the lightly drawn heart design. Open up card so that the design will be flat on a hard surface. Cover design area with the adhesive of choice. Put yarn strips over adhesive adjusting yarn to completely cover design. Allow to dry. Trim yarn ends if necessary. Once dry, refold card. Yarn will show through the heart design on the front of the card.
5. Optional: Embellish paper border of the heart design with markers, specialty hole punches, rick rack, or sequins.
6. Add your own special Valentine message on the front and inside of the card.
Pattern © by Coats & Clark Inc. Reproduced with permission from Coats & Clark Inc. PurpleKittyYarns.com is not endorsed by Coats & Clark Inc. It is not permissible to contract production of projects made from designs published by Coats & Clark to a third party for sale or distribution.
Garter Stitch Baby Hat WR2164

Skill Level: Beginner
Designed by Kathleen Sams
Hat circumference is 14".
RED HEART® "Super Saver®": 1 skein of 347 Light Periwinkle.
Knitting Needles: 5.5mm (US 9)
Yarn Needle
Gauge: 15 sts = 4", 30 rows = 4" in Garter stitch (knit every row). Squares = 7" x 7". CHECK YOUR GAUGE. Use any sized needle to obtain gauge given.
HAT
Square (Make 2)
Cast on 27 sts.
Row 1 (Right Side): Knit all sts.
Rows 2-42: Knit.
Bind off. Weave in ends.
Assembly
With right sides up, sew side seams; leave top and bottom edges open.
Make Twisted Cord using three 80" lengths of yarn. Weave the cord through the stitches about 1" down from the top edge of the hat. Pull ends of cord to gather fabric and secure with a knot.
Twisted Cord
Bring all six cut ends of yarn together and tie in a knot close to the end to form a large loop. Secure the knotted end to a stable surface or have someone hold it. Slip a knitting needle into the loop and hold the yarn just below the loop and needle. Hold the yarn taut, and twirl the needle, twisting the yarn, until the entire length is tightly twisted and begins to twist back on itself. Bring the loop end and the knotted end together; tie tightly so the cord will not untwist. Smooth out the kinks so the cord lies flat and twists evenly.
Pattern © by Coats & Clark Inc. Reproduced with permission from Coats & Clark Inc. PurpleKittyYarns.com is not endorsed by Coats & Clark Inc. It is not permissible to contract production of projects made from designs published by Coats & Clark to a third party for sale or distribution.
Alien Pillows WR1964
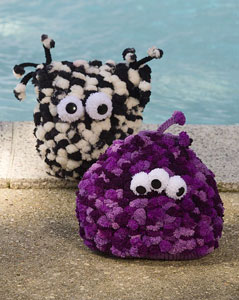
Designed by Heather Lodinsky
Skill Level: EASY
Black Rectangle Pillow measures 8" wide x 10" tall. Purple Oval Pillow measures 8" wide x 10" tall.
For Black Rectangle Pillow
RED HEART® "Pomp-a-Doodle™": 2 Balls in 9945 Night & Day A.
RED HEART® "Super Saver®": 1 Skein in 312 Black B.
2 black buttons: ⅞” diameter.
For Purple Oval Pillow
RED HEART® "Pomp-a-Doodle™": 2 Balls in 9930 Plush Plum A.
RED HEART® "Super Saver®": 1 Skein in 528 Medium Purple B.
3 black buttons: ¾” diameter.
For Both
RED HEART® "Super Saver®": 1 Skein in 311 White C or purchased white pompoms.
Knitting Needles: 5.5 mm [US 9] and 6.5 mm [US 10½].
Polyester stuffing.
Yarn needle.
GAUGE: 16 sts = 4"; 22 rows = 4" in garter stitch with smaller needles and B. CHECK YOUR GAUGE. Use any size needles to obtain the given gauge.
Note: Knit 2 stitches on thread between pompoms. Do not pull pompoms through stitches.
BLACK RECTANGLE PILLOW
Body
With larger needles and A, cast on 24 sts.
Work in garter stitch for 20".
Bind off.
Base
With smaller needles and B, cast on 10 sts.
Working in garter st, inc 1 st at beginning of every row 10 times - 20 sts.
Work even until piece measures 4" from beginning.
Dec 1 stitch at beginning of every row 10 times - 10 sts. Bind off.
Antennae (Make 6)
With smaller needles and B, cast on 12 sts.
Bind off, leaving a long tail.
Cut 2 pompoms from A for each Antenna.
Sew 2 pompoms to top of each Antenna.
FINISHING
Fold Body piece in half and sew side seams, leaving cast-on and bind-off edges open.
Make 2 pompoms, each 1½" diameter, from C.
Sew buttons on pompoms and sew to Front of Body.
Sew 3 antennae to each top corner.
Sew Base to open edge of Body, leaving an opening for stuffing.
Stuff with polyester filling.
Sew opening closed.
Weave in ends.
PURPLE OVAL PILLOW
Body
(Make 2)
With larger needles and A, cast on 30 sts.
Work in garter stitch for 5".
Dec 1 st at beginning of next 14 rows - 16 sts.
Bind off 2 stitches at beginning of next 2 rows, then 3 sts at beginning of next 2 rows - 6 sts.
Bind off.
Base
With smaller needles and B, cast on 10 sts.
Working in garter st, inc 1 st at beginning of every row 14 times - 24 sts.
Work even until piece measures 7" from beginning.
Dec 1 stitch at beginning of every row 14 times - 10 sts.
Bind off.
Antennae
(Make 3)
Work as for Rectangle Pillow Antennae.
FINISHING
Sew Body pieces together, leaving cast-on edges open.
Make 3 pompoms, each 1½" diameter, from C.
Sew buttons on pompoms and sew to Front of Body. Sew 3 antennae to top edge of Pillow.
Sew Base to open edge of Body, leaving an opening for stuffing.
Stuff with polyester filling.
Sew opening closed.
Weave in ends.
ABBREVIATIONS: A, B, etc = color A, B, etc; dec = decrease; inc = increase; K = knit; mm = millimeters; st(s) = stitch (es); St st = Stockinette stitch.
Pattern © by Coats & Clark Inc. Reproduced with permission from Coats & Clark Inc. PurpleKittyYarns.com is not endorsed by Coats & Clark Inc. It is not permissible to contract production of projects made from designs published by Coats & Clark to a third party for sale or distribution.
Pillow Party WR2148

Designed by Darla Sims.
Skill Level: INTERMEDIATE
Heart Pillow is 15" tall and 16" at widest point.
Square Pillow measures 15½" square.
Crochet Hook: 5.5mm [US I-9].
Yarn needle.
GAUGE: 15 sts = 4"; 6 rows = 4" in pattern. CHECK YOUR GAUGE. Use any size hook to obtain the gauge.
HEART PILLOW
RED HEART® "Super Saver®": 1 Skein 940 Plum Pudding A.
RED HEART® "Pomp-a-Doodle™": 1 Ball 9955 Berries & Cream B.
Fiberfill, ½ yd fabric for lining.
PILLOW
Side 1
With A, ch 12.
Row 1 (Right Side): 3 dc in 6th ch from hook, ch 1, skip next 2 ch, 3 dc in next ch, ch 1, skip next 2 ch, dc in last ch; turn - 2 3-dc groups.
Row 2: Ch 4 (counts as dc and ch-1), * 3 dc in next ch-1 space, ch 1; repeat from * across; 3 dc in beginning ch-5 space, ch 1, dc in 4th ch of ch-5; turn - 3 3-dc groups.
Row 3: Ch 4, * 3 dc in next ch-1 space, ch 1; repeat from * across; dc in last st; turn.
Rows 4-11: Repeat Row 3.
Row 12: Ch 4, skip first ch-1 space, [3 dc in next ch-1 space, ch 1] 11 times, skip last ch-1 space, dc in last st; turn.
Row 13: Repeat Row 3.
Rows 14-17: Repeat Rows 12-13.
Row 18: Repeat Row 12.
Upper Heart-Right Side
Row 1: Ch 3, [3 dc in next ch-1 space, ch 1] 4 times; 3 dc in next ch-1 space, dc in next ch-1 space; turn.
Row 2: Ch 3, [3 dc in next ch-1 space, ch 1] 3 times; 3 dc in next ch-1 space, dc in last st; turn.
Row 3: Ch 3, [3 dc in next ch-1 space, ch 1] 2 times; 3 dc in next ch-1 space, dc in last st; turn.
Row 4: ch 3, 3 dc in next ch-1 space, ch 1, 3 dc in next ch-1 space, dc in last st; turn.
Row 5: Ch 1, sc in first st, 3 dc in next ch-1 space, sc in last st. Fasten off.
Upper Heart-Left Side
Row 1: With Right Side facing, skip next 3-dc group of Row 18, join yarn in next ch-1 space; ch 3, [3 dc in next ch-1 space, ch 1] 4 times, 3 dc in next ch-1 space, dc in last st; turn.
Rows 2-5: Work same as for Right Side.
Edging-Round 1: With Right Sides facing, join A in any st, ch 1, sc evenly around; join with a slip st. Fasten off.
Side 2
Work same as for Cover 1 to Row 5 of Upper Heart Left Side.
Edging-Round 1: With Wrong Sides facing, join B in any st, ch 1, sc evenly around; join. Fasten off.
FINISHING
Lining: Using one Cover piece as pattern, add ½” to outside edge and cut two heart shaped pieces from lining fabric. With Right Sides facing, sew together using ½” seam, leaving 8" opening along one side. Turn right side out. Insert fiberfill and sew opening closed.
With Wrong Sides together, stitch outer edges of pillow covers, leaving 8" opening. Insert pillow and close opening. Weave in ends.
SQUARE PILLOW
RED HEART® "Super Saver®": 1 Skein 718 Shocking Pink A.
HEART® "Pomp-a-Doodle™": 1 Ball 9930 Plush Plum B.
16" x 16" pillow form, ½ yd fabric for lining.
PILLOW
Side 1
With A, ch 5; join with a slip st into a ring.
Round 1: Ch 5 (counts as dc and ch-2), [3 dc in ring, ch 2] 3 times; 2 dc in ring; join to 3rd ch of ch-5.
Round 2: Slip st in next ch-2 space, ch 5, 3 dc in same space, ch 1, [(3 dc, ch 2, 3 dc) all in next ch-2 space - corner made, ch 1] 3 times; 2 dc in first ch-2 space; join.
Round 3: Slip st in next ch-2 space, ch 5, 3 dc in same space, ch 1, 3 dc in next ch-1 space, ch 1 - side space made; * corner in next ch-2 space, ch 1, side space in next ch-1 space; repeat from * around; 2 dc in first ch-2 space; join.
Round 4: Slip st in next ch-2 space, ch 5, 3 dc in same space, ch 1, side space in each ch-1 space to next ch-2 space, * corner in next ch-2 space, ch 1, side space in each ch-1 space to next ch-2 space; repeat from * around; 2 dc in first ch-2 space; join.
Rounds 5-11: Repeat Round 4.
Fasten off.
Edging-Round 12: With Right Sides facing, join A in any st, ch 1, sc in each st around, working 3 sc in each ch-2 space; join. Fasten off.
Side 2
Repeat as for Cover 1 to Round 12.
Edging-Round 12: With Wrong Side facing, join B in any st, ch 1, sc in each st around; join. Fasten off.
FINISHING
Lining: Cut two 17" squares from lining fabric. With Right Sides facing, sew together using seam, leaving 8" opening. Turn right side out. Insert pillow and sew opening closed.
Sew covers together around pillow. Weave in ends.
ABBREVIATIONS: A, B = color A, B; ch = chain; dc = double crochet; mm = millimeters; sc = single crochet; st(s) = stitch(es); tr = treble crochet; * or ** = repeat whatever follows the * or ** as indicated; [ ] = work directions in brackets the number of times specified.
Pattern © by Coats & Clark Inc. Reproduced with permission from Coats & Clark Inc. PurpleKittyYarns.com is not endorsed by Coats & Clark Inc. It is not permissible to contract production of projects made from designs published by Coats & Clark to a third party for sale or distribution.
Valentine Wreath WR1085

Skill Level: BEGINNER
Designed by Elizabeth Hill.
Valentine wreath measures approximately 11" wide x 12" high.
RED HEART® "Super Saver®": 2 Ounces each 319 Cherry Red CA, 724 Baby Pink CB, and 311 White CC.
Susan Bates® French Knitter, Small, Art. 14102.
Susan Bates® Easy Wrap Pom Pom Maker, Art. 14063.
All purpose white craft glue; glue gun and glue sticks; buttons 1" in diameter and larger; thread to match yarns; heart shaped Styrofoam wreath; yarn needle; 18 gauge 18" floral wire stems; 1"-wide foam brush; 6 push pins; paper and cardboard.
Instructions:
Wreath: Apply white craft glue with foam brush to Styrofoam wreath, an inch at a time. Wrap Styrofoam wreath with CA. Repeat applying glue and wrapping yarn until wreath is completely covered with yarn. Adjust yarn as needed to cover Styrofoam completely.
Decorate wreath with Half Pom Pom Button Flowers and/or French Knitter Blossoms.
Half Pom Pom Button Flowers: Using Pom Pom Maker, make one large pom pom but do not fill Pom Pom Maker as instructed; use only about half the yarn indicated so that the pom pom will be less full and round and will spread open into a flower. In the same manner, make one medium pom pom with a contrasting color. Layer the smaller pom pom over the larger pom pom; tie or sew together. Place a 1" button at the center and sew in place.
Make as many flowers as you desire. Arrange on the wreath and, once satisfied with the layout, glue in place with a hot glue gun.
French Knitter Flowers with Wire: With CB or CC and the Small French Knitter, make an 18" cord; weave in yarn ends. Thread a wire stem down the center of the cord. Approximately one inch from the end of the cord, bend the wired cord around a pencil to create petal. Bend wire back, then around the pencil again to create another petal. Continue in this fashion until 6 petals are made, adjusting length and width as necessary. Bring wire ends to the center and wrap ends together to create flower. Hot glue gun a button in the center.
Make as many flowers as you desire. Arrange on the wreath and, once satisfied with the layout, glue in place with a hot glue gun.
French Knit Flowers without Wire: With CB or CC and the Small French Knitter, make 21" or longer cords; weave in yarn ends.
Make a template for the flowers: Draw a 2½"-diameter circle on a piece of paper. Attach paper to a piece of cardboard. Put 6 push pins evenly spaced around the rim of the circle. Wrap a cord around the push pins to create petals. Pin in place. Sew petals with yarn or sewing thread, securing the base of the petals to maintain circular shape. Use glue gun to attach buttons over the center of the flower. Make as many flowers as you desire. Arrange on the wreath and, once satisfied with the layout, glue in place with a hot glue gun.
Pattern © by Coats & Clark Inc. Reproduced with permission from Coats & Clark Inc. PurpleKittyYarns.com is not endorsed by Coats & Clark Inc. It is not permissible to contract production of projects made from designs published by Coats & Clark to a third party for sale or distribution.
Happy Hearts Afghan WR1658

Skill Level: EASY
Afghan measures approximately 40" wide x 48" long.
RED HEART® "Super Saver®": 2 Skeins each 774 Lt. Raspberry CA, 376 Burgundy CB, 378 Claret CC, 358 Lavender CD, and 776 Dark Orchid CE.
Crochet Hook: 5mm [US H-8].
Stitch marker (optional), yarn needle.
GAUGE: Square = 4½" x 4½”. CHECK YOUR GAUGE. Use any size hook to obtain the gauge.
SPECIAL ABBREVIATIONS:
sc2tog = [insert hook in next st and draw up a lp] twice, yo and draw through all 3 lps on hook-one sc decreased.
SOLID SQUARE (Make 20-4 in each color): Ch 5; join with a sl st in first ch to form a ring.
Rnd 1: Ch 3, 2 dc in ring, ch 2, [3 dc in ring, ch 2] 3 times; join with a sl st in top of ch-3.
Rnd 2: Ch 3, dc in next 2 dc, (2 dc, ch 2, 2 dc) all in next ch-2 sp, [dc in next 3 dc, (2 dc, ch 2, 2 dc) all in next ch-2 sp] 3 times; join.
Rnd 3: Ch 3, dc in next 4 dc, (2 dc, ch 2, 2 dc) all in next ch-2 sp, [dc in next 7 dc, (2 dc, ch 2, 2 dc) all in next ch-2 sp] 3 times, dc in next 2 dc; join.
Rnd 4: Ch 3, dc in next 6 dc, (2 dc, ch 2, 2 dc) all in next ch-2 sp, [dc in next 11 dc, (2 dc, ch 2, 2 dc) all in next ch-2 sp] 3 times, dc in next 4 dc; join - 15 dc between corner sps. Fasten off.
SINGLE-ROW STRIPE SQUARE (Make 20): With color CA, CB, CC, CD or CE, work Rnds 1-3 same as for Solid Square for 4 squares per color, then work Rnd 4 of each square with a different contrasting color.
DOUBLE-ROW STRIPE SQUARE (Make 20): With color CA, CB, CC, CD or CE, work Rnds 1 and 2 same as for Solid Square for 4 squares per color, then work Rnds 3 and 4 of each square with a different contrasting color.
TRIPLE-ROW STRIPE SQUARE (Make 20): With color CA, CB, CC, CD or CE, work Rnd 1 same as for Solid Square for 4 squares per color, then work Rnds 2-4 of each square with a different contrasting color.
HEART (Make 20-4 in each color): Ch 11.
Point-Row 1 (Right Side): Sc in 2nd ch from hook and in each ch across; turn - 10 sc.
Row 2: Ch 1, sc in each sc to last 2 sc; sc2tog; turn - 9 sc.
Rows 3-7: Rep Row 2 - 4 sc at end of Row 7.
Row 8: Ch 1, [sc2tog] twice; turn - 2 sc.
Row 9: Ch 1, sc2tog - 1 sc. Fasten off.
Bumps-Row 1: With right side facing and working in rem lps of beg ch, join yarn in the first ch; ch 1, sc in same ch and next 4 ch; turn - 5 sc.
Row 2: Ch 1, sc in each sc across.
Row 3: Sc2tog, sc in next sc, sc2tog. Fasten off.
With right side facing, join yarn in next free lp of beg ch and rep Rows 1-3.
FINISHING: Weave in ends. Sew hearts to Solid Squares, ensuring that the heart and square color are different. Randomly arrange all squares into an 8 square x 10 square grid, and sew together.
Edging is worked in short rows across 1 or more squares in different colors. When fastening off, leave a yarn tail to sew the seams between edging sections.
LOWER EDGING-Row 1: With right side facing, join CA in lower left corner of afghan; ch 3, dc evenly across 3 squares; turn.
Rows 2-4: Ch 3, skip first dc, dc in next dc and in each dc across and in top of ch-3; turn. Fasten off. Join CB and work 4 rows dc across next 2 squares of lower edge. Fasten off. Join CC and work 4 rows dc across next 3 squares. Fasten off.
SIDE EDGING: Join CD and work 4 rows dc across row ends of last edging section and next 3 squares. Fasten off. Join CE and work 4 rows dc across next 4 squares. Fasten off. Join CA and work 4 rows dc across one square. Fasten off. Join CB and work 4 rows dc across next 2 squares. Fasten off.
TOP EDGING: Join CC and work 4 rows dc across row ends of last edging section and next 4 squares. Fasten off. Join CD and work 4 rows dc across next 3 squares. Fasten off. Join CE and work 4 rows dc across one square. Fasten off.
SIDE EDGING: Join CA and work 4 rows dc across row ends of last edging section and next 2 squares. Fasten off. Join CB and work 4 rows dc across next 3 squares. Fasten off. Join CD and work 4 rows dc across next 2 squares. Fasten off. Join CE and work 4 rows dc across last 3 squares and row ends of first edging section. Fasten off. Sew ends of edging sections tog. Weave in ends.
ABBREVIATIONS: beg = beginning; CA, CB, etc. = color A, B, etc.; ch = chain; dc = double crochet; lp = loop; mm = millimeters; rem = remaining; rep = repeat; rnd = round; sc = single crochet; sl = slip; sp = space; tog = together; yo = yarn over; * = repeat whatever follows the * as indicated; [ ] = work directions in brackets the number of times specified.
Pattern © by Coats & Clark Inc. Reproduced with permission from Coats & Clark Inc. PurpleKittyYarns.com is not endorsed by Coats & Clark Inc. It is not permissible to contract production of projects made from designs published by Coats & Clark to a third party for sale or distribution.
Crochet Hearts Afghan WR1004
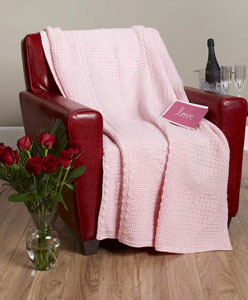
Skill Level: INTERMEDIATE
Afghan measures approximately 45" x 58".
RED HEART® "Super Saver®": 42 Ounces No. 724 Baby Pink.
Crochet Hook: 6.5mm [US K-10.5].
Yarn needle.
GAUGE: 12 sts = 4"; 12 rows = 4" in pat; panel = 13" wide before edging. CHECK YOUR GAUGE. Use any size hook to obtain the gauge.
SPECIAL ABBREVIATION:
CL (cluster) = [yo and draw up a lp, yo and draw through 2 lps on hook] twice all in next st, yo and draw through all 3 lps on hook.
PANEL (Make 3): Ch 40.
Row 1 (Right Side): Sc in 2nd ch from hook and in each ch across; turn - 39 sc.
Rows 2-5: Ch 1, sc in each st across; turn.
Row 6: Ch 1, sc in first 19 sc, CL in next sc, sc in last 19 sc; turn.
Row 7 AND EVERY RIGHT SIDE ROW: Rep Row 2.
Row 8: Ch 1, sc in first 17 sc, [CL in next sc, sc in next sc] 3 times, sc in each sc to end; turn.
Row 10: Ch 1, sc in first 15 sc, [CL in next sc, sc in next sc] 5 times, sc in each sc to end; turn.
Row 12: Ch 1, sc in first 13 sc, [CL in next sc, sc in next sc] 7 times, sc in each sc to end; turn.
Row 14: Ch 1, sc in first 11 sc, [CL in next sc, sc in next sc] 9 times, sc in each sc to end; turn.
Row 16: Ch 1, sc in first 9 sc, [CL in next sc, sc in next sc] 11 times, sc in each sc to end; turn.
Rows 18, 20, 22: Ch 1, sc in first 7 sc, [CL in next sc, sc in next sc] 13 times, sc in each sc to end; turn.
Rows 24, 26: Ch 1, sc in first 7 sc, [CL in next sc, sc in next sc] 6 times, sc in next 2 sc, [CL in next sc, sc in next sc] 6 times, sc in each sc to end; turn.
Row 28: Ch 1, sc in first 9 sc, [CL in next sc, sc in next sc] 4 times, sc in next 6 sc, [CL in next sc, sc in next sc] 4 times, sc in each sc to end; turn.
Row 30: Ch 1, sc in first 11 sc, [CL in next sc, sc in next sc] twice, sc in next 10 sc, [CL in next sc, sc in next sc] twice, sc in each sc to end; turn.
Rows 31-35: Ch 1, sc in each sc across; turn.
Rep Rows 6-35 five more times. Fasten off.
Panel Edging (Work on BOTH long edges of center panels; on LEFT edge of Right panel and on RIGHT edge on Left panel)-Row 1: With right side facing, attach yarn to work across long edge; ch 1, sc in each row end across; turn.
Row 2: Ch 1, sc in first 2 sc, CL in next sc, * sc in next 3 sc, CL in next sc; rep from * to last 2 sc; sc in last 2 sc; turn.
Row 3: Ch 1, sc in each st across. Fasten off.
FINISHING: Sew or sl st panels together, being careful that the far right and far left edges of the afghan do not have edging.
Border-Rnd 1: With right side facing, attach yarn to work across top edge; ch 1, 2 sc in corner, sc in each sc and each joining across to next corner, 3 sc in corner, skip first row, sc in each row end to last row, skip last row, 3 sc in corner, sc in each sc and each joining across to next corner, 3 sc in corner, skip first row, sc in each row end to last row, skip last row, 1 more sc in first corner; join with a sl st to first sc; TURN.
Rnd 2: Ch 1, sc in same sc as joining, ** sc in next 2 sc, CL in next sc, * sc in next 3 sc, CL in next sc; rep from * to 2 sc before the center corner sc; sc in next 2 sc, 3 sc in corner sc; rep from ** around; join; turn.
Rnd 3: Ch 1, sc in each st around and 3 sc in center corner sc; join; do NOT turn.
Rnd 4: Ch 1, sc in each sc across top and bottom edges and sl st in each sc across side edges, increase as necessary at corners; join. Fasten off. Weave in ends.
ABBREVIATIONS: ch = chain; lp = loop; mm = millimeters; pat = pattern; rep = repeat; rnd = round; sc = single crochet; st(s) = stitch (es); yo = yarn over; * or ** = repeat whatever follows the * or ** as indicated; [ ] = work directions in brackets the number of times indicated.
Pattern © by Coats & Clark Inc. Reproduced with permission from Coats & Clark Inc. PurpleKittyYarns.com is not endorsed by Coats & Clark Inc. It is not permissible to contract production of projects made from designs published by Coats & Clark to a third party for sale or distribution.
| Pattern Categories Browse the categories to help you find the patterns you're looking for. |
||
|
|
    
|

|
Navigation

All contents © 2003-2022 Purple Kitty LLC. All rights reserved.
Privacy Policy | FAQ | About Me | Newsletters | Sitemap