 |
South Maid
Fright Night Flier LC1276
No Skills Required
Designed by Barbara Swanson.
Hot Air Balloon measures approximately 27" from top of balloon to bottom of basket.
Cotton "South Maid", Art. D54: One ball (350 yards/320 meters) of No. 431 Pumpkin.
Additional Materials: Commercial fabric stiffener; 1 large balloon; purple, yellow and black felt; COATS & CLARK Medium Rick Rack, Art. M29P: 2 packages No. 177 Kerry Green; 1 package No. 135C Tango; 4" square empty tissue box; clear nylon cord or fishing line; hot glue gun and sticks; white craft glue; scissors; large bowl.

Balloon: Blow up balloon to measure 32" around the height and 29" around the width; knot end securely. Tie the end of the thread to the knot of the balloon and wrap thread around the balloon criss-crossing in all directions using all of the thread. Secure thread end at the knot, leaving a length for hanging.
Stiffen: Hold wrapped balloon over a large bowl and pour stiffener over the balloon. Repeat until all threads are thoroughly saturated. Gently smooth excess stiffener on balloon away with hands. Hang balloon over bowl to catch drips and allow to dry completely, approximately 24-48 hours. Burst balloon with a sharp point and remove from the thread bubble.
Assembly: Cover sides and bottom of the tissue box with purple felt; cover inside of box if desired. Cut four 10" lengths of orange rick rack; fold in half and glue at fold to top of each corner of the box, then glue a separate length of orange rick rack around the top of box over all other rick rack. Mark the center of top (wide end) of the thread bubble. Cut two 60" lengths of green rick rack for streamers. Glue the center 12" of each length evenly across the center of the top of the thread bubble forming a large "X". Mark lower 6" of each of these 4 streamer ends and glue at the mark to the 4 corners of the covered box as shown, adjusting streamer lengths if necessary for box to hang evenly. Cut four 12" lengths of green rick rack, mark the centers and glue centers to top of thread bubble over "X" of streamers for "hair", leaving ends unglued.
Copy templates. Cut facial features from black felt and glue to a piece of uncut yellow felt with features ½" apart; allow to dry. Cut around features approximately ⅛" from the edge of the black felt to form a yellow border. Glue to thread bubble.
Attach clear hanging cord to top of thread bubble.

Pattern © by Coats & Clark Inc. Reproduced with permission from Coats & Clark Inc. PurpleKittyYarns.com is not endorsed by Coats & Clark Inc. It is not permissible to contract production of projects made from designs published by Coats & Clark to a third party for sale or distribution.
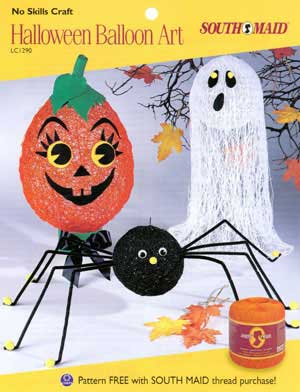
Halloween Balloon Art LC1290
No skills required.
Pumpkin measures approximately 15" high; Spider measures approximately 9" high; Ghost measures approximately 18" high.
Cotton "South Maid®", Size 10 crochet cotton, 100% mercerized cotton, Art. D54 (350 and 400 yard balls).
MATERIALS:
Thread Amounts: Pumpkin: Two balls No. 431 Pumpkin. Spider: One ball No. 12 Black. Ghost: One ball No. 1 White.
Pumpkin: Green, yellow and black felt; ½ yard 1" wide black ribbon.
Spider: Eight 12" black chenille stems; two 15mm wiggle eyes; eight ¾" yellow pom poms; one ½" yellow pom pom; clear nylon thread or fishing line.
Ghost: Large plastic bag; black felt; two ½" yellow pom poms; clear nylon thread or fishing line.
All: 12" Balloons; commercial fabric stiffener; large bowl; scissors; white craft glue; hot melt glue gun and glue sticks.
PUMPKIN
Balloon: Blow up balloon to measure 33" around; knot end securely. Tie the end of the Pumpkin thread to the knot of the balloon and wrap thread around the balloon and wrap thread around the balloon, criss-crossing in all directions. Secure thread end at the knot, leaving a length for hanging.
Stiffen: Hold wrapped balloon over a large bowl and pour stiffener over the balloon. Repeat until all threads are thoroughly saturated. Gently smooth away excess stiffener on balloon with hands. Hang balloon over bowl to catch drips and allow to dry completely, approximately 24-48 hours. Burst balloon with a sharp point and remove from the thread bubble.
Stand: Cut empty thread cardboard form in half across the diameter; cover with green felt; make a black bow and glue to the Stand.
Features: Copy templates for Leaves, Eyebrows and Mouth. Top: Cut a 6" diameter circle from green felt. Cut a ½" diameter hole in the center of this circle; cut from the edge of the circle to the hole. Make zigzag cuts around the circle. Glue to the top of the thread bubble, overlapping ends as necessary. Stem: Cut a 2 ½" x 8" strip from green felt and roll firmly, gluing as you roll. Glue a thread bubble over the Top. Leaves: Cut 2 from green felt; glue over Top and Stem. Eyes: Cut two 1 ⅝" diameter circles from black felt; cut out a wedge from each black circle and discard. Cut two 2" diameter circles from yellow felt. Glue black circles onto the yellow circles; glue assembled Eyes in place. Eyelashes: Cut eight ½" x 1" triangles from black felt; glue four eyelashes around each Eye. Eyebrows: Cut 2 from black felt; glue above Eyes. Mouth: Cut one from black felt; glue in place. Nose: Cut a 1" x 1" triangle from black felt; glue in place.
SPIDER
Balloon: Blow up balloon to measure 14" around. Wrap with Black thread and stiffen same as for Pumpkin.
Legs: Glue 4 chenille stems to each side of the thread bubble spaced approximately ½" apart; apply glue to end of stem and to spider body where Leg is to be attached, insert tip of stem into thread bubble. Bend each stem to form "knees" and "feet". Glue one ¾" pom pom to each "foot."
Features: Glue wiggle eyes to thread bubble. Glue a ½" pom pom in place for the nose. Hanger: Glue a small circle of black thread to the top of the thread bubble for a hanger. Hang with clear thread or fishing line.
GHOST
Balloon: Blow up balloon, wrap with White thread and stiffen same as for Spider. Hang balloon so that the top of the balloon is approximately 18" above a large flat surface that is covered with the large plastic bag. Plastic bag will catch drips – do not place a bowl under the balloon.
Body: Cut 180 45" long strands of White; divide into bundles of 10-20 strands each. Immerse a bundle of thread in fabric stiffener to saturate; remove one strand at a time and drape over the top of the balloon and onto the plastic in all directions to form ghost body. Repeat with remaining bundles until thread bubble is well covered and body is formed. Allow to dry completely, approximately 24-48 hours. Burst balloon with a sharp point and remove from the thread bubble. Carefully remove stiffened thread ends from the plastic bag.
Features: Cut three 1 ½" x ¾" tapered ovals from black felt for Eyes and Mouth; glue in place. Glue a ½" pom pom onto each Eye. Hanger: Glue a small circle of white thread to the top of the thread bubble for a hanger. Hang with clear thread or fishing line.

Pattern © by Coats & Clark Inc. Reproduced with permission from Coats & Clark Inc. PurpleKittyYarns.com is not endorsed by Coats & Clark Inc. It is not permissible to contract production of projects made from designs published by Coats & Clark to a third party for sale or distribution.
Bag of Treats LC1383
Bags measure 4" wide x 5 3/4" high.
MATERIALS:
Cotton South Maid, size 10 crochet thread, Art. D54, 100% mercerized cotton: One 350-yard ball each No. 12 Black CA and No. 413 Pumpkin CB will make several bags.
Steel Crochet Hook: 1.75mm [US 2].
Tapestry needle; small amounts of black and green felt; two 5mm wiggle eyes; scissors; white craft glue; small amount adhesive tape; pencil.
GAUGE: 32 sts = 4"; 38 rows = 4" in sc. CHECK YOUR GAUGE. Use any size hook to obtain the gauge.

PUMPKIN BAG-First Side: With CA, ch 34.
Row 1 (Right Side): Sc in 2nd ch from hook and in each ch across; turn - 33 sc. Row 2: Ch 1, sc in each sc across; turn. Rep Row 2 until 5" from beg, end right side row.
Beading Row: Ch 4 (counts as a dc and a ch-1 sp), skip first 2 sc, dc in next sc, * ch 1, skip next sc, dc in next sc; rep from * across; turn.
Next Row: Ch 1, sc in dc, * sc in ch-1 sp, sc in dc; rep from * to last sp; sc in sp, sc in 3rd ch of ch-4; turn - 33 sc. Now work 3 more rows in sc. Fasten off.
Second Side: With right side facing, attach CA at lower edge; ch 1, work 33 sc across lower edge in remaining lps of beg ch; turn. Complete to correspond to first side.
Pumpkin Motif: With CB, ch 4; join with a sl st in first ch to form a ring.
Rnd 1: Ch 3, 15 dc in ring; join with a sl st to top of ch-3 - 16 sts. Rnd 2: Ch 3, dc in same st as joining, 2 dc in each dc around; join - 32 sts. Rnd 3: Ch 3, dc in same st as joining, dc in next dc, * 2 dc in next dc, dc in next dc; rep from * around; join - 48 sts. Rnd 4: Ch 1, sc in same st as joining and in each dc around; join to first sc. Fasten off.
FINISHING: Glue pumpkin to front of bag. Cut facial features and stem from felt; glue in place as pictured. When glue is dry, sew side seams.
Top Edging: With right side facing, attach CB at a side seam; ch 1, sc in each sc around; join to first sc. Next Rnd: Ch 1, sc in each sc around; join. Fasten off.
Twisted Cord: Cut two 72"-long strands of CB; fold in half; knot the cut ends together. Tape the knotted end to a smooth surface (like a counter or tabletop); insert a pencil into the loop at the other end, hold thread firmly just below the pencil and spin the pencil clockwise until strands are very firmly twisted. Holding the strands taut, bring the loop end to the taped end and knot these ends together to prevent untwisting. The cord will twist back upon itself and should be about 12" long. Weave the cord through the beading row at the top of the bag, beginning and ending at the center of the front. Tie a knot in the opposite end of the cord. Trim ends, leaving a short "fringe" beyond each knot.
SPIDER BAG: With CB, work same as Pumpkin Bag.
Spider Motif-Body: With CA, work Rnds 1 and 2 same as Pumpkin Motif, then work Rnd 4. Fasten off.
Head: With CA, work Rnd 1 same as for Pumpkin Motif, then work Rnd 4. Fasten off.
FINISHING: Glue spider body and head to front of bag, placing head partly under body as shown; glue eyes to head. When glue is dry, embroider 4 legs on each side of body. Sew side seams. With CA, work Top Edging and Twisted Cord same as for Pumpkin Bag.
ABBREVIATIONS: beg = begin(ning); ch = chain; dc = double crochet; lp = loop; rep = repeat; rnd = round; sc = single crochet; sl st = slip stitch; st(s) = stitch(es); * = rep whatever follows the * as indicated.
Designed by Mary Jane Protus.
Pattern © by Coats & Clark Inc. Reproduced with permission from Coats & Clark Inc. PurpleKittyYarns.com is not endorsed by Coats & Clark Inc. It is not permissible to contract production of projects made from designs published by Coats & Clark to a third party for sale or distribution.
| Pattern Categories Browse the categories to help you find the patterns you're looking for. |
||
|
|
    
|

|
Navigation

All contents © 2003-2022 Purple Kitty LLC. All rights reserved.
Privacy Policy | FAQ | About Me | Newsletters | Sitemap