 |
Red Heart Super Saver
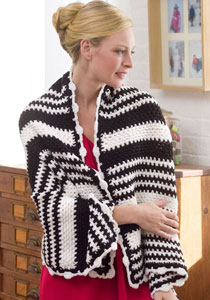
Striped Wrap Around Throw LW2073
Skill Level: Intermediate
Designed by Margaret Santino.
Throw measures 29" x 59".
RED HEART® "Super Saver®": 2 skeins each 311 White A and 312 Black B.
Crochet Hook: 5.5 mm [US I-9].
Yarn needle.
GAUGE: 12 sts = 4"; 12 rows = 4" in Pattern. CHECK YOUR GAUGE. Use any size hook to obtain the gauge.
Pattern Stitch
Row 1 (Right Side): Sc in 2nd ch from hook, * ch 1, skip next ch, sc in next ch; repeat from * across; turn.
Row 2: Ch 1, sc in first sc, sc in ch-1 space, * ch 1, skip next sc, sc in next ch-1 space; repeat from * to last sc; sc in last sc; turn.
Row 3: Ch 1, sc in first sc, * ch 1, skip next sc, sc in next ch-1 space; repeat from * to last 2 sc; ch 1, skip next sc, sc in last sc; turn.
Repeat Rows 2 and 3 for Pattern.
THROW
With A, ch 88. Work in Pattern over 87 sts in the following color sequence: 2 rows A, [2 rows B, 2 rows A] twice, 2 rows B, 6 rows A, 6 rows B, 6 rows A, [2 rows B, 2 rows A] 3 times, 6 rows B, 6 rows A, 6 rows B, [2 rows A, 2 rows B] 3 times - 72 rows completed.
Continue with B as follows:
Row 1 (Right Side): Ch 3, skip first sc, dc in each ch-1 space and sc across; turn - 87 sts.
Row 2: Ch 3, skip first dc, dc in next 2 dc, * ch 1, skip next st, dc in next dc; repeat from * to last 2 sts; dc in next dc and in top of ch-3; turn.
Row 3: Ch 3, skip first dc, dc in next 2 dc, ch 1, skip next space, * [dc in next dc, dc in next space] 7 times, dc in next dc, ch 1, skip next space; repeat from * to last 3 sts; dc in next 2 dc and in top of ch-3; turn.
Row 4: Ch 3, skip first dc, dc in next 2 dc, ch 1, [dc in next 15 dc, ch 1] 5 times, dc in next 2 dc and in top of ch-3; turn.
Row 5: Ch 3, skip first dc, dc in next 2 dc, ch 1, * dc in next 3 dc, ch 3, [skip next dc, tr in next dc] 4 times, ch 3, skip next dc, dc in next 3 dc, ch 1; repeat from * to last 3 sts; dc in next 2 dc and in top of ch-3; turn.
Row 6: Ch 3, skip first dc, dc in next 2 dc, ch 1, * dc in next 3 dc, ch 3, sc in 4 tr, ch 3, dc in next 3 dc, ch 1; repeat from * to last 3 sts; dc in next 2 dc and in top of ch-3; turn.
Rows 7, 8 and 9: Ch 3, skip first dc, dc in next 2 dc, ch 1, * dc in next 3 dc, ch 3, sc in 4 sc, ch 3, dc in next 3 dc, ch 1; repeat from * to last 3 sts; dc in next 2 dc and in top of ch-3;turn.
Row 10: Ch 3, skip first dc, dc in next 2 dc, ch 1, * dc in next 3 dc, [ch 1, tr in next sc] 4 times, ch 1, dc in next 3 dc, ch 1; repeat from * to last 3 sts; dc in next 2 dc and in top of ch-3; turn.
Row 11: Ch 3, skip first dc, dc in next 2 dc, ch 1, * dc in next 3 dc, [dc in ch-1 space, dc in next tr] 4 times, dc in next ch-1 space, dc in next 3 dc, ch 1; repeat from * to last 3 sts; dc in next 2 dc and in top of ch-3; turn.
Row 12: Repeat Row 4.
Row 13: Repeat Row 2.
Row 14: Ch 3, skip first dc, dc in each ch-1 space and dc across; turn.
Now work in Pattern, begin with Pattern Row 3, in the following color sequence: [2 rows B, 2 rows A] 3 times, 6 rows B, 6 rows A, 6 rows B, [2 rows A, 2 rows B] 3 times, 6 rows A, 6 rows B, 6 rows A, [2 rows B, 2 rows A] 3 times - 72 rows completed. Fasten off.
Edging
Round 1: With right side facing, join B in any corner; ch 1, [3 sc in corner, work an odd number of sc evenly to next corner] 4 times; join with a slip st in first sc.
Round 2: Ch 1, skip joining sc, ** (sc, ch 1, sc) all in center corner sc, ch 1, skip next sc, * sc in next sc, ch 1, skip next sc; repeat from * to next center corner sc; repeat from ** around; join. Fasten off.
Round 3: Join A in corner ch-1 space; ch 1, ** (sc, dc, tr, dc, sc) all in corner ch-1 space, ch 3, sc in next ch-1 space, ch 3, * (sc, dc, tr, dc, sc) all in next ch-1 space, ch 3, sc in next ch-1 space, ch 3; repeat from * to next corner ch-1 space; repeat from ** around; join. Fasten off. Weave in ends.
ABBREVIATIONS: A, B = color A, B; ch = chain; dc = double crochet; mm = millimeters; sc = single crochet; st(s) = stitch(es); tr = treble crochet; * = repeat whatever follows the * as indicated; [ ] = work directions in brackets the number of times specified.
Pattern © by Coats & Clark Inc. Reproduced with permission from Coats & Clark Inc. PurpleKittyYarns.com is not endorsed by Coats & Clark Inc. It is not permissible to contract production of projects made from designs published by Coats & Clark to a third party for sale or distribution.
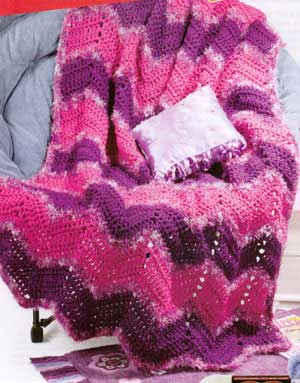
Teen Ripple Afghan LW1474
Skill Level: Easy
Afghan measures approximately 45" x 62".
Red Heart® Super Saver®, Art. E300 (7 ounce/364 yard solid skein; 5 ounce/278 yard multi skein): 19 Ounces No. 0776 Dark Orchid CA, 15 ounces No. 0778 Light Fuchsia CB, 6 No. 0940 Plum Pudding CC.
RED HEART© Ltd. "Foxy™", Art. E724 (1.76 ounce/89 yard ball): 4 Balls No. 9379 Plummy CD.
Crochet Hook: 11.5mm [US P-16]. Yarn needle.
GAUGE: One repeat = 8 ½" wide; 8 rows = 9" in pat with 2 strands CA or CB. CHECK YOUR GAUGE. Use any size hook to obtain the gauge.
TO CHANGE COLOR: Work the last stitch before a color change until 2 lps remain on hook, drop color in use, with next color to be used, yo and draw through 2 lps.
With 2 strands CA held tog, ch 97.
Row 1 (Right Side): Dc in 5th ch from hook, dc in next 6 ch, * (dc, ch 2, dc) all in next ch, dc in next 7 ch **, yo and draw up a lp in next ch, yo and draw through 2 lps, skip next 2 ch, yo and draw up a lp in next ch, yo and draw through 2 lps, yo and draw through all 3 lps on hook, dc in next 7 ch; rep from * to last 2 ch, end at **; skip next ch, dc in last ch; turn.
Row 2: Ch 3 (counts as first dc), skip first 2 dc, * dc in next 7 dc, (dc, ch 2, dc) all in ch-2 sp, dc in next 7 dc ** ; yo and draw up a lp in next dc, yo and draw through 2 lps, skip next st, yo and draw up a lp in next dc, yo and draw through 2 lps, yo and draw through all 3 lps on hook - dc-dec made; dc in next 7 dc; rep from * to last 2 sts, end at **; skip next dc, dc in top of ch-3; turn.
Row 3: Rep Row 2.
Row 4: Rep Row 2, changing to one strand each CC and CD held tog in last st; turn.
Row 5: With one strand each CC and CD held tog, ch 1, sc in first dc, skip next dc, * sc in next 7 dc, (sc, ch 2, sc) all in ch-2 sp, sc in next 7 dc **, draw up a lp in next dc, skip next st, draw up a lp in next dc, yo and draw through all 3 lps on hook, sc in next 7 sc; rep from * to last 2 sts, end at **; skip next dc, sc in top of ch-3; turn.
Row 6: Ch 1, sc in first sc, skip next sc, * sc in next 7 sc, (sc, ch 2, sc) all in ch-2 sp, sc in next 7 sc **, draw up a lp in next sc, skip next st, draw up a lp in next sc, yo and draw through all 3 lps on hook, sc in next 7 sc; rep from * to last 2 sts, end at **; skip next sc, sc in last sc changing to 2 strands CB held tog; turn.
Row 7: With 2 strands CB held tog, ch 3, skip first 2 sc, * dc in next 7 sc, (dc, ch 2, dc) all in ch-2 sp, dc in next 7 sc **, dc-dec over next 3 sts; rep from * to last 2 sts, end at **; skip next sc, dc in last sc; turn.
Rows 8, 9, 10: Rep Rows 2, 3, 4 with CB.
Rows 11 and 12: Rep Rows 5 and 6 EXCEPT change to 2 strands CA at end of Row 12.
Row 13: Rep Row 7 with CA.
Rep Rows 2-13 four more times, then rep Rows 2-5 once more, ending at left side of top edge; DO NOT TURN. Now work Edging as follows:
Rnd 1: Work 2 more sc in same st as last st of last row, turn afghan to work down left side; sc evenly down side, work 3 sc in first corner ch at lower edge, sc across lower edge working 3 sc in each V-points and in last corner ch, sc up right side of afghan, work 2 more sc in same st as first sc at top edge; join with a sl st to first sc; turn.
Rnd 2: Ch 1, work 1 more rnd sc with wrong side facing, again working 3 sc in each corner and V points; join to first sc. Fasten off. Weave in ends.
Designed by Michele Thompson.
ABBREVIATIONS: beg = beginning; CA, CB, CC, CD = Colors A, B, C, D; ch = chain; dc = double crochet; dec = decrease; lp(s) = loop (s); mm = millimeters; pat = pattern; rep = repeat; rnd = round; sc =: single crochet; sl st = slip stitch; sp(s) = space (5); st(s) = stitch (es); tog = together; yo = yarn over;" or ** = repeat whatever follows the * or ** as indicated.
Pattern © by Coats & Clark Inc. Reproduced with permission from Coats & Clark Inc. PurpleKittyYarns.com is not endorsed by Coats & Clark Inc. It is not permissible to contract production of projects made from designs published by Coats & Clark to a third party for sale or distribution.
Other free crochet afghan patterns:
The Wrap LW1444
Beginner
Designed by Marilyn Coleman.
Wrap measures approximately 54" x 60".
RED HEART® "Fiesta®", Art. E704 (6 ounce/330 yard skein): 29 Ounces No. 6012 Black CA and RED HEART® "Super Saver®", Art. E300 (6 ounce/348 yard skein): 29 Ounces No. 312 Black CB.
OR
RED HEART® "Super Saver®", Art. E300 (6 ounce/348 yard skein): 58 Ounces No. 312 Black.
Crochet Hook: 10mm [US N-15].
Yarn needle.
GAUGE: 4 groups of (sc, ch 2, sc) = 5"; 6 rows = 4" with double strand of yarn. CHECK YOUR GAUGE. Use any size hook to obtain the gauge given.

NOTE: Work with one strand each of CA and CB, or 2 strands of Black for Super Saver only version, held together as one throughout.
Ch 129.
Row 1 (Right Side): (Sc, ch 2, sc) all in 3rd ch from hook, * skip next 2 ch; (sc, ch 2, sc) all in next ch - group made; rep from * across; turn - 43 groups.
Row 2: Ch 2, * group in next ch-2 sp; rep from * across; do NOT work into turning ch; turn.
Rep Row 2 until approximately 30" from beginning, end wrong side row.
Divide for Front Opening: Ch 2, [group in next ch-2 sp] 20 times, TURN. Work even on these 20 groups until approximately 30" from division. Fasten off.
With right side facing, skip next 3 groups on last long row, attach yarn in next ch-2 sp; ch 1, group in same sp, [group in next ch-2 sp] 19 times; turn - 20 groups. Complete to correspond to first side. Fasten off. Weave in ends.
ABBREVIATIONS: CA, CB = Colors A, B; ch = chain; mm = millimeters; rep = repeat; sc = single crochet; sp = space; * = repeat whatever follows the * as indicated; [ ] = repeat directions in brackets the num-ber of times specified.
Pattern © by Coats & Clark Inc. Reproduced with permission from Coats & Clark Inc. PurpleKittyYarns.com is not endorsed by Coats & Clark Inc. It is not permissible to contract production of projects made from designs published by Coats & Clark to a third party for sale or distribution.
Tranquil Lapghan WR1893
Skill Level: Easy
Designed by Grace Alexander.
Afghan is 36" x 48".
RED HEART® "Super Saver™": 2 skeins 883 Spa Blue A, 3 skeins 931 Seagrass B.
Knitting Needles: 5mm [US 8] circular needle, 24" or 36" long.
Yarn needle.
GAUGE: 16 sts = 4"; 22 rounds = 4" in Stockinette Stitch. CHECK YOUR GAUGE. Use any size needles to obtain the specified gauge.
Note: Afghan is worked back and forth in rows. Circular needle is used to accommodate large number of stitches.

Pattern Stitch
Row 1 (Right Side): With A, k2, [p2, k2] across.
Row 2: P2, [k2, p2] across.
Row 3: P2, [k2, p2] across.
Row 4: K2, [p2, k2] across.
Repeat Rows 1-4 for Pattern st.
LAPGHAN
With A, cast on 130 sts.
Work 6 rows in Pattern st.
With B, work 20 rows in St st.
With A, work 10 rows in Pattern st.
With B, work 30 rows in St st.
With A, work 16 rows in Pattern st.
With B, work 50 rows in St st.
With A, work 6 rows in Pattern st.
With B, work 50 rows in St st.
With A, work 16 rows in Pattern st.
With B, work 30 rows in St st.
With A, work 10 rows in Pattern st.
With B, work 20 rows in St st.
With A, work 6 rows in Pattern st.
Bind off in pattern.
FINISHING
Side Edges: With right side facing and A, pick up and knit 194 sts evenly along one long edge.
Work in Pattern st for 10 rows.
Bind off in pattern.
Repeat along opposite long edge.
Weave in ends.
ABBREVIATIONS: K = knit; mm = millimeters; P = purl; St st = Stockinette stitch; st(s) = stitch (es); [ ] = work directions in brackets the number of times specified.
Pattern © by Coats & Clark Inc. Reproduced with permission from Coats & Clark Inc. PurpleKittyYarns.com is not endorsed by Coats & Clark Inc. It is not permissible to contract production of projects made from designs published by Coats & Clark to a third party for sale or distribution.
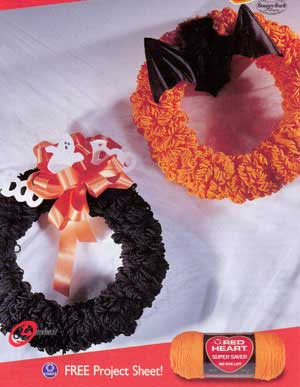
Trick or Treat LW1367
No skills required.
Red Heart® Super Saver®, Art. E300 (8 ounce solid/6 ounce multi-color skeins): 10 Ounces No. 312 Black or 10 ounces No. 254 Pumpkin.
Wire coat hanger for each wreath; pliers; 4"-wide cardboard; scissors; 1 ½"-wide ribbon; purchased Halloween decorations; fine wire; hot glue gun and sticks.
With pliers, shape hanger into a circle, then bend hook for the hanging loop.
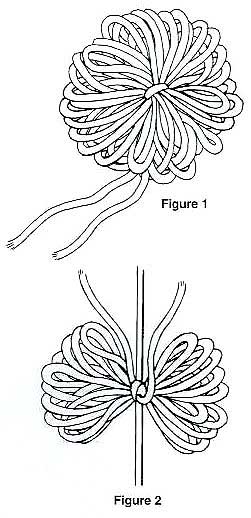
Yarn Bundle (Make approximately 100): Wind yarn 20 times around the cardboard. Slip these strands off the cardboard. Then, with a separate 8" strand of yarn, tie strands together at center (see Figure 1); do not cut the yarn loops.
Using the ends of the 8" strand, tie the bundle to the ring, positioning the bundle perpendicular to the wire (see Figure 2). If necessary, trim the ends of the 8" strand.
Make another bundle and tie to the ring adjacent to the previous bundle. Continue to make bundles and tie them to the wire in the same way, positioning each bundle against the previous bundle and working around the ring until the entire wire circle is filled.
Make a bow from the ribbon. Wind yarn or fine wire through an area that can be hidden and tie or twist around wire ring. With hot glue, attach smaller decorations.
Pattern © by Coats & Clark Inc. Reproduced with permission from Coats & Clark Inc. PurpleKittyYarns.com is not endorsed by Coats & Clark Inc. It is not permissible to contract production of projects made from designs published by Coats & Clark to a third party for sale or distribution.
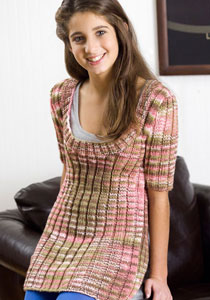
Tween Layer Top WR1736
Skill Level: Easy
Designed by Heather Lodinsky
Sizes: XS (S, M, L, 1X)
Bust: 28 (34, 38, 44, 48)"
Length: 26 (27, 28, 29, 30)"
RED HEART® "Super Saver®": 3 (3, 4, 5, 5) skeins in 972 "Pink Camo".
Knitting Needles: 5mm [US 8]; 4.5mm [US 7] circular needle, 24" long size
Stitch holders.
Yarn needle.
GAUGE: 16 sts = 4"; 22 rows = 4" in K3, p2 rib, slightly stretched. CHECK YOUR GAUGE. Use any size needles to obtain the gauge given.
STITCH EXPLANTIONS:
K3, p2 Rib.
Row 1 (WS): K2,*(p3, k2); repeat from * to end.
Row 2 (RS): P2, *(k3, p2); repeat from * to end.
Repeat Rows 1 and 2 for K3, p2 rib.
Note: In order to avoid color pooling that can result from a variegated yarn, use two balls simultaneously, working 2 rows with one ball then 2 rows with a second ball.
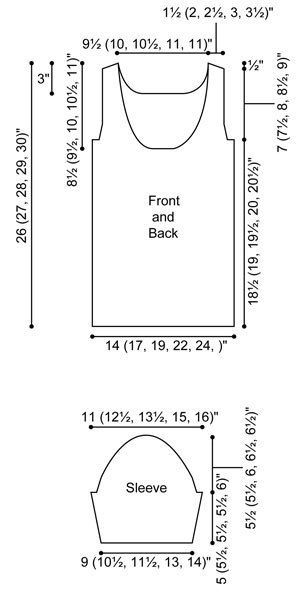
BACK
With larger needles, cast on 57 (67, 77, 87, 97) sts. Starting with Row 1, work in K3, p2 rib until Back measures 18% (19,19%, 20, 20%)" from beginning, end with a wrong side row.
Shape Armhole
Keeping in K3, p2 rib pattern, bind off 2 (3, 4, 5, 6) sts at beginning of next two rows, then dec 1 at each side every other row 2 (4, 6, 8, 12) times - 51 (57, 63, 69, 73) sts. Work even until armhole measures 4½ (5, 5½, 6, 6½)", end with a wrong side row.
Shape Neck
Next Row (Right Side): Work 11 (13, 16, 18, 20) sts, slip center 29 (31, 31, 33, 33) sts to a stitch holder for neck, join second ball of yarn and work last 11 (13, 16, 18, 20) sts.
Work both sides at same time with separate balls of yarn. Bind off 3 sts at each neck edge once, then dec 1 st at neck edge every other row 2 (2, 3, 3, 3) times - 6 (8, 10, 12, 14) sts.
Work even until armhole measures 7 (7½, 8, 8½, 9)", end with a wrong side row.
Shape Shoulder
Bind off at each shoulder edge 3 (4, 5, 6, 7) sts twice.
FRONT
Work same as for Back until piece measures 17 (17½, 18, 18½, 19)", end with a wrong side row.
Shape Neck
Next Row (Right Side): Work 21 (26, 31, 36, 41) sts, slip center 15 sts to a stitch holder for neck, join second ball of yarn and work last 21 (26, 31, 36, 41) sts.
Work both sides at same time with separate balls of yarn. Bind off at each neck edge 3 sts once, then dec 1 st at neck edge every other row 8 (8, 8, 8, 6) times. AT THE SAME TIME, when Front measures 18½ (19, 19½, 20, 20½)" from beginning, shape armhole same as for Back.
Work even on 6 (8, 10, 12, 14) sts until Front measures same as Back to shoulder, end with a wrong side row. Bind off at each shoulder edge 3 (4, 5, 6, 7) sts twice.
SLEEVES
With smaller needles, cast on 37 (42, 47, 52, 57) sts. Work in K3, p2 rib until piece measures 1½". Change to larger needles and continue to work in K3, p2 rib, inc 1 st each side every 4th row 4 times - 45 (50, 55, 60, 65) sts. Work even until Sleeve measures 5 (5½, 5½, 5½, 6)" from beginning, end with a wrong side row.
Shape Cap
Bind off 2 (3, 4, 5, 6) sts at beginning of next 2 rows - 41 (44, 47, 50, 53) sts.
Continue to work in K3, p2 rib, dec 1 st each side every other row 3 times - 35 (38, 41, 44, 47) sts. Dec 1 st each side every 4th row until Sleeve Cap measures 5½ (5½, 6, 6½, 6½)" from beginning, end with a wrong side row.
Bind off 4 sts at beginning of next 2 rows. Bind off remaining sts.
FINISHING
Sew shoulder seams.
Neckband: With right side facing and circular needle, join yarn at right shoulder seam, pick up 15 sts down Back right neck, knit across 29 (31, 31, 33, 33) sts on Back stitch holder, pick up 15 sts up left Back neck edge, pick up 45 (48, 50, 53, 55) sts down left Front neck edge, knit 15 sts from Front stitch holder, pick up 45 (48, 50, 53, 51) sts up right Front neck edge - 164 (172, 176, 184, 188) sts. Place marker for beginning of round. Work in K2, p2 rib for 1½ ". Bind off in rib.
Set in Sleeves. Sew side and Sleeve seams.
Weave in ends.
ABBREVIATIONS: dec = decrease(s)(d)(ing); inc = increase(s)(d)(ing); K = knit; mm = millimeters; P = Purl; st(s) = stitch(es); St * = repeat whatever follows the * as indicated.
Pattern © by Coats & Clark Inc. Reproduced with permission from Coats & Clark Inc. PurpleKittyYarns.com is not endorsed by Coats & Clark Inc. It is not permissible to contract production of projects made from designs published by Coats & Clark to a third party for sale or distribution.
Valentine Hat WR2105

Designed by Theresa McCune.
Skill Level: INTERMEDIATE
Directions are for women's size Small. Changes for Medium and Large are in parentheses.
Finished Circumference: 20½ (22, 24)".
RED HEART® "Super Saver®": 1 skein each 774 Lt. Raspberry A, 528 Med. Purple B, 256 Carrot C, 332 Ranch Red D.
Crochet Hook: 5.5mm [US I-9].
Split-ring stitch markers, yarn needle.
GAUGE: 13 sts = 4"; 18 rows = 4". CHECK YOUR GAUGE. Use any size hook to obtain the gauge given.
HAT
With B, ch 66 (72, 78); making sure ch is not twisted, join with a slip st to first ch to form a ring.
Rnd 1 (Right Side): Ch 1, sc in same ch as joining and in each ch around; join into back loop of first sc; turn - 66 (72, 78) sts.
Rnd 2: Ch 1, working in back loops only, sc in each st around; join; turn. Fasten off B.
Rnd 3: Attach A in same st as join, ch 1, working in back loops only, sc in each st around; join; turn.
Rnd 4: Working in back loops only, sc in each st around; join; turn. Fasten off.
Rnds 5-6: With C, repeat Rnds 3-4.
Rnds7-8: With D, repeat Rnds 3-4.
Rnds 9-10: With B, repeat Rnds 3-4, DO NOT FASTEN OFF.
Rnd 11: Ch 1, working through both loops, sc in each st around; join. DO NOT TURN. Fasten off.
Rnd 12: Attach D, ch 1, sc in each st around. DO NOT JOIN. Instead, pm to indicate first st of rnd, move marker up each rnd.
Rnds 13-25: Sc in each st around. Fasten off D at end of Rnd 25.
Rnd 26: Attach B, ch 1, sc in first 2 sts; insert hook in next st 3 rows down, pull up loop, yo, pull loop through both loops on hook - point made; * sc in next 2 sts; point in next st; repeat from * around; join; turn.
Rnd 27: Ch 1, sc in each st around; join; turn.
Rnds 28-29: Repeat Rnd 27. Fasten off at end of Rnd 29.
Rnd 30: Attach A, ch 1, sc in each st around; join; turn.
Rnds 31-32: Repeat Rnd 27. Fasten off at end of Rnd 32.
Rnds 33-35: With C, repeat Rnds 30-32.
Rnd 36: With D, repeat Rnd 30.
Rnds 37-40: Repeat Rnd 27. Fasten off at end of Rnd 40.
Rnds 41-44: With A, repeat Rnds 26-29.
Rnd 45: With B, repeat Rnd 30.
Rnds 46-48: Repeat Rnd 27. Fasten off at end of Rnd 48.
Rnds 49-51: With C, repeat Rnds 30-32.
Rnds 52-55: With D, repeat Rnds 45-48.
FINISHING
Closing: Count 11 sts from join, pm in st, skip next 22 sts, pm in st, skip next 22 sts, pm. [Attach D in marked st, ch 1; fold hat with ch in corner; working through both layers, sc in first 11 sts; fasten off] 3 times.
Edging-Rnd 1: Fold bottom edge up, attach A in any free loop of Rnd 10, ch 1, working through free loops only, sc in each st around; join.
Rnd 2: Ch 1, sc in each st around. Fasten off.
Weave in ends.
ABBREVIATIONS: A, B = color A, B; ch = chain; mm = millimeters; pm = place marker; rnd = round; sc = single crochet; st(s) = stitch(es); yo = yarn over; * or ** = repeat whatever follows the * or ** as indicated; [ ] = work directions in brackets the number of times specified.
Pattern © by Coats & Clark Inc. Reproduced with permission from Coats & Clark Inc. PurpleKittyYarns.com is not endorsed by Coats & Clark Inc. It is not permissible to contract production of projects made from designs published by Coats & Clark to a third party for sale or distribution.
Valentine Wreath WR1085

Skill Level: BEGINNER
Designed by Elizabeth Hill.
Valentine wreath measures approximately 11" wide x 12" high.
RED HEART® "Super Saver®": 2 Ounces each 319 Cherry Red CA, 724 Baby Pink CB, and 311 White CC.
Susan Bates® French Knitter, Small, Art. 14102.
Susan Bates® Easy Wrap Pom Pom Maker, Art. 14063.
All purpose white craft glue; glue gun and glue sticks; buttons 1" in diameter and larger; thread to match yarns; heart shaped Styrofoam wreath; yarn needle; 18 gauge 18" floral wire stems; 1"-wide foam brush; 6 push pins; paper and cardboard.
Instructions:
Wreath: Apply white craft glue with foam brush to Styrofoam wreath, an inch at a time. Wrap Styrofoam wreath with CA. Repeat applying glue and wrapping yarn until wreath is completely covered with yarn. Adjust yarn as needed to cover Styrofoam completely.
Decorate wreath with Half Pom Pom Button Flowers and/or French Knitter Blossoms.
Half Pom Pom Button Flowers: Using Pom Pom Maker, make one large pom pom but do not fill Pom Pom Maker as instructed; use only about half the yarn indicated so that the pom pom will be less full and round and will spread open into a flower. In the same manner, make one medium pom pom with a contrasting color. Layer the smaller pom pom over the larger pom pom; tie or sew together. Place a 1" button at the center and sew in place.
Make as many flowers as you desire. Arrange on the wreath and, once satisfied with the layout, glue in place with a hot glue gun.
French Knitter Flowers with Wire: With CB or CC and the Small French Knitter, make an 18" cord; weave in yarn ends. Thread a wire stem down the center of the cord. Approximately one inch from the end of the cord, bend the wired cord around a pencil to create petal. Bend wire back, then around the pencil again to create another petal. Continue in this fashion until 6 petals are made, adjusting length and width as necessary. Bring wire ends to the center and wrap ends together to create flower. Hot glue gun a button in the center.
Make as many flowers as you desire. Arrange on the wreath and, once satisfied with the layout, glue in place with a hot glue gun.
French Knit Flowers without Wire: With CB or CC and the Small French Knitter, make 21" or longer cords; weave in yarn ends.
Make a template for the flowers: Draw a 2½"-diameter circle on a piece of paper. Attach paper to a piece of cardboard. Put 6 push pins evenly spaced around the rim of the circle. Wrap a cord around the push pins to create petals. Pin in place. Sew petals with yarn or sewing thread, securing the base of the petals to maintain circular shape. Use glue gun to attach buttons over the center of the flower. Make as many flowers as you desire. Arrange on the wreath and, once satisfied with the layout, glue in place with a hot glue gun.
Pattern © by Coats & Clark Inc. Reproduced with permission from Coats & Clark Inc. PurpleKittyYarns.com is not endorsed by Coats & Clark Inc. It is not permissible to contract production of projects made from designs published by Coats & Clark to a third party for sale or distribution.
Visor Cap WR1844

Skill Level: EASY
Designed by Linda Cyr
One size fits most women. Cap Circumference = 20½".
RED HEART® "Super Saver®": 1 Skein 365 Coffee.
Crochet Hook: 5mm [US H-8].
Split lock stitch marker; 4" x 9" piece of plastic mesh canvas; sheet of paper; yarn needle.
GAUGE: 14 sts = 4" in sc. CHECK YOUR GAUGE. Use any size hook to obtain the gauge.
SPECIAL ABBREVIATIONS:
Inc (increase) = 2 sc in next sc.
Dec (decrease) = draw up a loop in each of next 2 sc, yarn over and draw through all 3 loops on hook.
NOTE: Unless otherwise directed, work in continuous rnds without joining. Place a marker in first st of first rnd and move up each rnd.
Ch 2.
Rnd 1: 6 Sc in 2nd ch from hook.
Rnd 2: [Inc in next sc] 6 times - 12 sc.
Rnd 3: [Inc in next sc] 12 times - 24 sc.
Rnd 4 (And All Even Rnds): Sc in each sc around.
Rnd 5: [Inc in next sc, sc in next sc] 12 times - 36 sc.
Rnd 7: [Inc in next sc, sc in next 2 sc] 12 times - 48 sc.
Rnd 9: [Inc in next sc, sc in next 3 sc] 12 times - 60 sc.
Rnd 11: [Inc in next sc, sc in next 4 sc] 12 times - 72 sc.
Rnd 13: [Inc in next sc, sc in next 5 sc] 12 times - 84 sc.
Rnd 15: [Inc in next sc, sc in next 6 sc] 12 times - 96 sc.
Rnds 16, 17, 18: Repeat Rnd 4.
Rnd 19: [Dec, sc in next 6 sc] 12 times - 84 sc.
Rnds 20, 21, 22: Repeat Rnd 4.
Rnd 23: [Dec, sc in next 5 sc] 12 times - 72 sc.
Rnd 24: Hdc in each sc around.
Rnd 25: Slip st in the center (through the fabric) of each hdc around.
Brim-Row 1: Working under the 2 top loops of the slip sts, sc in next 31 slip sts, slip st in next slip st; turn.
Row 2: Ch 2, skip 2 sc, sc in next 28 sc, slip st in next sc; turn.
Row 3: Ch 2, skip 2 sc, sc in next 26 sc, slip st in next st; turn.
Row 4: Ch 2, skip 2, sc in next 24 sc, slip st in next st; turn.
Row 5: Ch 2, skip 2, sc in next 22 sc, slip st in next st; turn.
Row 6: Ch 2, skip 2, sc in next 20 sc, slip st in next st; turn.
Row 7: Ch 2, skip 2, sc in next 18 sc, slip st in next st; turn.
Row 8: Ch 2, skip 2, sc in next 16 sc, slip st in next st; turn.
Row 9: Ch 2, skip 2, sc in next 14 sc, slip st in next st; turn.
Row 10: Ch 2, skip 2, sc in next 12 sc, slip st in next st; turn. Fasten off.
Brim Facing: With right side facing, attach yarn in the hdc above the first sc of Row 1 of brim and repeat Rows 1-10, working first row in hdc of Rnd 24.
FINISHING: Trace around brim onto paper. Use this paper pattern to cut out brim liner from plastic canvas. Place plastic liner between brim pieces, trim if necessary. Edging: With right side facing, attach yarn to back of cap; ch 1, sc around entire edge, encasing plastic liner between brim and brim facing; slip st in each sc around. Fasten off.
Strap: Ch 43; 3 sc in 2nd ch from hook, sc in each ch to last ch; 3 sc in last ch; pivot and work sc in remaining loop of each ch across; slip st in each sc around. Fasten off.
Buttons (Make 2): Ch 3; 8 hdc in 3rd ch from hook; slip st in each hdc around. Fasten off.
Place strap over front of cap. Sew buttons to ends of strap through all layers. Weave in ends.
ABBREVIATIONS: ch = chain; hdc = half double crochet; mm = millimeters; rnd = round; sc = single crochet; st = stitch; [ ] = work directions in brackets the number of times specified.
Pattern © by Coats & Clark Inc. Reproduced with permission from Coats & Clark Inc. PurpleKittyYarns.com is not endorsed by Coats & Clark Inc. It is not permissible to contract production of projects made from designs published by Coats & Clark to a third party for sale or distribution.
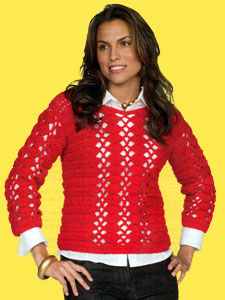
Weekend Crochet Top LW1526
Skill Level: Easy
Designed by Mary Jane Protus.
Directions are for size Small; changes for sizes Medium and Large are in parentheses.
RED HEART® "Super Saver®": 12 ½, (14, 15 ½) Ounces No. 319 Cherry Red.
Crochet Hook: 6.5mm [US K-I0.5].
Yarn needle.
GAUGE: 12 sts = 4"; 6 rows = 4" in dc. CHECK YOUR GAUGE. Use any size hook to obtain the gauge.
To Fit Bust: 30-32 (34-36, 38-40)".
Finished Bust: 32 ½ (38, 43)".
PANEL PAT (Worked over 25 sts):
Row 1 (RS): 3 Dc in next dc, skip 2 dc, sc in next dc, ch 3, skip next dc, sc in next dc, skip 2 dc, [5 dc in next dc, skip 2 dc, sc in next dc, ch 3, skip next dc, sc in next dc, skip 2 dc] twice, 3 dc in next dc.
Row 2: 3 Dc in next dc, skip 2 dc, [ch 3, sc in ch-3 sp, ch 3, skip 2 dc, 5 dc in next dc] twice, ch 3, sc in ch-3 sp, ch 3, skip 2 dc, 3 dc in next dc.
Row 3: 3 Dc in next dc, skip 2 dc, [sc in ch-3 sp, ch 3, sc in next ch-3 sp, skip 2 dc, 5 dc in next dc] twice, sc in ch-3 sp, ch 3, sc in next ch-3 sp, skip 2 dc, 3 dc in next dc.
Rep Rows 2 and 3 for panel pat.
FRONT & BACK (Alike): Ch 51 (59, 67).
Foundation Row (WS): Dc in 4th ch from hook and in each ch across; turn - 49 (57, 65) sts. Place panel pat:
Row 1: Ch 3, skip first dc, dc in next 11 (15, 19) dc, work panel pat Row 1 across next 25 dc, dc in next 11 (15, 19) dc, dc in top of ch-3; turn.
Panel pat is now in position. Work in dc and appropriate row of panel until 14 (14, 15)" from beg, end WS row.
Shape Armholes: Ch 1, sl st in first 3 (4, 5) dc, ch 3; [yo and draw up a lp in next st, yo and draw through 2 lps] 3 times, yo and draw through all 4 lps on hook - dec made; work to last 6 (7, 8) sts; dec, dc in next dc; turn - 8 (11, 14) sts each side of panel. Work even until 4" above armhole, end WS row.
Divide for Neck-Row 1: Work to middle dc of first 5-dc group; 2 dc in this dc; turn.
Row 2: Ch 3, dc in first dc, ch 3, sc in sp, ch 3, skip 2 dc, 3 dc in next dc, dc to end; turn.
Row 3: Ch 3, dc in next 7 (10, 13) dc, 3 dc in next dc, sc in sp, ch 3, 2 dc in top of ch-3; turn.
Row 4: Ch 3, dc in first dc, skip next 2 dc, 3 dc in next dc, dc to end; turn.
Row 5: Ch 3, dc in next 7 (10, 13) dc, 3 dc in next dc, sc in top of ch-3; turn.
Row 6: Ch 3, dec, dc to end. Work 0 (1, 2) more rows. Fasten off.
With RS facing, attach yarn in middle dc of next 5-dc group; ch 3, dc in same dc, sc in sp, ch 3, sc in next sp, skip 2 dc, 3 dc in next dc, dc to end; turn.
Row 2: Ch 3, dc in 7 (10, 13) dc, 3 dc in next dc, ch 3, sc in sp, ch 3, 2 dc in top of ch-3; turn.
Row 3: Ch 3, dc in first dc, ch 3, skip next sp, sc in next sp, skip 2 dc, 3 dc in next dc, dc to end; turn.
Row 4: Ch 3, dc in 7 (10, 13) dc, 3 dc in next dc, 2 dc in top of beg ch-3; turn.
Row 5: Ch 1, sc in first dc, skip next 3 dc, 3 dc in next dc, dc to end; turn.
Row 6: Ch 3, dc in 7 (10, 14) dc, dec, dc in sc. Work 0 (1, 2) more rows. Fasten off.
SLEEVES: Ch 35 (37, 39).
Foundation Row (WS): Dc in 4th ch from hook and in each ch across; turn - 33 (35, 37) sts.
Row 2: Ch 3, skip first dc, dc in next 3 (4, 5) dc, work panel pat Row 1 across next 25 dc, dc in last 4 (5, 6) sts; turn.
Panel pat is now in position. Work in dc and appropriate row of panel, shaping sides by inc 1 st each end of 5th row, then every 3rd row 4 more times, working added sts in dc - 9 (10, 11) dc on each side of panel. Work even until 13" from beg, end RS row.
Shape Armhole-Row 1: Work same as for armhole shaping of Back. Work dec each end of next row - 3 sts each side of panel.
Last Row: Ch 1, sl st in first 4 sts, skip 2 dc, ch 3, sc in ch-3 sp, ch 3, [skip 2 dc, sc in next dc, ch 3, sc in ch-3 sp, ch 3] twice, skip 2 dc, sl st in last 4 sts. Fasten off.
FINISHING: Sew shoulder seams. Sew side and sleeve seams. Set in sleeves.
Neck and Sleeve Edgings: With WS facing, attach yarn at a seam; ch 1, work sc evenly around; join with a sl st in first sc. Fasten off. Weave in ends.
ABBREVIATIONS: beg = beginning; ch = chain; dc = double crochet; dec = decrease; inc = increase; mm = millimeters; RS = right side; rep = repeat; sc = single crochet; sl = slip; sp = space; st(s) = stitch (es): WS = wrong side; yo = yarn over; * = repeat whatever follows the * as indicated; [ ] = work directions in brackets the number of times specified.
Pattern © by Coats & Clark Inc. Reproduced with permission from Coats & Clark Inc. PurpleKittyYarns.com is not endorsed by Coats & Clark Inc. It is not permissible to contract production of projects made from designs published by Coats & Clark to a third party for sale or distribution.
| Pattern Categories Browse the categories to help you find the patterns you're looking for. |
||
|
|
    
|

|
Navigation

All contents © 2003-2022 Purple Kitty LLC. All rights reserved.
Privacy Policy | FAQ | About Me | Newsletters | Sitemap