 |
Red Heart Super Saver
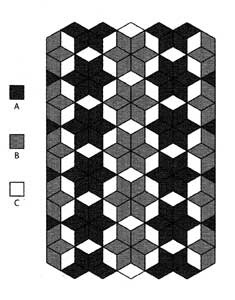
Christmas Star Afghan LW1894
Skill Level: Intermediate
Afghan measures 45" x 72".
RED HEART® "Super Saver®": 3 skeins each 0376 Burgundy A and 0389 Hunter Green B; 2 skein 0313 Aran C.
Crochet Hook: 5.5mm [US I-9].
Yarn needle.
GAUGE: Motif measures approx. 4 ¼" x 6 ¾" CHECK YOUR GAUGE. Use any size hook to obtain the gauge.

Make 180 motifs as follows:
64 in color A; 60 in color B; 56 in color C
MOTIF:
Ch 4, join with slip st to form a ring.
Rnd 1: Ch 1, [sc, hdc, dc, tr, ch 3, tr, dc, hdc] twice all in ring; join to first sc.
Rnd 2: Ch 5, dc in sc, * dc in next 3 sts, (3 dc, ch 4, 3 dc) all in sp, dc in next 3 sts **, (dc, ch 2, dc) all in next sc; rep from * to **; join to 3rd ch of ch-5.
Rnd 3: Ch 3, * (dc, ch 3, dc) all in sp, dc in next 2 dc, ch 1, skip next dc, dc in next 3 dc, ch 1, skip next dc, (3 dc, ch 5, 3 dc) all in sp, ch 1, skip next dc, dc in next 3 dc, ch 1, skip next dc **, dc in next 2 dc; rep from * to **; dc in last dc; join. Fasten off.
HALF MOTIF: Make 8 in color A.
Ch 4; join with a slip st to form a ring.
Row 1 (Right Side): Ch 1, (sc, hdc, dc, tr, ch 3, tr, dc, hdc, sc) all in ring; do not join; turn.
Row 2: Ch 3, dc in first 4 sts, (3 dc, ch 4, 3 dc) all in sp, dc in next 3 sts, 2 dc in last sc; turn.
Row 3: Ch 3, dc in next 3 dc, ch1, sk next dc, dc in next 3 dc, ch1, sk next dc (3dc, ch5, 3dc) all in space, ch1, skip next dc, dc in next 3 dc, ch1, skip next dc, dc in next 2 dc, dc in top of turning ch-3 of Row 2. Fasten off.
NOTE:
Check Motif placement carefully.
Referring to diagram and beginning at upper right corner, sew motifs together.
EDGING-Rnd 1: With right side facing, attach B in any st; ch 1, work 1 rnd sc evenly around, increasing at outer points and decreasing at inner points to keep work flat; join to first sc.
Rnd 2: Ch 3, work 1 rnd dc, increasing and decreasing at points as before to keep work flat; join to top of ch-3. Fasten off. Weave in ends.
ABBREVIATIONS: CA, CB = Color A, Color B; ch = chain; dc = double crochet; hdc = half double crochet; mm = millimeters; rep = repeat; rnd = round; sc = single crochet; sl = slip; sp = space; st(s) = stitch (es); tr = treble crochet; * or ** = repeat whatever follows the * or ** as indicated; [ ] = work directions in brackets the number of times specified.
Pattern © by Coats & Clark Inc. Reproduced with permission from Coats & Clark Inc. PurpleKittyYarns.com is not endorsed by Coats & Clark Inc. It is not permissible to contract production of projects made from designs published by Coats & Clark to a third party for sale or distribution.
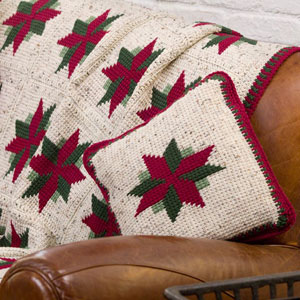
Christmas Star Throw and Pillow LW2071
INTERMEDIATE
Designed by Glenda Winkleman.
Throw measures 42" x 57½". Pillow measures 15" x 15½".
RED HEART® "Super Saver®": 7 skeins 4313 Aran Fleck A; 2 balls each 376 Burgandy B and 633 Dark Sage C; 1 Ball 631 Light Sage D.
Afghan Crochet Hook: 6mm [US J-10].
Yarn needle, 16" pillow form.
GAUGE: 13 sts = 3"; 10 rows = 3" in Afghan st. CHECK YOUR GAUGE. Use any size hook to obtain the gauge.
NOTES: Use separate ball of yarn for each large block of color. Pick up new yarn from under old to twist yarns and prevent holes.
THROW
Block (Make 20)
With Afghan hook and A, ch 31.
Row 1: First Half: Insert hook in 2nd ch from hook, yo, draw yarn through st, *insert hook in next ch, yo, draw yarn through st; repeat from * across - 31 loops on hook;
Second Half of Row: Yo, draw yarn through first loop on hook, *yo, draw yarn through 2 loops on hook; repeat from * across until 1 loop remains on hook, (counts as first loop of next row).
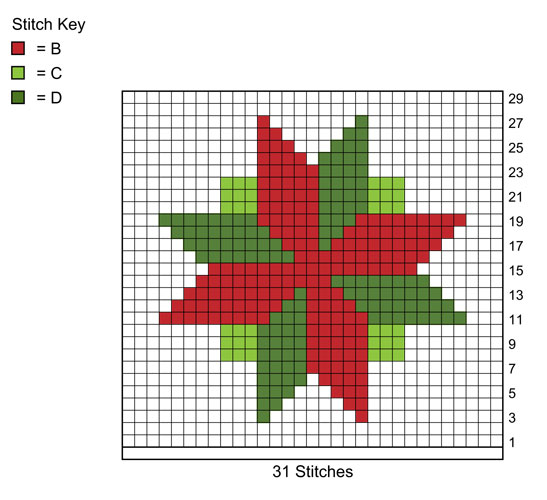
Rows 2-29: Beginning with Row 2, follow Chart through Row 29.
Row 30: Slip st in each vertical st across. Fasten off.
Block Border
With right side facing and crochet hook, join A in upper right hand corner st.
Round 1: Ch 3 (counts as dc), dc in corner st, dc in next 2 sts, [skip next st, dc in next 3 sts] across to 3 sts from corner, skip next st, dc in next st, 2 dc in next st, ch 2, turn to work along side edge, 2 dc in edge of first row, dc in edge of each row to last row, 2 dc in last row, ch 2, turn to work along opposite edge of foundation ch, dc in next st, dc in next 2 sts, [skip next st, dc in next 3 sts] across to 3 sts before next corner, skip next st, dc in next st, 2 dc in next st, ch 2, turn to work along side edge, 2 dc in edge of first row, dc in edge of each row to last row, 2 dc in last row, ch 2, slip st in top of beginning ch. Fasten off.
FINISHING
Arrange Blocks, 4 Blocks wide by 5 Blocks long, for Throw. Holding wrong sides together, join A in one Block with crochet hook, working through sts of two Blocks, slip st Blocks together. Repeat until all Blocks are joined.
Border
Round 1: With right side facing and crochet hook, join A in upper right hand corner dc, ch 3 (counts as first dc), dc in each dc and ch-space around, working (2 dc, ch 2, 2 dc) in each corner ch-2 space, join with slip st to top of beginning ch.
Round 2: Ch 1, sc in each dc around, working (2 sc, ch 2, 2 sc) in each corner ch-2 space, join with slip st to first sc.
Round 3: Ch 3 (counts as first dc), dc in each sc around, working (2 dc, ch 2, 2 dc) in each corner ch-2 space, join with slip st to top of beginning ch 3.
Round 4: Ch 1, sc in each dc around, working 4 sc in each corner ch-2 space, join with slip st to first sc.
Round 5: Ch 3 with B, [dc with D in next sc, dc with B in next sc] around, end with D, join with slip st in top of beginning ch. Cut B.
Round 6: With D only, ch 3 (counts as first dc), dc in same st, ch 1, skip next dc, [dc in next dc, ch 1, skip next dc] 56 times, [2 dc in next dc, ch 1, skip next dc] 4 times, turn to work along side edge, [dc in next dc, ch 1, skip next dc] 85 times, [2 dc in next dc, ch 1, skip next dc] 4 times, turn to work along next edge, [dc in next dc, ch 1, skip next dc] 57 times, turn to work along side edge, [dc in next dc, ch 1, skip next dc] 85 times, [2 dc in next dc, ch 1, skip next dc] 3 times, join with slip st to top of beginning ch 3. Fasten off.
Round 7: Join B in top of beginning ch 3, ch 1, sc in same space, *[sc in next dc, dc in next dc 2 rounds below, pulling dc up to current level of work] across to first set of 2 dc of next corner, [sc in next 2 dc, dc in next dc 2 rounds below, pulling dc up to current level of work] 4 times; repeat from * around to last side, [sc in next dc, dc in next dc 2 rounds below, pulling dc up to current level of work] across to first set of 2 dc of next corner, [sc in next 2 dc, dc in next dc 2 rounds below, pulling dc up to current level of work] 3 times, join with slip st to first sc. Fasten off. Weave in ends.
PILLOW
Back
With Afghan hook and A, ch 51.
Row 1: First Half: Insert hook in 2nd ch from hook, yo, draw yarn through st, *insert hook in next ch, yo, draw yarn through st; repeat from * across - 51 loops on hook;
Second Half of Row: Yo, draw yarn through first loop on hook, *yo, draw yarn through 2 loops on hook; repeat from * across until 1 loop remains on hook, (counts as first loop of next row).
Repeat Row 1 until 41 rows have been worked.
Last Row: Slip st in each vertical st across. Fasten off.
Front
With Afghan hook and A, ch 51.
Row 1: First Half: Insert hook in 2nd ch from hook, yo, draw yarn through st, *insert hook in next ch, yo, draw yarn through st; repeat from * across - 51 loops on hook;
Second Half of Row: Yo, draw yarn through first loop on hook, *yo, draw yarn through 2 loops on hook; repeat from * across until 1 loop remains on hook, (counts as first loop of next row).
Repeat Row 1 until 8 rows have been worked.
Begin Chart
Next Row: Work 5 sts, beginning with Row 3, work Chart across 31 sts, work 5 sts.
Continue to work Chart as established until 29 rows have been worked.
Repeat Row 1 for 6 rows.
Last Row: Slip st in each vertical st across. Fasten off.
Block Border
Round 1: With right side of Front facing, join D in upper right hand corner st, ch 3 (counts as first dc), 2 dc in corner st, ch 1, [skip next st, dc in next st] across to last st, 3 dc in last st, turn to work along side edge, 2 dc in edge of row, [ch 1, skip next row, dc in next row] across to last 2 rows, ch 1, skip next row, 2 dc in last row, turn to work along opposite edge of foundation ch, 3 dc in first st, ch 1, [skip next st, dc in next st] across to last st, 3 dc in last st, turn to work along side edge, 2 dc in edge of row, [ch 1, skip next row, dc in next row] across to last 2 rows, ch 1, skip next row, 2 dc in last row, ch 1, join with slip st to top of beginning ch 3. Fasten off.
Round 2: Join B in top of beginning ch, ch 1, sc in first 3 dc, *[dc in next dc 2 rounds below, pulling dc up to current level of work, sc in next dc] across to first dc of corner 5-dc, sc in next 5 dc; repeat from * around to last side, [dc in next dc 2 rounds below, pulling dc up to current level of work, sc in next dc] across to last 2 dc, sc in next 2 dc, join with slip st in first sc.
Round 3: Ch 1, sc in first 3 sts, *[skip next st, sc in next 3 sts] 12 times, sc in next 48 sts; repeat from * around to last side, [skip next st, sc in next 3 sts] to last 2 sts, sc in next 2 sc, join with slip st in first sc.
Repeat Border around Pillow Block.
FINISHING
Round 1: Holding wrong sides together, join B in one Block with crochet hook, working through sts of two Blocks, ch 1, sc in each st around 3 sides, turn to work along last side, sc in each st across on only 1 piece.
Fasten off.
Insert pillow form.
Whipstitch opening closed.
Weave in ends.
ABBREVIATIONS: A, B, C = Color A, B, C; ch = chain; dc = double crochet; mm = millimeters; sc = single crochet; st(s) = stitch(es); yo = yarn over; [ ] = work directions in brackets the number of times specified; * or ** = repeat whatever follows the * or ** as indicated.
Pattern © by Coats & Clark Inc. Reproduced with permission from Coats & Clark Inc. PurpleKittyYarns.com is not endorsed by Coats & Clark Inc. It is not permissible to contract production of projects made from designs published by Coats & Clark to a third party for sale or distribution.
Christmas Tree Duo LW2630
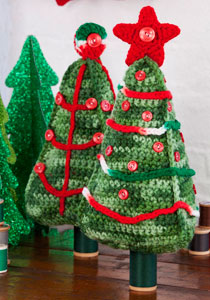
Decorated with buttons and crocheted chains and using spools for the trunks, this pair of crocheted trees are a delightful addition to your cottage-y Christmas decorations. Display them on tables, the mantel or even your cubicle at work.
Skill Level: INTERMEDIATE
Designed by Sharon Mann.
Finished Size
Tree measures 8½" tall
Base measures 5½" in diameter
RED HEART® "Super Saver®": 1 skein each 629 Green Tones A, 979 Mistletoe B and 0319 Cherry Red C.
Crochet Hook: 5.0mm [US H-8]
Yarn Needle
For Tree 1: 21 to 24 – 7/16" red buttons and 2 – ¾" red buttons.
For Tree 2: 18 – 9/16" Red buttons and 2 – ¾" red buttons
Two spools of Coats Cotton Machine Quilting Thread for Tree Trunk in color #8975.
Two ⅛" X 7½" long wood dowels or 1 set of wood chopsticks
Sewing needle and red sewing thread
Tacky Glue.
GAUGE: 16 sts = 4", 16 rows sc = 4". CHECK YOUR GAUGE. Use any size hook to obtain the gauge.
TREE (MAKE 2)
Tree Sides (make 3)
Starting at bottom, with A, ch 2.
Row 1: 3 sc in 2nd ch from hook; turn - 3 sc.
Row 2: Ch 1, sc in each st across, turn.
Row 3: Ch 1, 2 sc in first st, sc in next sc, 2 sc in last st; turn - 5 sc.
Rows 4-6: Ch 1, sc in each st across; turn.
Row 7: Ch 1, 2 sc in first st, sc in each st across to last st, 2 sc in last st; turn - 7 sc.
Rows 8-27: Repeat rows 4-7 (5 times).
Row 28-32: Repeat Row 4. Fasten off.
Tree Bottom With A, ch 2.
Row 1: 3 sc in 2nd ch from hook; turn - 3 sc.
Row 2: Ch 1, sc in each st across, turn.
Row 3: Ch 1, 2 sc in first st, sc in each st across to last st, 2 sc in last st; turn - 5 sc.
Row 4: Ch 1, sc in each st across; turn.
Rows: 5-16: Repeat rows 3 and 4 (6 times) - 17 sc at end of last row. Fasten off, leaving a sewing length.
FINISHING
With wrong sides facing, sew bottom edge of 3 tree sides to the edges of tree bottom. With right side facing, sc 2 tree sides together. Add stuffing and sc the last 2 trees side together, adding additional stuffing as needed. Weave in ends.
Tree 1 Embellishments Star (make 2)
With C, Ch 4, slip st in first ch to form ring.
Round 1: Ch 1, work 10 sc in ring; join with a slip st in first sc - 10 sc.
Round 2: Ch 1, sc in first sc, *ch 5, sc in 2nd ch from hook, hdc in next ch, dc in next 2 ch, skip next sc in round 1**, sc in next sc, repeat from * around ending last repeat at **, join with a slip st in first sc - 5 points. Fasten off, leaving a sewing length.
With right sides facing, sew two stars together, matching sts. Sew star to top of tree. With sewing needle and thread, sew one ¾" button to center of each side of star. Weave in ends.
Garland
With B, make 4 chains in different lengths for garland to wrap around tree. Fasten off, leaving a sewing length. Start at the bottom or top, placing garland chains apart. Sew garlands in place. With sewing needle and thread, sew 7/16" buttons between garland, on each side of tree.
Tree 2 Embellishments Circle (make 2)
With B, ch 2.
Round 1: 6 sc in 2nd, ch from hook; join with a slip st in first sc - 6 sc.
Round 2: Ch 3 (counts as dc), dc in first sc, 2 dc in each sc around; join with a slip st in top of beginning ch-3 - 12 dc. Fasten off leaving a sewing length. With right sides facing, sew circles together, matching sts. Sew assembled circle to top of tree. With sewing needle and thread, sew one ¾" button to center of each side of circle. Weave in ends.
Center Tree Stem (make 3)
With C, ch 33. Fasten off, leaving a sewing length.
Tree Branches (make 3 in each length)
Branch 1: With C, ch 15. Fasten off, leaving a sewing length.
Branch 2: With C, ch 19. Fasten off, leaving a sewing length.
Branch 3: With C, ch 23. Fasten off, leaving a sewing length.
Sew one stem to the center of each side of tree.
Sew the tree branches to the stem in a triangular shape as pictured. Sew one 9/16" button at ends of each branch.
Tree Trunk (for both trees)
Insert wood dowel into thread spool. Add glue to the top of the spool. Insert the remaining wood dowel into the center bottom of the tree and glue the spool to the tree.
ABBREVIATIONS: A, B, C = Color A, B, C; ch = chain; dc = double crochet; sc = single crochet; [ ] = work directions in brackets the number of times specified; * or ** = repeat whatever follows the * or ** as indicated.
Pattern © by Coats & Clark Inc. Reproduced with permission from Coats & Clark Inc. PurpleKittyYarns.com is not endorsed by Coats & Clark Inc. It is not permissible to contract production of projects made from designs published by Coats & Clark to a third party for sale or distribution.
Circles in Octagons Throw WR2039
INTERMEDIATE
Designed by Anne Halliday.
Throw is 50" x 68".
RED HEART® "Super Saver®": 4 Skeins 313 Aran A; 2 skeins each 631 Light Sage B and 406 Medium Thyme C.
Crochet Hook: 5mm [US H-8].
Yarn needle.
GAUGE: Motif is 6" across. CHECK YOUR GAUGE. Use any size hook to obtain the gauge.
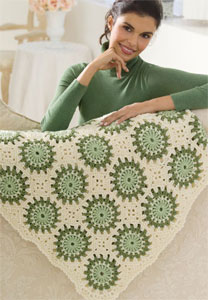
MOTIF (Make 88)
With B, ch 7; join with slip st in 1st ch to form ring.
Round 1 (Right Side): Ch 5 (counts as tr, ch 1), [tr, ch 1] 15 times in ring; join in 4th ch of ch-5 - 16 ch-1 spaces. Fasten off.
Round 2: Attach A in any ch-1 space; ch 1, sc in same space, ch 2, * sc in next ch-1 space, ch 2; repeat from * around; join. Fasten off.
Round 3: Attach C in any ch-2 space; ch 3 (counts as dc here and throughout), dc in same space, ch 1, * 2 dc in next ch-2 space, ch 1; repeat from * around; join. Fasten off.
Round 4: Attach A in any ch-1 space, ch 3, dc in same space, ch 3, 2 dc in next ch-1 space, ch 1, * 2 dc in next ch-1 space, ch 3, 2 dc in next ch-1 space, ch 1; repeat from * around; join. Fasten off.
SQUARE (Make 70)
Round 1 (Right Side): With A, ch 6, ([hdc, ch 3] 3 times) all in 6th ch from hook; join to 3rd ch of beginning ch-6 - 4 ch-3 spaces.
Round 2: Ch 3, (2 dc, ch 3, 2 dc) all in next ch-3 space, * dc in next hdc, (2 dc, ch 3, 2 dc) all in next ch-3 space; repeat from * around; join. Fasten off.
TRIANGLE (Make 34)
Row 1 (Wrong Side): With A, ch 5, (hdc, ch 3, hdc, ch 1, dc) all in 5th ch from hook; turn.
Row 2: Ch 5 (counts as tr, ch 1), dc in 1st dc, dc in next ch-1 space, dc in next hdc, (2 dc, ch 3, 2 dc) all in next ch-3 space, dc in next hdc, dc in next ch-1 space, (dc, ch 1, tr) all in 4th ch of beginning ch-5. Fasten off.
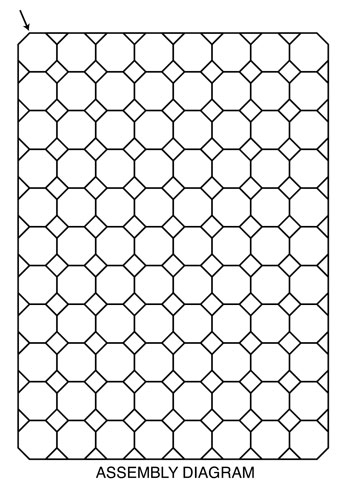
FINISHING
Following diagram, hold right sides of 2 Motifs together. With A and working through back loops only of both Motifs, sew through center st of any ch-3 space, next ch, next 2 dc, next ch-1 space, next 2 dc, next 2 ch. Fasten off. In this manner, join all pieces according to diagram.
Edging-Round 1: With Right Side facing, attach A in ch-3 space at corner marked with arrow on diagram, ch 5, dc in same space, [ch 1, skip next dc, dc in next dc, ch 1, (dc, ch 3, dc) all in next ch-3 space] 3 times; ch 1, skip next dc, dc in next dc, ch 1, * sc around post of next tr, ch 1, sc in top of next dc, ch 1, sc in center ch, ch 1, sc in top of next dc, ch 1, sc around post of next tr, ch 1, dc in next ch-3 space, ch 1, skip next dc, dc in next dc, ch 1, (dc, ch 3, dc) all in next ch-1 space; ch 1, skip next dc, dc in next dc, ch 1, ** repeat from * across side; *** [(dc, ch 3, dc) all in next ch-3 space, ch 1, skip next dc, dc in next dc, ch 1] 4 times; repeat from ** around; end at ***; join.
Round 2: Ch 1, [sc, ch 1] twice in next ch-3 space; work (sc, ch 1) in each ch-1 space and ([sc, ch 1] twice) in each ch-3 space around; join.
Round 3: * Slip st in next ch-1 space, ch 2; repeat from * around; join. Fasten off, weave in ends.
ABBREVIATIONS: A, B = color A, B; ch = chain; dc = double crochet; hdc = half double crochet; mm = millimeters; sc = single crochet; st(s) = stitch(es); tr = treble crochet; * or ** = repeat whatever follows the * or ** as indicated; [ ] = work directions in brackets the number of times specified.
Pattern © by Coats & Clark Inc. Reproduced with permission from Coats & Clark Inc. PurpleKittyYarns.com is not endorsed by Coats & Clark Inc. It is not permissible to contract production of projects made from designs published by Coats & Clark to a third party for sale or distribution.
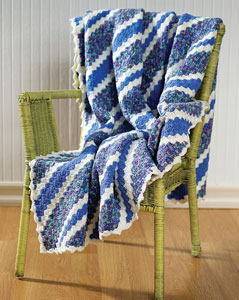
Corner-to-Corner Throw LW1595
Skill Level: INTERMEDIATE
Designed by Catherine Watson.
Throw measures 67" x 67" square (including edging).
RED HEART® "Super Saver®": 4 Skeins 316 Soft White CA, 5 skeins 885 Delft Blue CB, 7 skeins 310 Monet Print CC.
Crochet Hook: 5 mm [US H-8].
Yarn needle.
GAUGE: 6 blocks = 4"; 6 rows = 4" in pattern. CHECK YOUR GAUGE. Use any size hook to obtain the gauge.
To change color in dc: Work last dc before color change until 2 loops are left on hook, drop color in use, with next color to be used draw through 2 loops on hook and continue with new color.
With CA, ch 6.
Row 1 (Right Side): Dc in 4th ch from hook and in next 2 ch; turn - 1 block made.
Row 2: Ch 6, dc in 4th ch from hook and in next 2 ch, (slip st, ch 3, 3 dc) all in ch-3 space of previous row changing to CB in last dc; turn - 2 blocks made.
Row 3: With CB, ch 6, dc in 4th ch from hook and in next 2 ch, [(slip st, ch 3, 3 dc) all in next ch-3 space of previous row] twice; turn - 3 blocks made.
Row 4: Ch 6, dc in 4th ch from hook and in next 2 ch, [(slip st, ch 3, 3 dc) all in next ch-3 space of previous row] 3 times; turn - 4 blocks made.
Continue in this manner, increasing 1 block on each row until there are 96 blocks across AND working Stripe pattern as follows: 2 more rows CB, 2 rows CA, [7 rows CC, 2 rows CA, 2 rows CB, 2 rows CA, 7 rows CC, 2 rows CA, 4 rows CB, 2 rows CA] 3 times, 4 rows CC.
Now work in decreasing rows as follows:
Row 97: With CC, slip st across first 3 dc, * (slip st, ch 3, 3 dc) all in next ch-3 space of previous row; repeat from * to last ch-3 space; slip st in last space; turn, do NOT make a block in last space - 95 blocks.
Repeat Row 97 for decreasing block pattern and work 2 more rows with CC, [2 rows CA, 2 rows CB, 2 rows CA, 7 rows CC, 2 rows, CA, 4 rows CB, 2 rows CA, 7 rows CC] 3 times, 2 rows CA, 2 rows CB, 2 rows CA, 2 rows CC - 1 block remains. Fasten off.
Edging: With right side facing, attach CA in same ch-3 space as last slip st; ch 3, 4 dc in same space, * sc in center dc of next block, 3 dc in next ch-3 space or over dc; ch 3, slip st in top of last dc - picot made; 2 dc in same space, sc in center dc of next block, 5 dc in next space; repeat from * to corner; (4 dc, picot, 3 dc) all in corner space; repeat from * around, adjusting if necessary at corners and end of rnd; join with a slip st in top of ch-3. Fasten off. Weave in ends.
ABBREVIATIONS: CA, CB, CC = color A, B, C; ch = chain; dc = double crochet; mm = millimeters; rnd = round; sc = single crochet; st(s) = stitch (es); * = repeat whatever follows the * as indicated; [ ] = work directions in brackets the number of times specified.
Pattern © by Coats & Clark Inc. Reproduced with permission from Coats & Clark Inc. PurpleKittyYarns.com is not endorsed by Coats & Clark Inc. It is not permissible to contract production of projects made from designs published by Coats & Clark to a third party for sale or distribution.
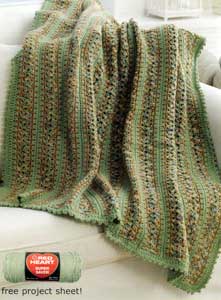
Country Home Crochet Throw LW1767
Skill Level: Intermediate
Designed by Glenda Winkleman.
Throw measures 50" x 63".
RED HEART® "Super Saver®": 2 skeins each 336 Warm Brown A, 661 Frosty Green Band 4 skeins 305 Aspen Print C.
Crochet Hook: 6.5 mm (US K-10 ½).
Yarn needle.
GAUGE: Dc, shell st, dc = 2"; 4 rows = 3". CHECK YOUR GAUGE: Use any size hook to obtain gauge given.
Strip
(Make 13).
With C, ch 9.
Row 1: Work (2 dc, ch 3, 2 dc) in 6th ch from hook, skip next 2 ch, dc in last ch, turn.
Rows 2-85: Ch 3 (counts as first dc), skip next 2 dc, (2 dc, ch 3, 2 dc) in ch-3 space, skip next 2 dc, dc in top of beginning ch, turn. Fasten off.
Side Border
Work Side Border along each long edge of each Strip.
With right side facing, join A in last st to work along one long edge of each Strip.
Row 1: Ch 1, 2 sc in first row, [ch 1, sc] in each row to last row, 2 sc in last row, turn.
Row 2: Ch 1, sc in each of first 2 sc, *ch 1, skip next ch-1 space, sc in next sc; repeat from * across to last sc, sc in last sc. Fasten off.
Strip Border
Work Strip Border around each Strip.
With right side facing, join B in beginning st to work along one long edge of each Strip.
Rnd 1: Ch 1, sc in first 2 sc, *[work 2 hdc in each corresponding ch-1 space 2 rows below (Row 1 of Side Border) pulling st up to current level] across to last 2 sc, sc in last 2 sc, ch 2, 2 sc in edge of Row 2 of Side Border, 2 sc in edge of Row 1 of Side Border, turn to work along short end of Strip, skip next 2 dc, 2 sc in next ch-3 space, skip next 2 dc, turn to work along opposite long edge of Strip, 2 sc in edge of Row 1 of Side Border, 2 sc in edge of Row 2 of Side Border, ch 2; repeat from *, join with a slip st to beginning sc.
Assembly
With right side facing and holding 2 Strips together along long edges, join B in one corner with a slip st.
Row 1: Working in back loops only and working through sts of both Strips, slip st across to opposite corner to join Strip together.
Repeat to join all Strips.
Border
With right side facing, join B in top right-hand corner ch-2 space with a slip st.
Rnd 1: Ch 3 (counts as first dc), 2 dc in corner ch-2 space, dc in each st and each ch-space around, working 3 dc in each corner ch-2 space, join with a slip st to beginning ch.
Rnd 2: Ch 1, sc in first 2 sts, (ch 3, slip st in last ch for picot), *sc in next 2 sts, (ch 3, slip st in last ch); repeat from * around, join with a slip st to beginning sc.
Fasten off. Weave in ends.
ABBREVIATIONS: A = Color A; B = Color B; C = Color C; ch = chain; dc = double crochet; hdc = half double crochet; mm = millimeters; rnd = round; sc = single crochet; st(s) = stitch(es); * = repeat whatever follows the * as indicated; [ ] = work directions in brackets the number of times specified.
Pattern © by Coats & Clark Inc. Reproduced with permission from Coats & Clark Inc. PurpleKittyYarns.com is not endorsed by Coats & Clark Inc. It is not permissible to contract production of projects made from designs published by Coats & Clark to a third party for sale or distribution.
Crafty Yarn Bowl for Treats LW2838
You don't need to knit or crochet to make a bowl with yarn. After soaking yarn in glue, each strand is placed over a bowl to dry. Kids will have fun creating a bowl for Halloween or any occasion. Follow these easy instructions.
Designed by Red Heart Design Team.
Red Heart® Super Saver®: 1 skein each Pumpkin A and 512 Black B.
Materials: Two bowls (one for mixing/soaking and one to use as your mold), plastic wrap, white glue, plastic spoon and newspaper.
Note: Place newspaper under project to protect work surface. This craft project will need to dry for 24 to 48 hours so start in an appropriate work area.

1. Take ¾ cup white glue and ¾ cup water and mix together in one bowl until well blended. (This amount can be reduced for small bowls, or you can mix more if you use up your glue mixture on a larger bowl.)
2. Turn second mixing bowl upside down. Take one strand of yarn and measure across the bowl from one side to the other. It is better to have a little more than not enough. Use that piece as a guide and cut 50 strands of A and 50 strands of B. Take a handful of A and B and soak in the glue mixture.
3. While yarn is soaking, place plastic wrap over the bowl covering entire bowl. Note: As yarn is used, add more yarn to the mixture for soaking.
4. Pull out yarn strands one at a time, running each strand between thumb and forefinger to remove excess glue. Place yarn strand over plastic-covered bowl. Continue this process, randomly selecting colors until entire bowl is covered.
5. Allow to dry for 24 to 48 hours depending on humidity.
6. Once yarn is completely dry, separate from the bowl, remove the plastic wrap and trim the edges.
Pattern © by Coats & Clark Inc. Reproduced with permission from Coats & Clark Inc. PurpleKittyYarns.com is not endorsed by Coats & Clark Inc. It is not permissible to contract production of projects made from designs published by Coats & Clark to a third party for sale or distribution.
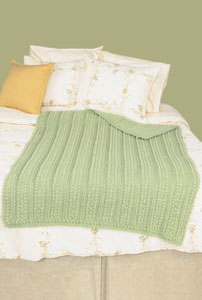
Crochet Aran Afghan LW1555
Skill Level: Intermediate
Designed by Michele Thompson
Afghan measures approximately 48" wide x 63" long.
RED HEART® "Super Saver®": 47 Ounces No. 661 Frosty Green.
Crochet Hooks: 6mm [US J-10] and 5.5mm [US I-9].
Yarn needle to weave in ends.
GAUGE: 12 sts = 4"; 10 rows = 4 ⅜" in pattern with larger hook. CHECK YOUR GAUGE. Use any size hook to obtain the gauge.
SPECIAL ABBREVIATIONS:
BPDC (back post double crochet): Yarn over, insert hook from back to front to back around the post of stitch indicated and draw up a lp, [yarn over and draw through 2 lps] twice.
FPDC (front post double crochet): Yarn over, insert hook from front to back to front around the post of stitch indicated and draw up a lp, [yarn over and draw through 2 lps] twice.
MB (make bobble): [yarn over and draw up a lp] 3 times all in stitch indicated, yarn over and draw through all 7 lps on hook.
INSTRUCTIONS:
Beginning at side edge (afghan is worked side to side) with larger hook, ch 181.
Row 1 (Wrong Side): Dc in 4th ch from hook and in each ch across; turn - 179 sts.
Row 2 (Right Side): Ch 2 (counts as first st), skip first dc, * BPDC around next st; rep from * across; turn.
Row 3: Ch 2, skip first st, * FPDC around next st; rep from * across; turn.
Row 4: Ch 1, sc in each st across; turn.
Row 5-Bobble Row: Ch 1, sc in first sc, * MB in next sc, sc in next sc; rep from * across; turn.
Row 6: Rep Row 4.
Row 7: Ch 3 (counts as first dc), skip first sc, * skip next sc, dc in next 2 sc, dc into skipped sc working around the last 2 dc (this dc encloses the last 2 dc); rep from * to last sc; dc in last sc; turn.
Rows 8-10: Rep Rows 4-6.
Row 11: Ch 3, skip first sc, dc in next sc and in each sc across; turn.
Work Rows 2-11 a total of 10 times. Work Rows 2-3 once more. Do not fasten off. Change to smaller hook.
EDGING-Rnd 1 (Right Side): Ch 1, work sc evenly around all 4 sides of afghan and work 3 sc in each corner; join with a sl st in first sc; turn.
Rnd 2 (Wrong Side): Ch 1, work as for Row 5-Bobble Row, working 3 sts in each corner and adjusting at end of rnd as necessary; join; turn.
Rnd 3 (Right Side): Ch 1, sc in each st around and work 3 sc in each corner as before; join; do NOT turn.
Rnd 4 (Right Side): * Ch 3, skip 1 sc, sl st in next sc; rep from * around; turn.
Rnd 5-Picot Rnd (Wrong Side): Ch 1, * (sc, ch 2, sl st into 2nd ch from hook, sc) all in ch- 3 sp; rep from * around; join. Fasten off. Weave in ends.
ABBREVIATIONS: beg = beginning; ch = chain; dc = double crochet; lp = loop; mm = millimeters; pat = pattern; rep = repeat; rnd = round; sc = single crochet; sl = slip; st(s) = stitch (es); yo = yarn over; * = repeat whatever follows the * as indicated; [ ] = work directions in brackets the number of times specified.
Pattern © by Coats & Clark Inc. Reproduced with permission from Coats & Clark Inc. PurpleKittyYarns.com is not endorsed by Coats & Clark Inc. It is not permissible to contract production of projects made from designs published by Coats & Clark to a third party for sale or distribution.
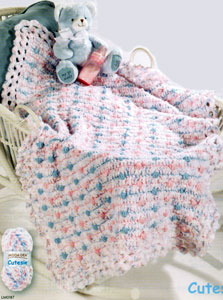
Crochet Baby Blanket LM0187
Skill Level: Easy
Designed by Denise Black.
Blanket measures approximately 32" wide x 42" long.
MODA-DEA™ "Cutesie™". Art. R129 (1.76 ounce/46 yard ball): 13 Balls No. 3730 Cotton Candy CA.
RED HEART® "Super Saver®", Art. E300 (7 ounce/364 yard skein): 3 Ounces No. 724 Baby Pink CB.
RED HEART® "Super Saver®", Art. E300 (7 ounce/364 yard skein): 3 Ounces No. 381 Light Blue CC.
Crochet Hook: 6.5mm [US K-10.5].
Yarn needle.
GAUGE: 10 sts = 4"; 9 rows = 4" in pat.
CHECK YOUR GAUGE. Use any size hook to obtain the gauge.
SPECIAL ABBREVIATION:
CL (Cluster): [yarn over and draw up a lp, yarn over and draw through 2 lps] 5 times all in st indicated, yarn over and draw through all 6 lps on hook; ch 1. Push CL to the right side of the fabric.
NOTE: To Change Color: With color in use, work last st of row until 2 lps remain on hook, drop color in use; with next color to be used yarn over and draw through 2 lps remaining on hook. Continue working with new color.
With CA, ch 73.
Row 1 (Right Side): Sc in 2nd ch from hook and each ch across; turn - 72 sc.
Row 2: With CA, ch 3 (counts as a dc on this and following rows), skip first sc, dc in next sc and in each sc across, changing to CB in last dc; turn. Cut CA.
Row 3: With CB, ch 1, sc in first 3 dc, CL in next dc, * sc in next 9 dc, CL in next dc; rep from * to last 8 sts; sc in next 7 dc, sc in top of ch-3 changing to CA; turn. Cut CB.
Row 4: With CA, ch 3, skip first sc, dc in next sc and in each sc and each CL across, changing to CC in last dc; turn. Cut CA.
Row 5: With CC, ch 1, sc in first 8 dc, CL in next dc, * sc in next 9 dc, CL in next dc; rep from * to last 3 sts; sc in next 2 dc, sc in top of ch-3 changing to CA. Cut CC.
Row 6: With CA, ch 3, skip first sc, dc in next sc and in each sc and each CL across, changing to CB in last dc; turn. Cut CA.
Rows 7 through 78: Rep Rows 3 through 6 eighteen times.
Rows 79 and 80: Rep Rows 3 and 4. At end of last row do not change color. Do NOT cut CA, but turn to work next (right side) round.
Edging-Rnd 1 (Right Side): With CA, ch 1, 3 sc in first dc, sc in each dc to last st; 3 sc in top of ch-3; working along next side in ends of rows, work 1 sc in each sc row and work 2 sc in each dc row; working along lower edge in unused lps of beg ch, 3 sc in first lp, sc in each lp to last lp; 3 sc In last lp; working along next side edge in ends of rows, work 1 sc in each sc row and work 2 sc in each dc row: join with a sl st in first sc - 396 sc.
Rnd 2: Ch 1, sc in same st as joining, ch 4, skip next 2 sc, * sc in next sc, ch 4, skip next 2 sc; rep from * around; join in first sc - 132 ch-4 sps.
Rnd 3: Sl st in first ch-4 sp, ch 1, * (sc, hdc, dc, hdc, sc) all in sp; rep from * around: join in first sc.
Rnd 4: Sl st to next dc, ch 1, * sc in dc, ch 4; rep from * around; join in first sc.
Rnd 5: Sl st in first ch-4 sp, ch 1, * (sc, hdc, dc, hdc, sc) all in sp; rep from * around; join in first sc. Fasten off. Weave in all ends.
ABBREVIATIONS: CA = Color A; CB = Color B; CC = Color C; ch = chain; dc = double crochet; hdc = half double crochet; lp(s) = loop (s); mm = millimeters; pat = pattern; rep = repeat; rnd (s) = round(s); sc = single crochet; sl = slip; sp(s) = space (s); st(s) = stitch (es); * = repeat whatever follows the * as indicated.
Pattern © by Coats & Clark Inc. Reproduced with permission from Coats & Clark Inc. PurpleKittyYarns.com is not endorsed by Coats & Clark Inc. It is not permissible to contract production of projects made from designs published by Coats & Clark to a third party for sale or distribution.
Crochet Box of Chocolates WR1086

Designed by Michele Wilcox.
Skill Level: INTERMEDIATE
Box measures approximately 9" across and 8" from "V" to bottom point. Candies measure approximately 1¼" across.
BOX
RED HEART® "Super Saver®": 4 Ounces 332 Ranch Red CA.
RED HEART® "Luster Sheen®": 2 Ounces 1 White CB.
Crochet Hooks: 3.5mm [US E-4] and 3.75mm [US F-5].
Yarn needle; small amount of polyfil stuffing; two 8" x 11" cardboards.
GAUGE: 16 sts = 4"; 16 rows = 3½" in sc with CA and larger hook. CHECK YOUR GAUGE. Use any size hook to obtain the gauge.
SPECIAL ABBREVIATIONS:
Dec = draw up a lp in each of next 2 sc, yarn over and draw through all 3 lps on hook.
Double dec = draw up a lp in each of next 3 sc, yarn over and draw through all 4 lps on hook.
BOTTOM OF BOX-Top Section: ** With larger hook and CA, ch 2.
Row 1 (Right Side): 3 Sc in 2nd ch from hook; turn - 3 sc.
Row 2: Ch 1, 2 sc in first sc, sc in next sc, 2 sc in last sc; turn - 5 sc.
Row 3: Ch 1, 2 sc in first sc, sc in each sc to last sc, 2 sc in last sc; turn - 7 sc.
Row 4: Ch 1, sc in each sc across; turn.
Rows 5 and 6: Rep Row 3 - 11 sc at end of Row 6.
Rows 7-21: Rep Rows 4-6 five times - 31 sc at end of Row 21.
Rows 22-28: Ch 1, sc in each sc across; turn.
Row 29: Ch 1, dec over first 2 sc, sc to last 2 sc, dec; turn - 29 sc.
Divide for Heart Shape-Row 30: Ch 1, sc in first 14 sc; turn and leave rem sts unworked.
Rows 31 and 32: Ch 1, sc in each sc across; turn.
Row 33: Ch 1, dec over first 2 sc, sc to end; turn - 13 sc.
Row 34: Rep Row 29 - 11 sc.
Row 35: Rep Row 22.
Row 36: Rep Row 29 - 9 sc.
Row 37: Rep Row 22.
Row 38: Rep Row 29 - 7 sc. Fasten off.
With wrong side facing, skip next st of last long row, join yarn in next st; ch 1, sc in same sc and in each sc across; turn - 14 sc. Complete to correspond to first side, reversing shaping of Row 33.
Edging and Side: With right side facing and larger hook, join CA and work 1 rnd sc evenly around entire heart, working 3 sc in point; join with a sl st in first sc. Do not fasten off. **
Place heart over cardboard and trace around heart. Cut 2 hearts from cardboard slightly smaller than crocheted heart, set aside.
Next Rnd: Ch 1, sc in front lps only of each sc around; join.
Next 6 Rnds: Ch 1, sc in both lps of each sc around.
Fasten off.
BOTTOM OF BOX-Lower Section: Work same as Top Section from ** to **.
Join Sections: Holding pieces wrong sides tog and matching st for st, sc through both Ips of sc on Lower Section and through rem back Ips on Top Section around AND INSERT ONE CARDBOARD piece before closing the rnd; join. Fasten off.
Lace Edging-Rnd 1: With smaller hook, join CB to any sc of joining rnd; ch 1, 2 sc in each sc around; join.
Rnd 2: Ch 1, sc in same sc as joining, * skip next 2 sc, 5 dc in next sc, skip next 2 sc, sc in next sc, ch 3, skip next sc **, sc in next sc; rep from * around, end at ** adjusting as necessary; join. Fasten off. Weave in ends.
TOP OF BOX-Lower Section: Work same as Bottom of Box-Top Section from ** to **.
Next Rnd: Ch 1, working in front lps only, * sc in next sc **, skip next 2 sc, 5 dc in next sc, skip next 2 sc; rep from * around, end at **, adjusting as necessary; join. Fasten off.
Top Section: Make another heart in the same manner through the first sc rnd. Join the 2 top pieces same as joining the bottom pieces except add a little stuffing between the cardboard and Top Section of box. Rep Lace Edging on top of box.
Flower: With smaller hook and CB, ch 6; join with a sl st in first ch to form a ring.
Rnd 1: Ch 3, 17 dc in ring; join with a sl st in back lp of top of ch-3 - 18 sts.
Rnd 2: Work all in front lps, [ch 1, hdc in same lp as last sl st, 3 dc in next lp, hdc in next lp, ch 1, sl st in next lp] 6 times.
Rnd 3: Ch 1, holding petals toward you, sl st in first back lp of Rnd 1, ch 1, sc in same lp, * 2 sc in next back lp **, sc in next lp, rep from * around, end at **; join with a sl st in first sc - 27 sc.
Rnd 4: [Ch 2, dc in same sc as last sl st, 3 tr in next sc, dc in next sc, ch 2, sl st in next sc] 9 times. Fasten off. Sew to top center of box.
CHOCOLATES
RED HEART® "Luster Sheen®": 1 Ounce 360 Chocolate CA, ¾ ounce 7 Vanilla CB; small amounts 615 Tealeaf CC, 332 Tan CD, 227 Buttercup CE, 235 Think Pink CF, and 915 Cherry Red CG.
Crochet Hook: 3.5mm [US E-4].
Yarn needle, polyfil stuffing, 20 white paper candy cups, 20 tiny pearls.
GAUGE: 6 sts = 1"; 5 rows = ¾" in sc. CHECK YOUR GAUGE. Use any size hook to obtain the gauge.
ROUND CHOCOLATES (Make 2 CA with CF flower and CC leaves; 1 CF with CB flower; 1 CA with CB chain st tic tac toe embroidery).
With main color, ch 2.
Rnd 1: 6 Sc in 2nd ch from hook; do not join but work in continuous rnds.
Rnd 2: 2 Sc in each sc around - 12 sc.
Rnd 3: [Sc in next sc, 2 sc in next sc] 6 times - 18 sc.
Rnd 4: Sc in back lps only of each sc around.
Rnds 5-7: Sc in both lps of each sc around.
Rnd 8: [Sc in next sc, dec over next 2 sc] 6 times - 12 sc.
Rnd 9: Sc in each sc around. Stuff lightly.
Rnd 10: [Dec over next 2 sc] 6 times - 6 times. Fasten off leaving a 6" end. Weave end through rem sc and draw up firmly; fasten securely.
Bottom Edge: Join main color to rem lps of Rnd 4; sl st in each lp around. Fasten off. Weave in ends.
Flower: With flower color, ch 3, sc in 2nd ch from hook, sl st in last ch, [ch 2, sc in 2nd ch from hook, sl st in same ch as last sl st] 3 times - 4 petals. Fasten off.
Leaves: With CC, [ch 4, sl st in 2nd ch from hook, sc in next ch, sl st in last ch] twice. Fasten off. Sew leaves to top of candy; sew flower on top of leaves.
CHOCOLATE SWIRLS (Make 1 CA with CF swirl and 1 CB with CA swirl).
With main color, ch 2.
Rnds 1-7: Work same as Round Chocolate. Stuff lightly.
Rnd 8: Working in back lps only [sc in next sc, dec over next 2 sc] 6 times - 12 sc.
Rnd 9: Working in back lps only [dec over next 2 sc] 6 times. Fasten off leaving a 6" end. Weave end through rem sc and draw up firmly; fasten securely.
Join swirl color in first unworked lp on Rnd 7 with a sl st; sl st in each free lp through Rnd 9. Fasten off. Weave in ends.
Bottom Edge: Work same as Bottom Edge of Round Chocolate.
SQUARE CHOCOLATE (Make 1 CA with CD topping and 1 CD with CA topping).
With main color, ch 2.
Rnd 1: 8 sc in 2nd ch from hook; do not join but work in continuous rnds.
Rnd 2: [Sc in next sc, 3 sc in next sc] 4 times - 16 sc.
Rnd 3: Sc in next 2 sc, 3 sc in next sc, [sc in next 3 sc, 3 sc in next sc] 3 times, sc in last sc - 24 sc.
Rnd 4: Working in back lps only sc in each sc around.
Rnds 5-7: Sc in both lps of each sc around.
Rnd 8: Sc in next 2 sc, double dec over next 3 sc, [sc in next 3 sc, double dec] 3 times, sc in last sc - 16 sc. Stuff lightly.
Rnd 9: [Sc in next sc, double dec] 4 times - 8 sc. Fasten off leaving a 6" end. Weave end through rem sc and draw up firmly; fasten securely.
Bottom Edge: Work same as Bottom Edge of Round Chocolate.
Topping: With topping color, ch 13; 2 sc in 2nd ch from hook and in each ch across. Fasten off. Roll into flower shape and sew to top.
CHOCOLATE COVERED PRETZEL (Make 1 CA and 1 CB).
Ch 31.
Row 1: Sc in 2nd ch from hook and in each ch across; turn - 30 sc.
Rows 2 and 3: Ch 1, sc in each sc across; turn. Fasten off at end of Row 3.
Fold in half lengthwise and sew tog. Fold into pretzel shape and sew tog.
CHOCOLATE RUFFLE (Make 2 CA with CG centers).
With CA, ch 18.
Row 1: 2 Dc in 4th ch from hook, 3 dc in each rem ch across; turn - 48 sts.
Row 2: Ch 1, sc in each dc across and in top of beg ch. Fasten off.
Roll up and sew bottom tog keeping it flat enough to sit alone.
Center-Rnd 1: With CG, ch 2; 6 sc in 2nd ch from hook; do not join but work in continuous rnds.
Rnd 2: Sc in each sc around. Fasten off.
Draw sts tog and sew to top of candy.
WHITE CHOCOLATE HEART (Make 1).
Rnd 1: Beginning at top of candy, with CB, ch 2; 6 sc in 2nd ch from hook; do not join but work in continuous rnds.
Rnd 2: 2 Sc in each sc around - 12 sc.
Rnd 3: (Hdc, dc, tr) all in next sc, (dc, hdc) all in next sc, sl st in next sc, (hdc, dc) all in next sc, (tr, dc, hdc) all in next sc, sc in next 3 sc, 3 sc in next sc, sc in last 3 sc - 20 sts.
Rnd 4: Working in back lps only, sc in next 5 sts, sl st in next st, sc in last 14 sts.
Rnds 5 and 6: Sc in both lps of each sc around.
Rnd 7: Double dec over next 3 sts, dec over next 2 sts, sl st in next st, dec over next 2 sts, double dec over next 3 sts, sc in next 3 sts, double dec over next 3 sts, sc in last 3 sts - 12 sts. Stuff lightly.
Rnd 8: [Dec over next 2 sts] 6 times. Fasten off leaving a 6" end. Weave end through rem sc and draw up firmly; fasten securely.
Top Edging: Join CC in any unworked lp on Rnd 4 with a sl st; * ch 1, sl st in next lp, rep from * around. Fasten off.
Flower: With CE, ch 2; 6 sc in 2nd ch from hook; join with a sl st to first sc. Fasten off. Sew to top center.
FLOWER CHOCOLATE (Make 1 each CB with CA center; CA with CB center; CE with CC center; CF with CA center).
With main color, ch 2.
Rnd 1: 6 sc in 2nd ch from hook; do not join but work in continuous rnds.
Rnd 2: 2 Sc in each sc around - 12 sc.
Rnd 3: Working in front lps only, [(sl st, ch 1, dc) all in next sc, dc in next sc, ch 1] 6 times, sl st in first sl st - 6 petals.
Rnd 4: Ch 1, holding petals toward you, sc in each rem back lp around - 12 sc.
Rnds 5 and 6: Sc in each sc around. Stuff lightly.
Rnd 7: Working in back lps only, [dec over next 2 sc] 6 times. Fasten off. Draw rem sts tog tightly.
Bottom Edge: Join main color to rem lps of Rnd 7; sl st in each lp around. Fasten off. Weave in ends.
Center: Make same as center of Chocolate Ruffle. Sew to center of flower.
JORDAN ALMOND (Make 1 CC and 1 CF).
Rnd 1: Ch 2; 6 sc in 2nd ch from hook; do not join but work in continuous rnds.
Rnds 2-4: 2 Sc in next sc, sc in each sc around - 9 sc at end of Rnd 4.
Rnds 5 and 6: Dec over next 2 sc, sc in each sc around - 7 sc at end of Rnd 6. Stuff lightly.
Rnd 7: Rep Rnd 5. Fasten off. Draw rem sts tog.
POLKA DOT CHOCOLATE (Make 1 CA).
Top-Rnds 1-3: Work same as Rnds 1-3 of Round Chocolate. Fasten off. Sew tiny pearls on top of this piece.
Bottom: Rep Rnds 1-3 of top; do NOT end off; with wrong sides tog, sl st the 2 pieces tog through back lps. Do not stuff.
ABBREVIATIONS: beg = beginning; CA, CB, etc.= Color A, Color B, etc; ch = chain; dc = double crochet; dec = decrease; hdc = half double crochet; lp = loop; mm = millimeters; rem = remaining; rep = repeat; rnd = round; sc = single crochet; sl = slip; sp = space; st(s) = stitch(es); tog = together; tr = treble crochet; * or ** = repeat whatever follows the * or ** as indicated; [ ] = work directions given in brackets the number of times specified.
Pattern © by Coats & Clark Inc. Reproduced with permission from Coats & Clark Inc. PurpleKittyYarns.com is not endorsed by Coats & Clark Inc. It is not permissible to contract production of projects made from designs published by Coats & Clark to a third party for sale or distribution.
| Pattern Categories Browse the categories to help you find the patterns you're looking for. |
||
    
|
|
|


Navigation

All contents © 2003-2026 Purple Kitty LLC. All rights reserved.
Privacy Policy | FAQ | About Me