 |
Red Heart Super Saver
Gotcha Covered #1 Knitted Hats LW1268
Skill level: Beginner
|
YARN QUALITY* |
KNITTING NEEDLES |
GAUGE in St st ON LARGER NEEDLES |
|
|
A |
Fingering Weight |
2.75mm [US 2] & 3.5mm [US 4] |
26 sts = 4"; 35 rows = 4" |
|
B |
Light Sport Weight |
3.5mm [US 4] & 4mm [US 6] |
22 sts = 4"; 30 rows = 4" |
|
C |
Sport Weight |
3.5mm [US 4] & 4mm [US 6] |
20 sts = 4"; 27 rows = 4" |
|
D |
Light Worsted Weight |
4mm [US 6] & 5mm [US 8] |
18 sts = 4"; 24 rows = 4" |
|
E |
Worsted Weight |
4mm [US 6] & 5mm [US 8] |
17 sts = 4"; 23 rows = 4" |
|
F |
Chunky Weight |
5mm [US 8] & 6mm [US 10] |
15 sts = 4"; 20 rows = 4" |
|
G |
Bulky Weight |
6.5mm [US 10.5] & 9mm [US 13] |
9 sts = 4"; 13 rows = 4" |
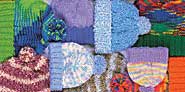
Amount: One skein each of 2 colors of any yarn quality will make one or more hats.
|
SIZE |
1 |
2 |
3 |
4 |
5 |
6 |
|
TO FIT |
Preemie |
Baby |
Toddler |
Child |
Women |
Men |
|
CIRCUMFERENCE |
12" |
14" |
16" |
18" |
20" |
22" |
|
NOTE: Circle the numbers appropriate to the hat size and yarn quality you are making to help keep track of the pattern. HAT-Cuff: With smaller needles and first color, cast on |
||||||
|
A |
77 |
93 |
105 |
- |
- |
- |
|
B |
65 |
77 |
89 |
97 |
109 |
121 |
|
C |
61 |
69 |
81 |
89 |
101 |
109 |
|
D |
53 |
61 |
73 |
81 |
89 |
97 |
|
E |
49 |
57 |
69 |
77 |
85 |
93 |
|
F |
- |
53 |
61 |
69 |
77 |
81 |
|
G |
- |
33 |
37 |
41 |
45 |
49 |
|
sts. Work in ribbing as follows: Row 1 (Right Side): * K2, P2; rep from * to last st; K1. Row 2: P1, * K2, P2; rep from * across. Rep Rows 1 and 2 for |
||||||
|
A-G |
2 1/2 |
3 |
4 |
5 |
6 |
6 |
|
inches, end Row 1. Crown: Change to larger needles and second color and work in plain St st or stripes, beg K row, until |
||||||
|
A-G |
5 |
6 |
7 |
9 |
10 |
10 |
|
inches from beg, end P row. Shape Top: [K2tog, K |
||||||
|
A |
15 |
19 |
22 |
- |
- |
- |
|
B |
12 |
15 |
18 |
20 |
23 |
26 |
|
C |
11 |
13 |
16 |
18 |
21 |
23 |
|
D |
9 |
11 |
14 |
16 |
18 |
20 |
|
E |
8 |
10 |
13 |
15 |
17 |
19 |
|
F |
- |
9 |
11 |
13 |
15 |
16 |
|
G |
- |
4 |
5 |
6 |
7 |
8 |
|
sts, sl 1, K1, psso, place marker on needle] 4 times, K1. Next Row: P. Next Row: [K2tog, K to 2 sts before marker, sl 1, K1, psso] 4 times, K1. Rep the last 2 rows until the row “[K2tog, K1 OR K2, sl 1, K1, psso] 4 times, K1” has been worked and 13 OR 17 sts rem. Cut yarn, leaving a long end; weave through rem sts, draw up tightly and fasten securely. Sew seam, reversing for cuff turnback. Fold cuff in half to the right side. Optional: Make a pom pom and fasten to top of hat. *Yarn Quality: A = RED HEART® Baby Fingering Traditional and Pompadour. B = RED HEART® Soft Baby; TLC® Baby. C = RED HEART® Sport; Baby Sport Econo. D = RED HEART® Soft; Kids; Baby Teri; Tweed; TLC® Lustre; Heathers. E = RED HEART® Super Saver; Classic; Fiesta; Pounder; Classic Plus; TLC® Essentials. F = RED HEART® Misty. G = RED HEART® Light & Lofty; Baby Clouds. ABBREVIATIONS: beg = beginning; K = knit; P = purl; psso = pass the slipped stitch over; rem = remain(ing); rep = repeat; sl = slip; st = stitch; St st = Stockinette stitch (K1 row; P1 row); tog = together; * = repeat whatever follows the * as indicated; [ ] = work directions given in brackets the number of times specified. |
||||||
Pattern © by Coats & Clark Inc. Reproduced with permission from Coats & Clark Inc. PurpleKittyYarns.com is not endorsed by Coats & Clark Inc. It is not permissible to contract production of projects made from designs published by Coats & Clark to a third party for sale or distribution.
Other free hat patterns:
Gotcha Covered #2 Crochet Hats LW1269
Skill level: Beginner
Crochet striped baby sweater and hat done in TLC Baby yarn will look cute on any baby.
|
YARN QUALITY* |
CROCHET HOOKS | GAUGE in sc rnds ON SMALLER HOOK | |
|
A |
Fingering Weight |
3.25mm [US D-3] & 3.5mm [US E-4] |
21 sts = 4"; 25 rnds = 4" |
|
B |
Light Sport Weight |
3.75mm [US F-5] & 4mm [US G-6] |
18 sts = 4"; 21 rnds = 4" |
|
C |
Sport Weight |
4mm [US G-6] & 5mm [US H-8] |
16 sts = 4"; 18 rnds = 4" |
|
D |
Light Worsted Weight |
5mm [US H-8] & 5.5mm [US I-9] |
14 sts = 4"; 16 rnds = 4" |
|
E |
Worsted Weight |
5.5mm [US I-9] & 6mm [US J-10] |
13 sts = 4"; 14 rnds = 4" |
|
F |
Chunky Weight |
6mm [US J-10] & 6.5mm [US K-101/2] |
11 sts = 4"; 13 rnds = 4" |
|
G |
Bulky Weight |
10mm [US N-15] & 11.5mm [US P-16] |
5 sts = 3"; 8 rnds = 41/4" |
Amount: One skein each of 2 colors of any yarn quality will make one or more hats.
|
SIZE |
1 |
2 |
3 |
4 |
5 |
6 |
|
TO FIT |
Preemie |
Baby |
Toddler |
Child |
Women |
Men |
|
CIRCUMFERENCE |
12" |
14" |
16" |
18" |
20" |
22" |
|
NOTE: Circle the numbers appropriate to the hat size and yarn quality you are making to help keep track of the pattern. HAT-Cuff: With larger hook and first color, chain |
||||||
|
A |
64 |
72 |
84 |
- |
- |
- |
|
B |
52 |
64 |
72 |
80 |
92 |
100 |
|
C |
48 |
56 |
64 |
72 |
80 |
88 |
|
D |
40 |
48 |
56 |
64 |
68 |
76 |
|
E |
40 |
44 |
52 |
56 |
64 |
72 |
|
F |
- |
36 |
44 |
48 |
56 |
60 |
|
G |
- |
24 |
28 |
32 |
32 |
36 |
|
sts; join with a sl st to first ch, being sure ch is not twisted. Rnd 1: Ch 1, sc in same ch as joining and in each ch around; join in the back lp of first sc; turn - the number of sc should be the same as the number of ch. Rnd 2: Ch 1, sc in back lp of each sc around; join in back lp of first sc; turn. Rep Rnd 2 for |
||||||
|
A-F |
2 1/2 |
3 |
4 |
5 |
6 |
6 |
|
inches, do not turn at end of last rnd. Crown: Change to smaller hook and second color. Next Rnd (Right Side): Ch 1, sc in both lps of each sc around; join; do not turn. Rep last rnd with one color or 2 colors for stripes until |
||||||
|
A-F |
5 |
6 |
7 |
9 |
10 |
10 |
|
inches from beg. Shape Top: Ch 1; [draw up a lp in next 2 sc, yo and draw through all 3 lps on hook - dec made; sc in next |
||||||
|
A |
11 |
13 |
16 |
- |
- |
- |
|
B |
8 |
11 |
13 |
15 |
18 |
20 |
|
C |
7 |
9 |
11 |
13 |
15 |
17 |
|
D |
5 |
7 |
9 |
11 |
12 |
14 |
|
E |
5 |
6 |
8 |
9 |
11 |
13 |
|
F |
- |
4 |
6 |
7 |
9 |
10 |
|
G |
- |
1 |
2 |
3 |
3 |
4 |
|
sts, dec, sc in next sc, place marker in last st] 4 times; join to first sc – 8 sts dec. Next Rnd: Ch 1, [dec, sc in each sc to 2 sts before marked st, dec, sc in next sc] 4 times; join. Rep the last rnd until the rnd “Ch 1, [dec, sc in next 0 OR 1 sc, dec, sc in next sc] 4 times” has been worked and 12 OR 16 sts rem. Work 1 rnd even. Cut yarn, leaving a long end; weave through rem sts, draw up tightly and fasten securely. Fold cuff in half to the right side. Optional: Make a pom pom and fasten to top of hat. *Yarn Quality: A = RED HEART® Baby Fingering Traditional and Pompadour. B = RED HEART® Soft Baby; TLC® Baby. C = RED HEART® Sport; Baby Sport Econo. D = RED HEART® Soft; Kids; Baby Teri; Tweed; TLC® Lustre; Heathers. E = RED HEART® Super Saver; Classic; Fiesta; Pounder; Classic Plus; TLC® Essentials. F = RED HEART® Misty. G = RED HEART® Light & Lofty; Baby Clouds. ABBREVIATIONS: beg = beginning; ch = chain; dec = decrease(d); lp = loop; rem = remain(ing); rep = repeat; rnd = round; sc = single crochet; sl = slip; st = stitch; tog = together; yo = yarn over; * = repeat whatever follows the * as indicated; [ ] = work directions given in brackets the number of times specified. |
||||||
Pattern © by Coats & Clark Inc. Reproduced with permission from Coats & Clark Inc. PurpleKittyYarns.com is not endorsed by Coats & Clark Inc. It is not permissible to contract production of projects made from designs published by Coats & Clark to a third party for sale or distribution.
Other free hat patterns:
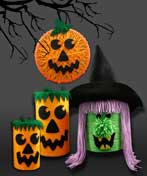
Halloween Yarn Crafts LW1289
Beginner level crafting and crocheting.
Red Heart® Super Saver® Yarn: 100% acrylic, Art. E300 (8 and 6 ounce skeins) or Art. E301 (3 and 2 ½ ounce skeins): Wreath: 6 Ounces No. 254 Pumpkin*; Cat: ½ ounce No. 312 Black; Basket: 2 ounces No. 254 Pumpkin*, ½ ounce No. 312 Black.
* or No. 354 Vibrant Orange.
Wreath: 12" vine wreath; pom-pom maker; 1 yard 1" wide black ribbon.
Cat: Two black 12" chenille stems; pom-pom maker; white covered wire; two 8mm wiggle eyes; small amounts of black and pink felt.
Basket: Gallon size empty, clean plastic bleach bottle; pencil, hole punch; orange spray paint; crochet hook size H-8 [5mm]; small amount black felt.
All: Hot melt glue gun and glue sticks; ruler; scissors; white craft glue.
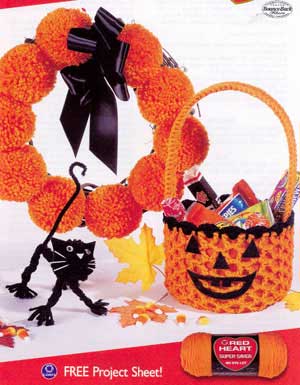
WREATH
Make ten (10) 3" diameter Pumpkin pom poms.
Make a black bow. Glue pom poms and bow to vine wreath with hot melt glue.
CAT
Cut twenty four (24) 16" long Black strands for body and legs. Cut six (6) 6" long Black strands for ties.
Body: With the ends of the 16" strands even, place one chenille stem over the strands, 4" from one (head) end. With a 6" strand, tie yarn and stem together 1" from top of chenille stem. Divide the 24 strands into three bundles of 8 strands, hold the stem together with one of the bundles and make a braid until braid length is approximately 4" long and approximately 5" of unbraided yarn remains. With 6" strand, tie yarn and stem together to secure the braid. A long length of stem will remain for the tail.
Legs: Cut second stem into two 6" pieces. Twist the 1" stem remaining at the head end over the center of a 6" piece to secure, leaving 3" at each side for front legs. Repeat with the stem at the tail end for the back legs. Divide the 5" yarn ends at each end of body into 2 bundles of 12 strands for each leg. Then braid 3 bundles of 4 strands together with a 3" stem until end of stem is reached. Secure braid at "ankle" with a 6" strand of yarn. Trim ends.
Head: Make one 2" Black pom pom and glue to remaining stem at head end of body with hot melt glue. Cut two ¾" triangles from black felt for ears; cut on ¼" triangle from pink felt for nose; cut six (6) 1 ¼" long pieces of white covered wire for whiskers. Glue features in place with craft glue. Bend legs and tail as desired. Glue onto wreath or use as separate decoration.
BASKET
Mark 4" from the bottom of the bleach bottle and repeat around the bottle. Mark again 1" above the 4" marks. Cut from the bottle opening down to the 4" mark, then around the bottle following the 4" marks for the basket. Cut following the 1" marks for the handle.
Punch holes down the center of the handle every ½", beginning ½" from the end. Cut the corners of the handle to round the ends. Make 32 evenly spaced marks ¼" from the top edge of the basket; punch holes over the center of the marks.
Spray basket and handle on all sides with orange paint and allow to dry.
Basket Cover: With Pumpkin yarn, ch 5; join with a sl st to form a ring. Rnd 1: Ch 3, 15 dc in ring; join with a sl st to top of ch-3 -16 sts. Rnd 2: Ch 4, * dc in next dc, ch 1; rep from * around; join to 3rd ch of ch-4 -16 sps. Rnd 3: Sl st in next sp, ch 5, dc in same sp, * (dc, ch 2, dc) all in next sp; rep from * around; join to 3rd ch of ch-5. Rnds 4-10: Sl st in next sp, ch 6, dc in same sp, * (dc, ch 3, dc) all in next sp; rep from * around; join to 3rd ch of ch-6. Fasten off. (Note: Stretch cover over basket to check height of cover before fastening off and work more or fewer rnds to fit.) Edging: Stretch cover over basket and align ch-3 sps with holes. With Black, make a slip knot on hook, * insert hook between dcs and into hole of basket and complete a sl st, ch 1, 3 dc in next ch-3 sp and hole, ch 1; rep from * around; join to first sl st. Fasten off. Weave in ends.
Handle: With Pumpkin, make a slip knot on hook, work 2 sc in each hole across long sides and 6 sc in each of the 2 end holes; join. Fasten off. With hot melt glue, glue ends of handle to inside of basket.
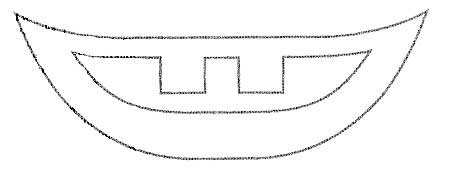
Face: Cut three 1" triangles from black felt for two eyes and a nose. Cut one mouth from black felt following template. Glue features to front of basket with craft glue.
ABBREVIATIONS: beg = beginning; ch = chain; dc = double crochet; mm = millimeters; rep= repeat; sc = single crochet; sl st = slip stitch; sp(s) = space(es); st(s) = stitch(es); * or ** = repeat whatever follows the * or ** as indicated.
Pattern © by Coats & Clark Inc. Reproduced with permission from Coats & Clark Inc. PurpleKittyYarns.com is not endorsed by Coats & Clark Inc. It is not permissible to contract production of projects made from designs published by Coats & Clark to a third party for sale or distribution.
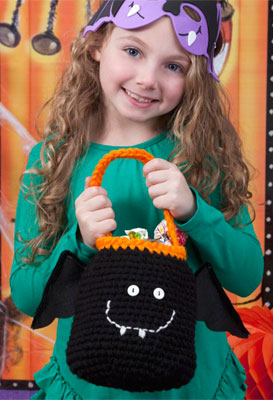
Happy Bat Bag LW2788
Perfect for filling with candy as youngsters go door to door, this whimsical bag is fun to crochet. Wings are cut from felt and grinning face is embroidered. Without the handle it will also serve as a treat bowl.
Skill Level: EASY
Bag measures 7½" tall x 5" diameter at top.
Red Heart® Super Saver®: 1 Skein 312 Black A, small amounts 254 Pumpkin B and 316 Soft White C.
Crochet Hook: 5.5mm [US I-9]
Stitch markers
Yarn needle
Two white buttons
Two black chenille stems
5" X 10" piece black felt
Hand sewing needle and black thread
Hot glue gun and glue
GAUGE: 6 sc and 6 rows = 2". CHECK YOUR GAUGE. Use any size hook to obtain the gauge.
NOTE: Hold 2 strands together for bag.
Special Stitches
Decrease single crochet (sc2tog) = [Draw up a loop in next st] twice, yarn over and draw through all 3 loops on hook.
Reverse single crochet (rsc) = Working from left to right, insert hook into next st, yo, pull up loop, yo, pull through both loops on hook.
BAG
Round 1: With A, ch 2; 8 sc in 2nd ch from hook. Do not join, work in continuous rounds (spirals). Place a marker for beginning of round. Move marker up as each round is completed - 8 sc.
Round 2: 2 sc in each sc around - 16 sc.
Round 3: [Sc in next sc, 2 sc in next sc] 8 times - 24 sc.
Round 4: [Sc in next 2 sc, 2 sc in next sc] 8 times - 32 sc.
Round 5: [Sc in next 3 sc, 2 sc in next sc] 8 times - 40 sc.
Round 6: [Sc in next 4 sc, 2 sc in next sc] 8 times - 48 sc.
Round 7: [Sc in next 5 sc, 2 sc in next sc] 8 times - 56 sc.
Rounds 8 - 10: Sc in each sc around.
Round 11: [Sc in next 6 sc, 2 sc in next sc] 8 times - 64 sc.
Rounds 12 - 20: Sc in each sc around.
Round 21: [Sc in next 6 sc, sc2tog] 8 times - 56 sc.
Round 22: Sc in each sc around.
Round 23: [Sc in next 5 sc, sc2tog] 8 times - 48 sc.
Round 24: Sc in each sc around.
Fasten off.
Round 25: Join B with sc in any st; sc in each sc around; join with slip st in first sc.
Round 26: Ch 1, rsc in each sc around.
Fasten off.
Handle
Using 2 strands of B, ch 23.
Row 1: Working in back bumps of chains, sc in 2nd ch from hook and in each ch to end. Join with a slip st to first sc - 22 sc. Fasten off.
Bat Wings (Make Two)
Cut wing shape from felt. Glue chenille stem to outer edge of felt wing. Trim chenille stem ends. Sew wings to back of bag
Finishing
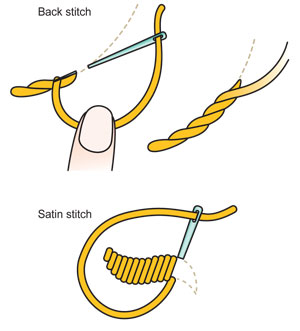
Weave in ends. Sew on buttons for eyes. Sew on handle. Using single strand of C and yarn needle, embroider grin in back stitch and two fangs in satin stitch.
ABBREVIATIONS: A, B, C, etc. = Color A, Color B, Color C, etc; ch = chain; mm = millimeters; sc = single crochet; st(s) = stitch (es); yo = yarn over; [ ] = work directions in brackets the number of times specified.
Pattern © by Coats & Clark Inc. Reproduced with permission from Coats & Clark Inc. PurpleKittyYarns.com is not endorsed by Coats & Clark Inc. It is not permissible to contract production of projects made from designs published by Coats & Clark to a third party for sale or distribution.
Happy Hearts Afghan WR1658

Skill Level: EASY
Afghan measures approximately 40" wide x 48" long.
RED HEART® "Super Saver®": 2 Skeins each 774 Lt. Raspberry CA, 376 Burgundy CB, 378 Claret CC, 358 Lavender CD, and 776 Dark Orchid CE.
Crochet Hook: 5mm [US H-8].
Stitch marker (optional), yarn needle.
GAUGE: Square = 4½" x 4½”. CHECK YOUR GAUGE. Use any size hook to obtain the gauge.
SPECIAL ABBREVIATIONS:
sc2tog = [insert hook in next st and draw up a lp] twice, yo and draw through all 3 lps on hook-one sc decreased.
SOLID SQUARE (Make 20-4 in each color): Ch 5; join with a sl st in first ch to form a ring.
Rnd 1: Ch 3, 2 dc in ring, ch 2, [3 dc in ring, ch 2] 3 times; join with a sl st in top of ch-3.
Rnd 2: Ch 3, dc in next 2 dc, (2 dc, ch 2, 2 dc) all in next ch-2 sp, [dc in next 3 dc, (2 dc, ch 2, 2 dc) all in next ch-2 sp] 3 times; join.
Rnd 3: Ch 3, dc in next 4 dc, (2 dc, ch 2, 2 dc) all in next ch-2 sp, [dc in next 7 dc, (2 dc, ch 2, 2 dc) all in next ch-2 sp] 3 times, dc in next 2 dc; join.
Rnd 4: Ch 3, dc in next 6 dc, (2 dc, ch 2, 2 dc) all in next ch-2 sp, [dc in next 11 dc, (2 dc, ch 2, 2 dc) all in next ch-2 sp] 3 times, dc in next 4 dc; join - 15 dc between corner sps. Fasten off.
SINGLE-ROW STRIPE SQUARE (Make 20): With color CA, CB, CC, CD or CE, work Rnds 1-3 same as for Solid Square for 4 squares per color, then work Rnd 4 of each square with a different contrasting color.
DOUBLE-ROW STRIPE SQUARE (Make 20): With color CA, CB, CC, CD or CE, work Rnds 1 and 2 same as for Solid Square for 4 squares per color, then work Rnds 3 and 4 of each square with a different contrasting color.
TRIPLE-ROW STRIPE SQUARE (Make 20): With color CA, CB, CC, CD or CE, work Rnd 1 same as for Solid Square for 4 squares per color, then work Rnds 2-4 of each square with a different contrasting color.
HEART (Make 20-4 in each color): Ch 11.
Point-Row 1 (Right Side): Sc in 2nd ch from hook and in each ch across; turn - 10 sc.
Row 2: Ch 1, sc in each sc to last 2 sc; sc2tog; turn - 9 sc.
Rows 3-7: Rep Row 2 - 4 sc at end of Row 7.
Row 8: Ch 1, [sc2tog] twice; turn - 2 sc.
Row 9: Ch 1, sc2tog - 1 sc. Fasten off.
Bumps-Row 1: With right side facing and working in rem lps of beg ch, join yarn in the first ch; ch 1, sc in same ch and next 4 ch; turn - 5 sc.
Row 2: Ch 1, sc in each sc across.
Row 3: Sc2tog, sc in next sc, sc2tog. Fasten off.
With right side facing, join yarn in next free lp of beg ch and rep Rows 1-3.
FINISHING: Weave in ends. Sew hearts to Solid Squares, ensuring that the heart and square color are different. Randomly arrange all squares into an 8 square x 10 square grid, and sew together.
Edging is worked in short rows across 1 or more squares in different colors. When fastening off, leave a yarn tail to sew the seams between edging sections.
LOWER EDGING-Row 1: With right side facing, join CA in lower left corner of afghan; ch 3, dc evenly across 3 squares; turn.
Rows 2-4: Ch 3, skip first dc, dc in next dc and in each dc across and in top of ch-3; turn. Fasten off. Join CB and work 4 rows dc across next 2 squares of lower edge. Fasten off. Join CC and work 4 rows dc across next 3 squares. Fasten off.
SIDE EDGING: Join CD and work 4 rows dc across row ends of last edging section and next 3 squares. Fasten off. Join CE and work 4 rows dc across next 4 squares. Fasten off. Join CA and work 4 rows dc across one square. Fasten off. Join CB and work 4 rows dc across next 2 squares. Fasten off.
TOP EDGING: Join CC and work 4 rows dc across row ends of last edging section and next 4 squares. Fasten off. Join CD and work 4 rows dc across next 3 squares. Fasten off. Join CE and work 4 rows dc across one square. Fasten off.
SIDE EDGING: Join CA and work 4 rows dc across row ends of last edging section and next 2 squares. Fasten off. Join CB and work 4 rows dc across next 3 squares. Fasten off. Join CD and work 4 rows dc across next 2 squares. Fasten off. Join CE and work 4 rows dc across last 3 squares and row ends of first edging section. Fasten off. Sew ends of edging sections tog. Weave in ends.
ABBREVIATIONS: beg = beginning; CA, CB, etc. = color A, B, etc.; ch = chain; dc = double crochet; lp = loop; mm = millimeters; rem = remaining; rep = repeat; rnd = round; sc = single crochet; sl = slip; sp = space; tog = together; yo = yarn over; * = repeat whatever follows the * as indicated; [ ] = work directions in brackets the number of times specified.
Pattern © by Coats & Clark Inc. Reproduced with permission from Coats & Clark Inc. PurpleKittyYarns.com is not endorsed by Coats & Clark Inc. It is not permissible to contract production of projects made from designs published by Coats & Clark to a third party for sale or distribution.
Haunting Goodies! WR1044
Skill Level: Beginner
Designed by Barbara Swanson
MATERIALS
Pumpkin Canisters and Hoop: 1 Skein No. 254 Pumpkin CC for each canister or hoop.
Witch Canister: 1 Skein No. 672 Spring Green CA, 2 skeins No. 530 Orchid CB.
Additional Materials:
White craft glue, small brush, hot glue gun and sticks, scissors, optional paint to match face color.
Pumpkin Canister: 18 or 42 Ounce oatmeal canister with lid – empty and clean, black and green felt.
Pumpkin Hoop: 12" Yellow Susan Bates® "Hoop-La™" hoop, orange jumbo rick rack, black and green felt.
Witch Canister: 3 Pound coffee can with plastic lid – empty and clean, Susan Bates® Pom Pom Maker, 1/3 yard of black felt, scraps of yellow felt, two purchased 1/2" black pom poms.
Pumpkin Canisters (A)
1. Paint label of canister if desired and let dry. Brush on glue along lower 1" of canister. Coil CC along edge and around canister, having each round of yarn touching the previous round but not overlapping. Continue to brush on glue and coil yarn to within 1/4" of top edge, leaving top 1/4" free to allow lid to fit. Cut yarn.
2. Cut facial features from black felt and glue in place as pictured.
Top: Trace circumference of canister lid onto center of green felt. Mark 1 1/4" for small canister or 1 1/2" for large canister all around the outside of this circle and cut out the larger circle. Cut out triangular shapes to within 1/4" of center circle to form jagged edge. Glue to lid top and side edges. Cut a few more triangles from remaining felt for "leaves" and glue to center of lid top.
Pumpkin Hoop (B)
1. Separate hoop sections; set outer hoop aside. Glue CC yarn end to outer edge of inner hoop. Wind yarn firmly across hoop, criss-crossing as pictured until desired fullness is achieved. Wind firmly enough to prevent sagging or loops but not tight enough to distort hoop shape. Glue yarn end to edge of hoop. Spread glue all along outer edge of yarn-covered hoop. Put outer hoop in place over inner hoop and tighten screw. Glue rick rack over edge of hoop.
2. Cut facial features from black felt. Glue in place noting that the hoop screw is at the top of the face. Cut a few triangular leaf shapes from the green felt and glue in place at top.
Witch Canister (C)
1. Paint label of can if desired and let dry. Brush on glue along lower 1" of can. Coil CA along edge and around can, having each round of yarn touching the previous round but not overlapping. Continue to brush on glue and coil yarn to within 1/4" of top edge, leaving top 1/4" free to allow lid to fit. Cut yarn.
2. Cut out felt facial features and glue to can over yarn as pictured. Make 2" pom pom from CA for nose. Glue nose pom pom and black eye pom poms in place.
Hair: Cut 80 28" lengths of CB; tie together at center with a separate length of yarn. Cut 80 20" lengths of CB; tie together 5" from one end with a separate length of yarn. Glue tied area of first bundle to center of can lid, spread strands to cover opposite quarters of lid and glue in place. Repeat with second bundle, gluing tied area to first tied area and spreading strands to cover remaining 2 quarters of lid; glue. The short strands become the front bangs of the witch's hair. Trim.
Hat: Cut a 12" diameter full circle and an 18" diameter half circle from black felt. Glue circle over hair on lid. Over lap straight edges of half circle several inches to form a cone for top of hat. Trim excess felt; glue over lapped edges. Center open edge of cone over top of hat and glue.
Pattern © by Coats & Clark Inc. Reproduced with permission from Coats & Clark Inc. PurpleKittyYarns.com is not endorsed by Coats & Clark Inc. It is not permissible to contract production of projects made from designs published by Coats & Clark to a third party for sale or distribution.
Heart Bouquet WR1083
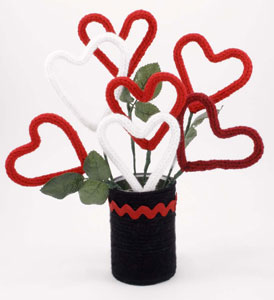
Skill Level: BEGINNER
Designed by Elizabeth Hill.
Hearts measure approximately 3½" x 3½" without stems.
RED HEART® "Super Saver®": 2 Ounces each of 4 colors:
|
Option 1 |
Option 2 |
CA |
724 Baby Pink |
319 Cherry Red |
CB |
722 Pretty 'n Pink |
376 Burgundy |
CC |
905 Magenta |
311 White |
CD |
786 Candy Print |
312 Black |
Susan Bates® French Knitter Spool, Small, Art. 14102. Yarn needle; 18" floral wire stems - 18 gauge; ½" wide floral tape; "silk" leaf groups; 15 ounce vegetable can-washed and dried for vase; white craft glue; 1" wide foam brush; scissors.
Heart Flowers:
1. Following instructions included in the package, make 10" and 12" cords using the French Knitter and CA, CB, and CC or colors of your choice. Weave in yarn ends.
2. Thread wire down the center of the cord so that 1" of the wire extends beyond the cord at the opposite end. Do not trim the long end; it will be used to create the heart flower stem.
3. Measure to find the center of the cord. Bend in half at the center to form the "V" at the upper part of the heart.
4. Wrap the right side around the French Knitter or a spool of thread to form a curve. Repeat with the left side; twist wire ends together at the lower part of the heart to close the heart. The remaining section of wire will become the stem for the heart flower.
5. Starting at the base of the heart flower, wrap wire with floral tape to the end of the wire, adding a leaf group if desired. Note: To make longer stems, add floral wire stems as needed and cover with floral tape.
Vase:
1. Wash and dry an empty 15 ounce vegetable or fruit can.
2. Apply glue with the foam brush 1" at a time around the can, beginning at the top. Wrap CD yarn around the can over the glued section, adjusting as you go along. Repeat gluing and wrapping until the can is covered. Cut yarn. (Optional: Spray paint can black before wrapping for better coverage of the can.)
3. Decorate the can as desired with rick-rack or ribbon.
4. Fill can with glass beads, marbles, small stones or sand to add stability to the vase.
Pattern © by Coats & Clark Inc. Reproduced with permission from Coats & Clark Inc. PurpleKittyYarns.com is not endorsed by Coats & Clark Inc. It is not permissible to contract production of projects made from designs published by Coats & Clark to a third party for sale or distribution.
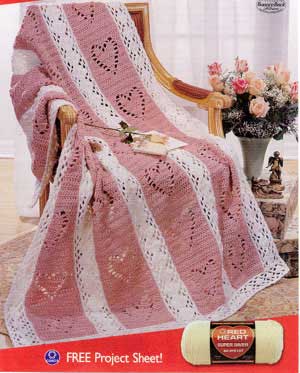
Hearts & Diamonds LW1335
Intermediate experience required.
Throw measures approximately 48" x 65 ½”.
Red Heart® Super Saver®, 100% acrylic, Art. E300 (8 ounce solid and 6 ounce multicolor skeins): 21 Ounces No. 372 Rose Pink CA and 17 ounces No. 316 Soft White CB.
Crochet Hooks: 5.5mm [US I-9] and 5mm [US H-8]. Yarn needle.
GAUGE: 21 sts = 7”; 14 rows = 8 ½” in dc with larger hook. CHECK YOUR GAUGE. Use any size hook to obtain the gauge.
PANEL: With larger hook and CA, ch 23. Row 1 (Right Side): dc in 4th ch from hook and in each ch across; turn - 21 sts.
Row 2: Ch 3, skip first dc, dc in next dc and in each dc across, dc in top of ch-3; turn.
Row 3: Ch 3, dc in next 7 dc; [yo, draw up a lp in next st, yo, draw through 2 lps] 3 times, yo, draw through all 4 lps on hook - dc3tog made; ch 3, dc3tog working first dc in same st as last dc of last dc3tog, dc in last 8 sts; turn.
Row 4: Ch 3, dc in next 6 dc; [yo, draw up a lp in next st, yo, draw through 2 lps on hook] twice, yo, draw through all 3 lps on hook - dec made; ch 5, dec, dc in last 7 sts; turn.
Row 5: Ch 3, dc in next 5 dc, dec, ch 3, working over the ch-5, 3 dc in 2nd ch of ch-3 two rows below, ch 3, dec, dc in last 6 sts; turn.
Row 6: Ch 3, dc in next 4 dc, dec, ch 3; 2 dc in next dc - inc made; dc in next dc, inc, ch 3, dec, dc in last 5 sts; turn.
Row 7: Ch 3, dc in next 3 dc, dec, ch 3, inc, dc in next 3 dc, inc, ch 3, dec, dc in last 4 sts; turn.
Row 8: Ch 3, dc in next 2 dc, dec, ch 3, inc, dc in next 5 dc, inc, ch 3, dec, dc in last 3 sts; turn.
Row 9: Ch 3, dc in next dc, dec, ch 3, dc in next 3 dc, dec, ch 4, dec working first dc in same st as last dc of last dec, dc in next 3 dc, ch 3, dec, dc in last 2 sts; turn.
Row 10: Ch 3, dc in next 2 dc, ch 3, dc in next 4 dc, ch 4, sc in lp, ch 4, dc in next 4 dc, ch 3, dc in last 3 sts; turn.
Row 11: Ch 3, dc in next dc, inc, ch 3; [draw up a lp in next dc] 4 times, yo, draw through all 5 lps on hook - 4sctog made; ch 4, sc in next lp, hdc in sc, sc in next lp, ch 4, 4sctog, ch 3, inc, dc in last 2 sts; turn.
Row 12: Ch 3, dc in next 2 dc, inc, ch 2, 2 sc in next lp, sc in next 3 sts, 2 sc in next lp, ch 2, inc, dc in last 3 sts; turn.
Row 13: Ch 3, dc in next 4 dc, dc in each of next 2 ch, dc in next 7 sts, dc in each of next 2 ch, dc in last 5 sts; turn - 21 sts. Rows 14 and 15: Rep Row 2.
Rep Rows 2-15 6 more times; with right side still facing, ch 1, work 201 sc down long edge. Fasten off. With right side facing, attach yarn and work 201 sc across rem long edge. Fasten off.
Wide Border-Row l: With right side facing and smaller hook, attach CB in first sc at lower right edge; ch 1, sc in each sc across; turn.
Row 2: Ch 5, skip first 2 sc, sc in next sc, * ch 5, skip 3 sc, sc in next sc; rep from * to last 2 sc; ch 2, dc in last sc; turn.
Row 3: Ch 1, sc in dc, * ch 5, sc in ch-5 lp; rep from * across, working last sc in 3rd ch of ch-5; turn.
Row 4: Ch 5, sc in ch-5 lp, * 3 dc in next sc, sc in next lp **, ch 5, sc in next lp; rep from * to last sc, end at **; ch 2, dc in last sc; turn.
Row 5: Ch 1, sc in dc, * 3 dc in next sc, skip next dc, sc in next dc, 3 dc in next sc, sc in next lp; rep from * across, end as Row 3.
Row 6: Ch 5, skip next dc, * sc in next dc, 3 dc in next sc, skip next dc, sc in next dc **, ch 5, skip next 3 sts; rep from * to last 2 sts, end at **; ch 2, skip next dc, dc in last sc; turn.
Row 7: Ch 1, sc in dc, * ch 5, skip next dc, sc in next dc, ch 5, sc in next lp; rep from * across, end as Row 3.
Row 8: Ch 4, sc in lp, * ch 3, sc in lp; rep from * to last sc; ch 1, dc in last sc; turn.
Row 9: Ch 1, sc in dc, sc in ch-l sp, sc in sc, * 3 sc in ch-3 sp, sc in sc; rep from * to last sp; sc in next sp, sc in 3rd ch of ch-4. Fasten off.
Narrow Border: With right side facing, rep Rows 1-5 only on opposite side of panel.
LEFT PANEL: Work same as Right Panel, reversing placement of Wide and Narrow Borders.
CENTER PANELS (Make 2): Work same as Right Panel EXCEPT work Narrow Border on each side of both panels.
FINISHING: Sew panels together. Lower Edging: With right side facing and larger hook, attach CB in corner; ch 1, 13 sc across border, [23 sc across panel, 14 sc across border] 4 times; turn - 161 sc. Work Wide Border Rows 2-4, then Rows 7-9. Fasten off. Rep Edging on upper edge. Attach CB and work 9 sc across each side of Upper and Lower Edgings. Weave in ends.
ABBREVIATIONS: CA, CB = Color A, Color B; ch = chain; dc = double crochet; hdc = half double crochet; lp = loop; mm = millimeters; rem = remain(ing); rep = repeat; sc = single crochet; sl = slip; sp = space; st(s) = stitch(es); yo = yarn over; * or ** = repeat whatever follows the * or ** as indicated; [ ] = work directions given in brackets the number of times specified.
Designed by Marilyn Coleman.
Pattern © by Coats & Clark Inc. Reproduced with permission from Coats & Clark Inc. PurpleKittyYarns.com is not endorsed by Coats & Clark Inc. It is not permissible to contract production of projects made from designs published by Coats & Clark to a third party for sale or distribution.
Other free crochet afghan patterns:
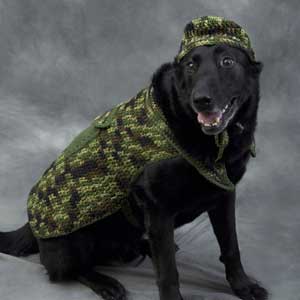
Hunter Dog WR1786
Designed by Darla Sims
Skill Level: EASY
Directions are for size Small. Changes for sizes Medium and Large are in parentheses.
RED HEART® "Super Saver": 1 skein each 971 Camouflage A and 406 Medium Thyme B
Crochet Hooks: 4mm [US G-6], 5mm [US H-8], 5.5mm [US I-9].
Stitch marker.
Yarn needle.
Two buttons, ⅞" diameter.
Two 1" D-rings.
GAUGE: 12 sts = 4" using 5.5mm [US I-9] hook. CHECK YOUR GAUGE. Use any size hook to obtain the specified gauge.
Finished Chest: 16-19 (20-25, 26-32)".
Finished Length: 10 (14, 17)".
NOTE: Different sizes of Cap are made by changing hook sizes.
LOWER BODY
With A and 5.5mm [US I-9] hook, ch 20 (38, 50).
Row 1 (RS): Dc in 4th ch from hook and in each ch across, turn - 18 (36, 48) dc.
Row 2: Ch 3 (counts as dc), 2 dc in first st, dc in each st to last st, 3 dc in last st, turn - 22 (40, 52) dc.
Row 3: Ch 3, dc in each st across, turn.
Row 4: Ch 3 (counts as dc), 2 dc in first st, dc in each st to last st, 3 dc in last st, turn - 26 (44, 56) dc.
Row 5: Ch 3, dc in each st across, turn.
Row 6: Ch 3 (counts as dc), 2 dc in first st, dc in each st to last st, 3 dc in last st, turn - 30 (48, 60) dc.
Rows 7-10 (12, 14): Ch 3, dc in each st across, turn.
Row 11 (13, 15)-14 (18, 20): Ch 2, dc in next st (counts as dc2tog), dc in each st to last 2 sts, dc2tog - 22 (36, 48) dc.
Rows 15 (19, 21)-16 (22, 28): Ch 3, dc in each st across.
Do not fasten off.
Shape Neck
Using separate length of A, join yarn to first st of last row, ch 8 (9, 9) for Collar.
Fasten off.
Row 1: With right side facing, insert hook in last st of last row worked, ch 9 (10, 10) for Collar, sc in 2nd ch from hook and each ch, sc in next 22 (36, 48) dc, sc in next 8 (9, 9) ch, turn - 38 (54, 66) sts.
Rows 2-2 (4, 4): Ch 1, sc in each st across, turn.
Shape Collar
Row 1: Ch 1, 2 sc in first st, sc in each st to last st, 2 sc in last st, turn - 40 (56, 68) sc.
Rows 2-6 (8, 8): Ch 1, 2 sc in first sc, sc in each st to last sc, 2 sc in last sc - 50 (70, 82) sc.
Fasten off.
With B and 5.5mm [US I-9] hook, ch 13 (15, 17).
Row 1: Sc in 2nd ch from hook and in each ch across, turn - 12 (14, 16) sc.
Rows 2-12 (14, 16): Ch 1, sc in each st across, turn.
Do not fasten off.
Edging
Round 1: With right side facing, ch 1, 2 sc in first sc, sc evenly spaced around, working 3 sc in each corner, sc in first corner, slip st to first st to join.
Fasten off.
Pocket Flap
With A and 5.5mm [US I-9] hook, ch 14 (16, 18).
Row 1: Sc in 2nd ch from hook and in each ch across, turn - 13 (15, 15) sc.
Row 2: Ch 1, sc in each st across, turn.
Row 3: Ch 1, sc3tog, sc in each st to last 3 sts, sc3tog - 9 (11, 11) sc.
Fasten off.
FINISHING
Body Edging
Row 1: With right side facing, join B at upper Body next to neck with sc, work 31 (43, 49) sc along side to lower corner, work 3 sc in corner, work 15 (34, 46) sc along lower edge, work 3 sc in corner, work 32 (44, 50) sc along edge to upper neck.
Fasten off.
Collar Edging
Round 1: With right side facing, join B in first sc of Body Edging, sc in next 7 (8, 8) sc, work 3 sc in corner of Collar, working in edges of neck rows, work sc, ch 4 for button loop, slip st in last sc made, sc in next 1 (2, 2) sc along edge of collar, work 3 sc in corner of Collar, work 48 (68, 80) sc to next Collar corner, work 3 sc in corner, work 5 (7, 7) sc along edges of Collar, work 3 sc in corner, work 7 (8, 8) sc to last st of Body Edging, slip st to first st to join.
Fasten off.
Flap Edging
Round 1: Working in opposite edge of beginning ch, join A in first ch with sc, sc again in same ch, sc in next 12 (14, 14) ch, work 3 sc in corner, work 3 sc along side edge, work 3 sc in corner, sc in next 3 (4, 4) sc, ch 4 for button loop, slip st in same st as last sc, sc in next 3 (4, 4) sc, sc in same st as beginning sc, slip st to first sc to join.
Fasten off.
Sew Pocket Flap on top edge of Pocket. Sew Pocket to center of Body.
Sew buttons opposite button loops.
D-Ring Tab
Row 1: Place marker on left side 6 (7, 8 ½)" from bottom edge. Using 5.5mm [US I-9] hook, join A with sc in 3rd st above marker, sc in next 2 sts, turn.
Rows 2-4: Ch 1, sc in each st across, turn.
Fasten off, leaving an 8" tail.
Fold tab over both D rings and sew end to inside edge of Body.
Strap
Row 1: With right side facing, join A with sc in opposite D-Ring Tab, sc in next 2 sts, turn.
Work even in sc until Strap measures 11 (12, 12)" or desired length.
Fasten off.
Weave in ends.
CAP
Note: Work Size Small using 4mm [US G-6] hook, Size Medium using 5mm [US H-8] hook, and Size Large using 5.5mm [US I-9] hook.
Round 1: With A, ch 2, work 8 sc in 2nd ch from hook. Do not join. Place marker for beginning of round.
Round 2: Work 2 sc in each sc around - 16 sc.
Round 3: [Sc in next sc, 2 sc in next sc] 8 times - 24 sc.
Round 4: [Sc in next 2 sc, 2 sc in next sc] 8 times - 32 sc.
Round 5: [Sc in next 3 sc, 2 sc in next sc] 8 times - 40 sc.
Round 6: Working in back loop only, sc in each sc around, sl st to first st to join.
Rounds 7-10: Ch 3 (counts as dc), working in both loops, dc in each st around, slip st to top of beginning ch. Fasten off.
Shape Bill
Row 1: With right side facing and working around bottom of Cap, join A in 16th sc after first st, sc in next st, hdc in next 3 sts, dc in next 2 sts, 3 dc in next st, dc in next 2 sts, hdc in next 3 sts, sc in next 2 sts, turn - 17 sts.
Row 2: Ch 1, sc in first 7 sts, 2 sc in each of next 3 sts, sc in last 7 sts, turn.
Row 3: Ch 1, work in sc around outer edge of Cap and Bill, slip st to first st to join.
Fasten off.
Ties (Make 2)
Join A at side of hat, ch 40.
Fasten off.
Weave in ends.
ABBREVIATIONS: ch = chain; dc = double crochet; dc2tog = double crochet 2 sts together; hdc = half double crochet; mm = millimeters; sc = single crochet; sc3tog = single crochet 3 sts together; st(s) = stitch(es); yo = yarn over needle; [ ] = work directions in brackets the number of times specified; * or ** = repeat whatever follows the * or ** as indicated.
Pattern © by Coats & Clark Inc. Reproduced with permission from Coats & Clark Inc. PurpleKittyYarns.com is not endorsed by Coats & Clark Inc. It is not permissible to contract production of projects made from designs published by Coats & Clark to a third party for sale or distribution.
Jack-O-Lantern Pin WR2001
Designed by Kim Kotary
Skill Level: Beginner
Pin measures 3 ½" in diameter.
RED HEART® "Super Saver®": 1 skein each 256 Carrot or 254 Pumpkin A, 389 Hunter Green B, 312 Black C.
Crochet Hook: 5.5mm [US I-9]
Safety pin or other pin back, stitch marker, yarn needle.
GAUGE: 12 single crochet = 4"; 16 rows = 4". CHECK YOUR GAUGE. Use any size hook to obtain the gauge. Gauge is not essential for this project but will affect finished size.

PUMPKIN
With A, chain 2.
Round 1: Work 6 single crochet in 2nd chain from hook - 6 single crochet. Working in continuous rounds, place marker for beginning of round.
Round 2: Work 2 single crochet in each stitch around - 12 single crochet.
Round 3: Work [2 single crochet in next stitch, single crochet in next stitch] 6 times - 18 single crochet.
Round 4: Work [2 single crochet in next stitch, single crochet in next 2 stitches] 6 times - 24 single crochet.
Round 5: Work [2 single crochet in next stitch, single crochet in next 3 stitches] 6 times - 30 single crochet. Fasten off.
STEM
Join B with a slip stitch in any stitch.
Row 1: Chain 1, single crochet in next 2 stitches, slip stitch in next stitch.
Row 2: Chain 1, turn, slip stitch in slip stitch, single crochet in each single crochet across.
Repeat Rows 1 & 2 once more.
Fasten off.
FINISHING
Weave in ends. With C and straight stitches, embroider face on Front. Attach a pin to Back.
ABBREVIATIONS: A, B, etc= color A, B, etc; mm = millimeters; [ ] = work directions in brackets the number of times specified.
Pattern © by Coats & Clark Inc. Reproduced with permission from Coats & Clark Inc. PurpleKittyYarns.com is not endorsed by Coats & Clark Inc. It is not permissible to contract production of projects made from designs published by Coats & Clark to a third party for sale or distribution.
| Pattern Categories Browse the categories to help you find the patterns you're looking for. |
||
|
|
    
|

|
Navigation

All contents © 2003-2022 Purple Kitty LLC. All rights reserved.
Privacy Policy | FAQ | About Me | Newsletters | Sitemap