 |
Red Heart Super Saver
Crochet Box of Chocolates WR1086
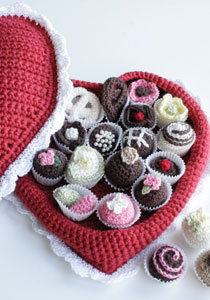
Designed by Michele Wilcox.
Skill Level: INTERMEDIATE
Box measures approximately 9" across and 8" from "V" to bottom point. Candies measure approximately 1¼" across.
BOX
RED HEART® "Super Saver®": 4 Ounces 332 Ranch Red CA.
RED HEART® "Luster Sheen®": 2 Ounces 1 White CB.
Crochet Hooks: 3.5mm [US E-4] and 3.75mm [US F-5].
Yarn needle; small amount of polyfil stuffing; two 8" x 11" cardboards.
GAUGE: 16 sts = 4"; 16 rows = 3½" in sc with CA and larger hook. CHECK YOUR GAUGE. Use any size hook to obtain the gauge.
SPECIAL ABBREVIATIONS:
Dec = draw up a lp in each of next 2 sc, yarn over and draw through all 3 lps on hook.
Double dec = draw up a lp in each of next 3 sc, yarn over and draw through all 4 lps on hook.
BOTTOM OF BOX-Top Section: ** With larger hook and CA, ch 2.
Row 1 (Right Side): 3 Sc in 2nd ch from hook; turn - 3 sc.
Row 2: Ch 1, 2 sc in first sc, sc in next sc, 2 sc in last sc; turn - 5 sc.
Row 3: Ch 1, 2 sc in first sc, sc in each sc to last sc, 2 sc in last sc; turn - 7 sc.
Row 4: Ch 1, sc in each sc across; turn.
Rows 5 and 6: Rep Row 3 - 11 sc at end of Row 6.
Rows 7-21: Rep Rows 4-6 five times - 31 sc at end of Row 21.
Rows 22-28: Ch 1, sc in each sc across; turn.
Row 29: Ch 1, dec over first 2 sc, sc to last 2 sc, dec; turn - 29 sc.
Divide for Heart Shape-Row 30: Ch 1, sc in first 14 sc; turn and leave rem sts unworked.
Rows 31 and 32: Ch 1, sc in each sc across; turn.
Row 33: Ch 1, dec over first 2 sc, sc to end; turn - 13 sc.
Row 34: Rep Row 29 - 11 sc.
Row 35: Rep Row 22.
Row 36: Rep Row 29 - 9 sc.
Row 37: Rep Row 22.
Row 38: Rep Row 29 - 7 sc. Fasten off.
With wrong side facing, skip next st of last long row, join yarn in next st; ch 1, sc in same sc and in each sc across; turn - 14 sc. Complete to correspond to first side, reversing shaping of Row 33.
Edging and Side: With right side facing and larger hook, join CA and work 1 rnd sc evenly around entire heart, working 3 sc in point; join with a sl st in first sc. Do not fasten off. **
Place heart over cardboard and trace around heart. Cut 2 hearts from cardboard slightly smaller than crocheted heart, set aside.
Next Rnd: Ch 1, sc in front lps only of each sc around; join.
Next 6 Rnds: Ch 1, sc in both lps of each sc around.
Fasten off.
BOTTOM OF BOX-Lower Section: Work same as Top Section from ** to **.
Join Sections: Holding pieces wrong sides tog and matching st for st, sc through both Ips of sc on Lower Section and through rem back Ips on Top Section around AND INSERT ONE CARDBOARD piece before closing the rnd; join. Fasten off.
Lace Edging-Rnd 1: With smaller hook, join CB to any sc of joining rnd; ch 1, 2 sc in each sc around; join.
Rnd 2: Ch 1, sc in same sc as joining, * skip next 2 sc, 5 dc in next sc, skip next 2 sc, sc in next sc, ch 3, skip next sc **, sc in next sc; rep from * around, end at ** adjusting as necessary; join. Fasten off. Weave in ends.
TOP OF BOX-Lower Section: Work same as Bottom of Box-Top Section from ** to **.
Next Rnd: Ch 1, working in front lps only, * sc in next sc **, skip next 2 sc, 5 dc in next sc, skip next 2 sc; rep from * around, end at **, adjusting as necessary; join. Fasten off.
Top Section: Make another heart in the same manner through the first sc rnd. Join the 2 top pieces same as joining the bottom pieces except add a little stuffing between the cardboard and Top Section of box. Rep Lace Edging on top of box.
Flower: With smaller hook and CB, ch 6; join with a sl st in first ch to form a ring.
Rnd 1: Ch 3, 17 dc in ring; join with a sl st in back lp of top of ch-3 - 18 sts.
Rnd 2: Work all in front lps, [ch 1, hdc in same lp as last sl st, 3 dc in next lp, hdc in next lp, ch 1, sl st in next lp] 6 times.
Rnd 3: Ch 1, holding petals toward you, sl st in first back lp of Rnd 1, ch 1, sc in same lp, * 2 sc in next back lp **, sc in next lp, rep from * around, end at **; join with a sl st in first sc - 27 sc.
Rnd 4: [Ch 2, dc in same sc as last sl st, 3 tr in next sc, dc in next sc, ch 2, sl st in next sc] 9 times. Fasten off. Sew to top center of box.
CHOCOLATES
RED HEART® "Luster Sheen®": 1 Ounce 360 Chocolate CA, ¾ ounce 7 Vanilla CB; small amounts 615 Tealeaf CC, 332 Tan CD, 227 Buttercup CE, 235 Think Pink CF, and 915 Cherry Red CG.
Crochet Hook: 3.5mm [US E-4].
Yarn needle, polyfil stuffing, 20 white paper candy cups, 20 tiny pearls.
GAUGE: 6 sts = 1"; 5 rows = ¾" in sc. CHECK YOUR GAUGE. Use any size hook to obtain the gauge.
ROUND CHOCOLATES (Make 2 CA with CF flower and CC leaves; 1 CF with CB flower; 1 CA with CB chain st tic tac toe embroidery).
With main color, ch 2.
Rnd 1: 6 Sc in 2nd ch from hook; do not join but work in continuous rnds.
Rnd 2: 2 Sc in each sc around - 12 sc.
Rnd 3: [Sc in next sc, 2 sc in next sc] 6 times - 18 sc.
Rnd 4: Sc in back lps only of each sc around.
Rnds 5-7: Sc in both lps of each sc around.
Rnd 8: [Sc in next sc, dec over next 2 sc] 6 times - 12 sc.
Rnd 9: Sc in each sc around. Stuff lightly.
Rnd 10: [Dec over next 2 sc] 6 times - 6 times. Fasten off leaving a 6" end. Weave end through rem sc and draw up firmly; fasten securely.
Bottom Edge: Join main color to rem lps of Rnd 4; sl st in each lp around. Fasten off. Weave in ends.
Flower: With flower color, ch 3, sc in 2nd ch from hook, sl st in last ch, [ch 2, sc in 2nd ch from hook, sl st in same ch as last sl st] 3 times - 4 petals. Fasten off.
Leaves: With CC, [ch 4, sl st in 2nd ch from hook, sc in next ch, sl st in last ch] twice. Fasten off. Sew leaves to top of candy; sew flower on top of leaves.
CHOCOLATE SWIRLS (Make 1 CA with CF swirl and 1 CB with CA swirl).
With main color, ch 2.
Rnds 1-7: Work same as Round Chocolate. Stuff lightly.
Rnd 8: Working in back lps only [sc in next sc, dec over next 2 sc] 6 times - 12 sc.
Rnd 9: Working in back lps only [dec over next 2 sc] 6 times. Fasten off leaving a 6" end. Weave end through rem sc and draw up firmly; fasten securely.
Join swirl color in first unworked lp on Rnd 7 with a sl st; sl st in each free lp through Rnd 9. Fasten off. Weave in ends.
Bottom Edge: Work same as Bottom Edge of Round Chocolate.
SQUARE CHOCOLATE (Make 1 CA with CD topping and 1 CD with CA topping).
With main color, ch 2.
Rnd 1: 8 sc in 2nd ch from hook; do not join but work in continuous rnds.
Rnd 2: [Sc in next sc, 3 sc in next sc] 4 times - 16 sc.
Rnd 3: Sc in next 2 sc, 3 sc in next sc, [sc in next 3 sc, 3 sc in next sc] 3 times, sc in last sc - 24 sc.
Rnd 4: Working in back lps only sc in each sc around.
Rnds 5-7: Sc in both lps of each sc around.
Rnd 8: Sc in next 2 sc, double dec over next 3 sc, [sc in next 3 sc, double dec] 3 times, sc in last sc - 16 sc. Stuff lightly.
Rnd 9: [Sc in next sc, double dec] 4 times - 8 sc. Fasten off leaving a 6" end. Weave end through rem sc and draw up firmly; fasten securely.
Bottom Edge: Work same as Bottom Edge of Round Chocolate.
Topping: With topping color, ch 13; 2 sc in 2nd ch from hook and in each ch across. Fasten off. Roll into flower shape and sew to top.
CHOCOLATE COVERED PRETZEL (Make 1 CA and 1 CB).
Ch 31.
Row 1: Sc in 2nd ch from hook and in each ch across; turn - 30 sc.
Rows 2 and 3: Ch 1, sc in each sc across; turn. Fasten off at end of Row 3.
Fold in half lengthwise and sew tog. Fold into pretzel shape and sew tog.
CHOCOLATE RUFFLE (Make 2 CA with CG centers).
With CA, ch 18.
Row 1: 2 Dc in 4th ch from hook, 3 dc in each rem ch across; turn - 48 sts.
Row 2: Ch 1, sc in each dc across and in top of beg ch. Fasten off.
Roll up and sew bottom tog keeping it flat enough to sit alone.
Center-Rnd 1: With CG, ch 2; 6 sc in 2nd ch from hook; do not join but work in continuous rnds.
Rnd 2: Sc in each sc around. Fasten off.
Draw sts tog and sew to top of candy.
WHITE CHOCOLATE HEART (Make 1).
Rnd 1: Beginning at top of candy, with CB, ch 2; 6 sc in 2nd ch from hook; do not join but work in continuous rnds.
Rnd 2: 2 Sc in each sc around - 12 sc.
Rnd 3: (Hdc, dc, tr) all in next sc, (dc, hdc) all in next sc, sl st in next sc, (hdc, dc) all in next sc, (tr, dc, hdc) all in next sc, sc in next 3 sc, 3 sc in next sc, sc in last 3 sc - 20 sts.
Rnd 4: Working in back lps only, sc in next 5 sts, sl st in next st, sc in last 14 sts.
Rnds 5 and 6: Sc in both lps of each sc around.
Rnd 7: Double dec over next 3 sts, dec over next 2 sts, sl st in next st, dec over next 2 sts, double dec over next 3 sts, sc in next 3 sts, double dec over next 3 sts, sc in last 3 sts - 12 sts. Stuff lightly.
Rnd 8: [Dec over next 2 sts] 6 times. Fasten off leaving a 6" end. Weave end through rem sc and draw up firmly; fasten securely.
Top Edging: Join CC in any unworked lp on Rnd 4 with a sl st; * ch 1, sl st in next lp, rep from * around. Fasten off.
Flower: With CE, ch 2; 6 sc in 2nd ch from hook; join with a sl st to first sc. Fasten off. Sew to top center.
FLOWER CHOCOLATE (Make 1 each CB with CA center; CA with CB center; CE with CC center; CF with CA center).
With main color, ch 2.
Rnd 1: 6 sc in 2nd ch from hook; do not join but work in continuous rnds.
Rnd 2: 2 Sc in each sc around - 12 sc.
Rnd 3: Working in front lps only, [(sl st, ch 1, dc) all in next sc, dc in next sc, ch 1] 6 times, sl st in first sl st - 6 petals.
Rnd 4: Ch 1, holding petals toward you, sc in each rem back lp around - 12 sc.
Rnds 5 and 6: Sc in each sc around. Stuff lightly.
Rnd 7: Working in back lps only, [dec over next 2 sc] 6 times. Fasten off. Draw rem sts tog tightly.
Bottom Edge: Join main color to rem lps of Rnd 7; sl st in each lp around. Fasten off. Weave in ends.
Center: Make same as center of Chocolate Ruffle. Sew to center of flower.
JORDAN ALMOND (Make 1 CC and 1 CF).
Rnd 1: Ch 2; 6 sc in 2nd ch from hook; do not join but work in continuous rnds.
Rnds 2-4: 2 Sc in next sc, sc in each sc around - 9 sc at end of Rnd 4.
Rnds 5 and 6: Dec over next 2 sc, sc in each sc around - 7 sc at end of Rnd 6. Stuff lightly.
Rnd 7: Rep Rnd 5. Fasten off. Draw rem sts tog.
POLKA DOT CHOCOLATE (Make 1 CA).
Top-Rnds 1-3: Work same as Rnds 1-3 of Round Chocolate. Fasten off. Sew tiny pearls on top of this piece.
Bottom: Rep Rnds 1-3 of top; do NOT end off; with wrong sides tog, sl st the 2 pieces tog through back lps. Do not stuff.
ABBREVIATIONS: beg = beginning; CA, CB, etc.= Color A, Color B, etc; ch = chain; dc = double crochet; dec = decrease; hdc = half double crochet; lp = loop; mm = millimeters; rem = remaining; rep = repeat; rnd = round; sc = single crochet; sl = slip; sp = space; st(s) = stitch(es); tog = together; tr = treble crochet; * or ** = repeat whatever follows the * or ** as indicated; [ ] = work directions given in brackets the number of times specified.
Pattern © by Coats & Clark Inc. Reproduced with permission from Coats & Clark Inc. PurpleKittyYarns.com is not endorsed by Coats & Clark Inc. It is not permissible to contract production of projects made from designs published by Coats & Clark to a third party for sale or distribution.
Valentine Hat WR2105
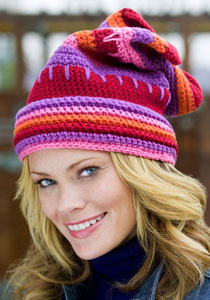
Designed by Theresa McCune.
Skill Level: INTERMEDIATE
Directions are for women's size Small. Changes for Medium and Large are in parentheses.
Finished Circumference: 20½ (22, 24)".
RED HEART® "Super Saver®": 1 skein each 774 Lt. Raspberry A, 528 Med. Purple B, 256 Carrot C, 332 Ranch Red D.
Crochet Hook: 5.5mm [US I-9].
Split-ring stitch markers, yarn needle.
GAUGE: 13 sts = 4"; 18 rows = 4". CHECK YOUR GAUGE. Use any size hook to obtain the gauge given.
HAT
With B, ch 66 (72, 78); making sure ch is not twisted, join with a slip st to first ch to form a ring.
Rnd 1 (Right Side): Ch 1, sc in same ch as joining and in each ch around; join into back loop of first sc; turn - 66 (72, 78) sts.
Rnd 2: Ch 1, working in back loops only, sc in each st around; join; turn. Fasten off B.
Rnd 3: Attach A in same st as join, ch 1, working in back loops only, sc in each st around; join; turn.
Rnd 4: Working in back loops only, sc in each st around; join; turn. Fasten off.
Rnds 5-6: With C, repeat Rnds 3-4.
Rnds7-8: With D, repeat Rnds 3-4.
Rnds 9-10: With B, repeat Rnds 3-4, DO NOT FASTEN OFF.
Rnd 11: Ch 1, working through both loops, sc in each st around; join. DO NOT TURN. Fasten off.
Rnd 12: Attach D, ch 1, sc in each st around. DO NOT JOIN. Instead, pm to indicate first st of rnd, move marker up each rnd.
Rnds 13-25: Sc in each st around. Fasten off D at end of Rnd 25.
Rnd 26: Attach B, ch 1, sc in first 2 sts; insert hook in next st 3 rows down, pull up loop, yo, pull loop through both loops on hook - point made; * sc in next 2 sts; point in next st; repeat from * around; join; turn.
Rnd 27: Ch 1, sc in each st around; join; turn.
Rnds 28-29: Repeat Rnd 27. Fasten off at end of Rnd 29.
Rnd 30: Attach A, ch 1, sc in each st around; join; turn.
Rnds 31-32: Repeat Rnd 27. Fasten off at end of Rnd 32.
Rnds 33-35: With C, repeat Rnds 30-32.
Rnd 36: With D, repeat Rnd 30.
Rnds 37-40: Repeat Rnd 27. Fasten off at end of Rnd 40.
Rnds 41-44: With A, repeat Rnds 26-29.
Rnd 45: With B, repeat Rnd 30.
Rnds 46-48: Repeat Rnd 27. Fasten off at end of Rnd 48.
Rnds 49-51: With C, repeat Rnds 30-32.
Rnds 52-55: With D, repeat Rnds 45-48.
FINISHING
Closing: Count 11 sts from join, pm in st, skip next 22 sts, pm in st, skip next 22 sts, pm. [Attach D in marked st, ch 1; fold hat with ch in corner; working through both layers, sc in first 11 sts; fasten off] 3 times.
Edging-Rnd 1: Fold bottom edge up, attach A in any free loop of Rnd 10, ch 1, working through free loops only, sc in each st around; join.
Rnd 2: Ch 1, sc in each st around. Fasten off.
Weave in ends.
ABBREVIATIONS: A, B = color A, B; ch = chain; mm = millimeters; pm = place marker; rnd = round; sc = single crochet; st(s) = stitch(es); yo = yarn over; * or ** = repeat whatever follows the * or ** as indicated; [ ] = work directions in brackets the number of times specified.
Pattern © by Coats & Clark Inc. Reproduced with permission from Coats & Clark Inc. PurpleKittyYarns.com is not endorsed by Coats & Clark Inc. It is not permissible to contract production of projects made from designs published by Coats & Clark to a third party for sale or distribution.
Heart Bouquet WR1083
Skill Level: BEGINNER
Designed by Elizabeth Hill.
Hearts measure approximately 3½" x 3½" without stems.
RED HEART® "Super Saver®": 2 Ounces each of 4 colors:
|
Option 1 |
Option 2 |
CA |
724 Baby Pink |
319 Cherry Red |
CB |
722 Pretty 'n Pink |
376 Burgundy |
CC |
905 Magenta |
311 White |
CD |
786 Candy Print |
312 Black |
Susan Bates® French Knitter Spool, Small, Art. 14102. Yarn needle; 18" floral wire stems - 18 gauge; ½" wide floral tape; "silk" leaf groups; 15 ounce vegetable can-washed and dried for vase; white craft glue; 1" wide foam brush; scissors.
Heart Flowers:
1. Following instructions included in the package, make 10" and 12" cords using the French Knitter and CA, CB, and CC or colors of your choice. Weave in yarn ends.
2. Thread wire down the center of the cord so that 1" of the wire extends beyond the cord at the opposite end. Do not trim the long end; it will be used to create the heart flower stem.
3. Measure to find the center of the cord. Bend in half at the center to form the "V" at the upper part of the heart.
4. Wrap the right side around the French Knitter or a spool of thread to form a curve. Repeat with the left side; twist wire ends together at the lower part of the heart to close the heart. The remaining section of wire will become the stem for the heart flower.
5. Starting at the base of the heart flower, wrap wire with floral tape to the end of the wire, adding a leaf group if desired. Note: To make longer stems, add floral wire stems as needed and cover with floral tape.
Vase:
1. Wash and dry an empty 15 ounce vegetable or fruit can.
2. Apply glue with the foam brush 1" at a time around the can, beginning at the top. Wrap CD yarn around the can over the glued section, adjusting as you go along. Repeat gluing and wrapping until the can is covered. Cut yarn. (Optional: Spray paint can black before wrapping for better coverage of the can.)
3. Decorate the can as desired with rick-rack or ribbon.
4. Fill can with glass beads, marbles, small stones or sand to add stability to the vase.
Pattern © by Coats & Clark Inc. Reproduced with permission from Coats & Clark Inc. PurpleKittyYarns.com is not endorsed by Coats & Clark Inc. It is not permissible to contract production of projects made from designs published by Coats & Clark to a third party for sale or distribution.
Christmas Tree Duo LW2630
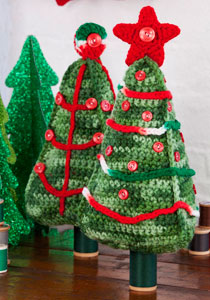
Decorated with buttons and crocheted chains and using spools for the trunks, this pair of crocheted trees are a delightful addition to your cottage-y Christmas decorations. Display them on tables, the mantel or even your cubicle at work.
Skill Level: INTERMEDIATE
Designed by Sharon Mann.
Finished Size
Tree measures 8½" tall
Base measures 5½" in diameter
RED HEART® "Super Saver®": 1 skein each 629 Green Tones A, 979 Mistletoe B and 0319 Cherry Red C.
Crochet Hook: 5.0mm [US H-8]
Yarn Needle
For Tree 1: 21 to 24 – 7/16" red buttons and 2 – ¾" red buttons.
For Tree 2: 18 – 9/16" Red buttons and 2 – ¾" red buttons
Two spools of Coats Cotton Machine Quilting Thread for Tree Trunk in color #8975.
Two ⅛" X 7½" long wood dowels or 1 set of wood chopsticks
Sewing needle and red sewing thread
Tacky Glue.
GAUGE: 16 sts = 4", 16 rows sc = 4". CHECK YOUR GAUGE. Use any size hook to obtain the gauge.
TREE (MAKE 2)
Tree Sides (make 3)
Starting at bottom, with A, ch 2.
Row 1: 3 sc in 2nd ch from hook; turn - 3 sc.
Row 2: Ch 1, sc in each st across, turn.
Row 3: Ch 1, 2 sc in first st, sc in next sc, 2 sc in last st; turn - 5 sc.
Rows 4-6: Ch 1, sc in each st across; turn.
Row 7: Ch 1, 2 sc in first st, sc in each st across to last st, 2 sc in last st; turn - 7 sc.
Rows 8-27: Repeat rows 4-7 (5 times).
Row 28-32: Repeat Row 4. Fasten off.
Tree Bottom With A, ch 2.
Row 1: 3 sc in 2nd ch from hook; turn - 3 sc.
Row 2: Ch 1, sc in each st across, turn.
Row 3: Ch 1, 2 sc in first st, sc in each st across to last st, 2 sc in last st; turn - 5 sc.
Row 4: Ch 1, sc in each st across; turn.
Rows: 5-16: Repeat rows 3 and 4 (6 times) - 17 sc at end of last row. Fasten off, leaving a sewing length.
FINISHING
With wrong sides facing, sew bottom edge of 3 tree sides to the edges of tree bottom. With right side facing, sc 2 tree sides together. Add stuffing and sc the last 2 trees side together, adding additional stuffing as needed. Weave in ends.
Tree 1 Embellishments Star (make 2)
With C, Ch 4, slip st in first ch to form ring.
Round 1: Ch 1, work 10 sc in ring; join with a slip st in first sc - 10 sc.
Round 2: Ch 1, sc in first sc, *ch 5, sc in 2nd ch from hook, hdc in next ch, dc in next 2 ch, skip next sc in round 1**, sc in next sc, repeat from * around ending last repeat at **, join with a slip st in first sc - 5 points. Fasten off, leaving a sewing length.
With right sides facing, sew two stars together, matching sts. Sew star to top of tree. With sewing needle and thread, sew one ¾" button to center of each side of star. Weave in ends.
Garland
With B, make 4 chains in different lengths for garland to wrap around tree. Fasten off, leaving a sewing length. Start at the bottom or top, placing garland chains apart. Sew garlands in place. With sewing needle and thread, sew 7/16" buttons between garland, on each side of tree.
Tree 2 Embellishments Circle (make 2)
With B, ch 2.
Round 1: 6 sc in 2nd, ch from hook; join with a slip st in first sc - 6 sc.
Round 2: Ch 3 (counts as dc), dc in first sc, 2 dc in each sc around; join with a slip st in top of beginning ch-3 - 12 dc. Fasten off leaving a sewing length. With right sides facing, sew circles together, matching sts. Sew assembled circle to top of tree. With sewing needle and thread, sew one ¾" button to center of each side of circle. Weave in ends.
Center Tree Stem (make 3)
With C, ch 33. Fasten off, leaving a sewing length.
Tree Branches (make 3 in each length)
Branch 1: With C, ch 15. Fasten off, leaving a sewing length.
Branch 2: With C, ch 19. Fasten off, leaving a sewing length.
Branch 3: With C, ch 23. Fasten off, leaving a sewing length.
Sew one stem to the center of each side of tree.
Sew the tree branches to the stem in a triangular shape as pictured. Sew one 9/16" button at ends of each branch.
Tree Trunk (for both trees)
Insert wood dowel into thread spool. Add glue to the top of the spool. Insert the remaining wood dowel into the center bottom of the tree and glue the spool to the tree.
ABBREVIATIONS: A, B, C = Color A, B, C; ch = chain; dc = double crochet; sc = single crochet; [ ] = work directions in brackets the number of times specified; * or ** = repeat whatever follows the * or ** as indicated.
Pattern © by Coats & Clark Inc. Reproduced with permission from Coats & Clark Inc. PurpleKittyYarns.com is not endorsed by Coats & Clark Inc. It is not permissible to contract production of projects made from designs published by Coats & Clark to a third party for sale or distribution.
Jingle Bells Baby Hat

Skill Level: INTERMEDIATE
Designed by Shirley Roemer
Hat Circumference: 13¼"
RED HEART® "Super Saver®": 1 Skein 672 Spring Green
Circular Knitting Needles: 4.5mm [US 7]-16".
Double Pointed Needles: 4.5mm [US 7].
3 Stitch markers
Yarn needle
3 jingle bells
Sewing needle and thread.
GAUGE: 18 sts = 4"; 24 rnds = 4" in St st. CHECK YOUR GAUGE. Use any size needles to obtain the gauge.
HAT
With circular needle, cast on 56 sts. Join to work in the round making sure that sts are not twisted and place a marker between first and last sts.
Rnd 1: * K2, P2; repeat from * around.
Repeat Rnd 1 for ribbing for 4½".
K 1 rnd, inc 4 sts evenly spaced - 60 sts. Work even in St st for 2½" - 7" from beginning.
Increase Shaping
[K20, place marker on needle] twice, K 20 to marker at end of rnd.
Rnd 1: K, inc 1 st before and after each marker - 6 sts inc in rnd.
Rnd 2: K.
Repeat Rnds 1 and 2 seven times - 108 sts.
Divide and Shape Points
First Point: Place first 36 sts onto a dpn; leave remaining sts on the circular needle.
Note: Points will measure about 5" from base to tip. To make points longer or shorter, adjust the number of rows between decrease rows.
Rnd 1: [K4, K2tog] 6 times - 30 sts.
Rnds 2-6: K.
Rnd 7: [K3, K2tog] 6 times - 24 sts.
Rnds 8-12: K.
Rnd 13: [K2, K2tog] 6 times - 18 sts.
Rnds 14-18: K.
Rnd 19: [K1, K2tog] 6 times - 12 sts.
Rnds 20-24: K.
Rnd 25: [K2tog] 6 times - 6 sts.
Rnds 26-30: K.
Cut yarn, leaving a 6" tail. With yarn needle, weave yarn tail through remaining sts; draw up firmly; fasten securely.
2nd Point: Place next 36 sts onto a dpn; leave remaining sts on the circular needle and work same as for First Point.
3rd Point: Place last 36 sts onto a dpn and work same as for First Point.
FINISHING: Weave in ends. With sewing needle and thread, sew a bell to each tip. Turn up half of ribbing for cuff.
ABBREVIATIONS: dpn = double pointed needle; inc = increase; K = knit; K2tog = knit next 2 sts together; mm = millimeters; P = purl; rnd = round; St st = Stockinette stitch (Knit every round.); st(s) = stitch (es); * = repeat whatever follows the * as indicated; [ ] = work directions in brackets the number of times specified.
Pattern © by Coats & Clark Inc. Reproduced with permission from Coats & Clark Inc. PurpleKittyYarns.com is not endorsed by Coats & Clark Inc. It is not permissible to contract production of projects made from designs published by Coats & Clark to a third party for sale or distribution.
Over the Shoulder Water Bottle Holder

A great way to keep your water bottle handy on the playground, when hiking or at an amusement park.
Supplies
Susan Bates Knitting Knobby, Art 14075 or Small French Knitter, Art 14102
Red Heart Super Saver, Art E300 or E301
Susan Bates 2 inch Steel Yarn Needle, Art 14081
#17 rubber O-ring
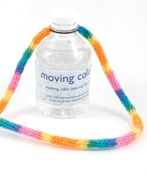
Instructions
Leave at least a 12" tail at the beginning.
Work until piece measures 36-40".
Bind off per how to instructions, leaving at least a 12" tail.
Thread yarn needle with tail, pass needle through O-ring and through the center of the knit tube at least 3 times.
Wrap yarn tail around the stitches between the O-ring and the yarn tube(similar to wrapping a button shank).
Tie a knot about ¼ inch from the secured end of the tail. Run the needle into the tube for an inch and back out after an inch or so.
Pull the knot inside the yarn tube and trim the yarn where it emerges, close to the tube.
Repeat with the other tail.
Pattern © by Coats & Clark Inc. Reproduced with permission from Coats & Clark Inc. PurpleKittyYarns.com is not endorsed by Coats & Clark Inc. It is not permissible to contract production of projects made from designs published by Coats & Clark to a third party for sale or distribution.
Cat Teaser
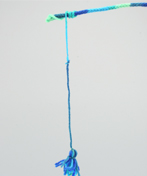
Have a favorite feline that loves play time? This simple to make Cat Teaser is a fun project for all ages, and your kitty will will love it!
Supplies:
Susan Bates Knitting Knobby, Art 14075 or Small French Knitter, Art 14102
Red Heart® Super Saver®, Art E300 or E301
12" pipe cleaner, any color
Susan Bates 2 inch Steel Yarn Needle, Art 14081
Instructions:
Leave at least a 24" tail at the beginning.
Bend the wire ends of the pipe cleaner under by wrapping the end around the pointed end of the tool included with the Knitting Knobby.
Insert pipe cleaner into tube, being careful not to push the pipe cleaner end beyond the end of the tube.
Continue working until the pipe cleaner is totally covered by the knit tube.
Bind off per instructions leaving a 12" tail.
Make a knot about 1/4 inch from the end of the tube.
Using a yarn needle, pull the knot inside the yarn tube and back out after an inch.
Trim the yarn where it emerges, close to the tube, being careful not to cut the tube.
Make a small tassel or pom pom and attach to the long tail end.
Twist the top 2 inches around the end of a pencil to shape to make a handle.
Pattern © by Coats & Clark Inc. Reproduced with permission from Coats & Clark Inc. PurpleKittyYarns.com is not endorsed by Coats & Clark Inc. It is not permissible to contract production of projects made from designs published by Coats & Clark to a third party for sale or distribution.
Easy Knit Zigzag Afghan WR1682
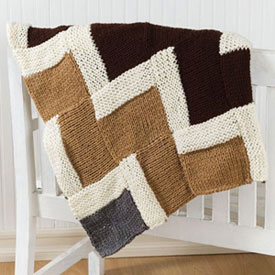
Skill Level: Easy
Designed by Jodi Snyder.
Afghan measures 48" by 56".
RED HEART® "Super Saver®": 3 Skeins 0313 Aran CA, 2 skeins each 0400 Grey Heather CB, 0336 Warm Brown CC and 0365 Coffee CD.
Knitting Needles: 10mm [US 15].
Yarn needle.
GAUGE: 10 sts = 4"; 12 rows = 4" in St st with double strand. CHECK YOUR GAUGE. Use any size needles to obtain the gauge.
NOTE: Use 2 strands of the same color held together throughout.
SQUARE 1 (Make 14): With CB, cast on 20 sts. Work in St st, begin K row, for 5", end P row. With CA, K 1 row. With CA, work in Rev St st for 3". Bind off.
SQUARE 2 (Make 14): Work same as Square 1, but use CC for 5" of St st.
SQUARE 3 (Make 14): Work same as Square 1, but use CD for 5" of St st.
FINISHING: Arrange squares in diagonal rows as shown in photograph, placing Rev St st at side and top of square. Sew together. Weave in ends.
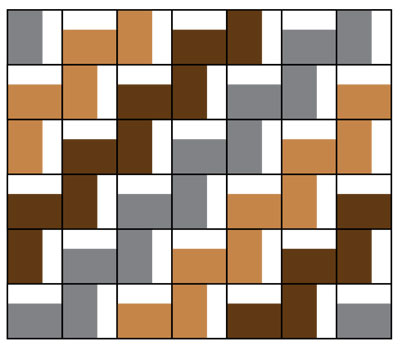
ABBREVIATIONS: CA = Color A; CB = Color B; CC = Color C; CD = Color D; K = knit; mm = millimeters; St st = Stockinette st (knit 1 row, purl 1 row); Rev St st = Reverse stockinette stitch (purl on right side rows, knit on wrong side).
Pattern © by Coats & Clark Inc. Reproduced with permission from Coats & Clark Inc. PurpleKittyYarns.com is not endorsed by Coats & Clark Inc. It is not permissible to contract production of projects made from designs published by Coats & Clark to a third party for sale or distribution.
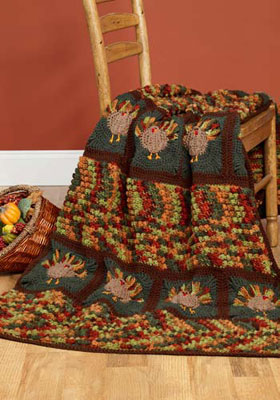
Crochet Turkey Talk Afghan WR1043
Skill Level: Intermediate
Designed by Michele Thompson
Afghan measures approximately 51" x 61½" before edging.
RED HEART® "Super Saver®": 4 Ounces No. 360 Cafe CA; 42 ounces No. 981 Fall CB; 9 ounces No.633 Dark Sage CC; 10 ounces No. 365 Coffee CD; 5 yards each No. 254 Pumpkin CE and No.376 Burgundy CF.
Crochet Hook: 6mm [US J-10].
Yarn needle.
GAUGES: Turkey square = 8 1/2" x 8 1/2". 16 sts = 5"; 16 rows = 5" in texture pat. CHECK YOUR GAUGE. Use any size hook to obtain the gauges.
NOTE: Afghan is made in strips of squares sewn together, then textured pattern is worked on both sides of two strips and sewn to center strip.
TURKEY SQUARE (Make 18): With CA, ch 3; join with a sl st to join to form a ring.
BODY REAR-Rnd 1: Ch 1, 8 sc in ring; join with a sl st in first sc.
Rnd 2: Ch 1, 2 sc in each sc around; join - 16 sc.
Rnd 3: Ch 1, [sc in sc, 2 sc in next sc] 8 times; join-24 sc.
Rnd 4: Ch 1, [sc in 2 sc, 2 sc in next sc] 8 times; join with CB in top of first sc - 32 sc. Fasten off CA.
Rnd 5A-FEATHERS: With CB, [ch 6; sc in 2nd ch from hook and next 4 ch, sl st into next sc] 16 times. Fasten off CB.
Rnd 5B: With right side facing, attach CC in same sc as last sl st; ch 3, 2 dc in next sc, [dc in next sc, 2 dc in next sc] 7 times; TURN - 24 sts.
Rnd 5C (Wrong Side): Ch 3, skip first dc, dc in next dc, 2 dc in next dc, [dc in next 2 dc, 2 dc in next dc] 7 times working last dc in top of ch-3; turn - 32 sts.
Rnd 6 (Right Side): Ch 1, [sc in 3 dc, 2 dc in next dc] 8 times working last sc in top of ch-3 - 40 sc; [2 sc across top of feather, ch 1, 2 sc across top of feather] 8 times - 40 sts over feathers = 80 sts total; join with a sl st to top of first sc.
Rnd 7: (Note: "st" = sc or ch.) Ch 1, sc in first 4 sc, hdc in next 2 sc, dc in next 2 sc, tr in next sc, (2 dtr, ch 2) all in next sc, * 2 dtr in next st, tr in next st, dc in next 2 sts, hdc in next 2 sts **, sc in next 8 sts, hdc in next 2 sts, dc in next 2 sts, tr in next st, (2 dtr, ch 2) all in next st; rep from * to last 4 sts, end at **; sc in last 4 sts; join. Fasten off.
Rnd 8: Attach CD in any corner ch-2 sp; (ch 3, dc, ch 1, 2 dc) all in corner sp, * dc in each st to next corner ch-2 sp **, (2 dc, ch 1, 2 dc) all in corner sp; rep from * around, end at **; join with a sl st in top of ch-3. Fasten off.
BODY FRONT (Make 18): With CA, ch 9; sc in 2nd ch from hook and in each ch across; turn - 8 sc.
Rnd 1: Beg at top of head, ch 1, 2 sc in first sc, sc in next 4 sc, hdc in next sc, dc in next sc, 3 dc in next sc; working on opposite side of beginning ch, 3 dc in first ch, dc in next ch, hdc in next ch, sc in next 4 ch, 2 sc in next ch; join with a sl st in first sc. Fasten off.
Sew Body Front onto Body Rear at center of square. Embroider legs and beak with CE. Wattle: With CF, ch 1. Fasten off. Attach to face as shown. Make 2 French knot eyes with CD.
STRIPS: Sew squares together to form 3 horizontal strips of 6 squares each.
Top Edging-On all 3 strips -Row 1: With right side facing, attach CD at top right-hand corner; ch 1, 28 sc across first square, [27 sc across next square] 5 times; turn - 163 sts.
Row 2: Ch 1, sc in each sc across. Fasten off.
Bottom Edging: Work same as for Top Edging across bottom of each strip.
TEXTURE PAT-On 2 strips only-Row 1 (Right Side): With right side facing, attach CB in first st of Edging; ch 1, sc in each sc across; turn.
Row 2: Ch 1, sc in first sc, * tr in next sc, sc in next sc; rep from * across; turn.
Row 3: Ch 1, sc in each st across; turn.
Row 4: Ch 1, sc in first 2 sc, * tr in next sc, sc in next sc; rep from * to last sc; sc in last sc; turn.
Row 5: Rep Row 3.
Rep Rows 2-5 until there are a total of 29 rows. Fasten off.
Rep Texture Pat on bottom of same 2 strips. Sew strip of squares with Edgings only in between strips with textured sections as pictured.
OUTSIDE EDGING: With right side facing, attach CD at top right-hand corner; ch 1, work sc evenly around all 4 sides and work 3 sc in each corner; join with a sl st in first sc; TURN. Repeat last rnd on the wrong side. Fasten off. Weave in ends.
ABBREVIATIONS: CA, CB, CC, etc = Colors A, B, C, etc.; ch = chain; dc = double crochet; dtr = double treble crochet; hdc = half double crochet; mm = millimeters; rep = repeat; rnd = round; sc = single crochet; sl = slip; sp = space; st(s) = stitch (es); tr = treble crochet; yo = yarn over; * or ** = repeat whatever follows the * or ** as indicated; [ ] = work directions in brackets the number of times specified
Pattern © by Coats & Clark Inc. Reproduced with permission from Coats & Clark Inc. PurpleKittyYarns.com is not endorsed by Coats & Clark Inc. It is not permissible to contract production of projects made from designs published by Coats & Clark to a third party for sale or distribution.
Bookworm Buddies

Supplies:
Susan Bates Knitting Knobby, Art 14075 or Small French Knitter, Art 14102
Red Heart® Super Saver®, Art E300 or E301
12" pipe cleaner, any color, cut in half
Susan Bates 2 inch Steel Yarn Needle, Art 14081
"Sunglasses" button
Sewing thread and hand sewing needle
Instructions:
Leave at least a 12" tail at the beginning.
Bend the wire ends of the pipe cleaner under by wrapping the end around the pointed end of the tool included with the Knitting Knobby.
Work until tube measures about 1 inch. Insert pipe cleaner into tube, being careful not to push the pipe cleaner end beyond the end of the tube. Continue working until the pipe cleaner is totally covered by the knit tube. Bind off per instructions leaving a 12" tail.
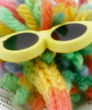
To make hair: make a small pom pom and use the tail to secure to the knit tube. You can also make loops over your finger and using a needle, secure each loop to the end of the tube.
Make a small tassel or pom pom and secure to one of the tail ends.
Twist the top 2 inches below the hair around the end of a pencil to shape.
Using a needle and thread, attach sunglasses where the "hair" and knit tube meet.
Pattern © by Coats & Clark Inc. Reproduced with permission from Coats & Clark Inc. PurpleKittyYarns.com is not endorsed by Coats & Clark Inc. It is not permissible to contract production of projects made from designs published by Coats & Clark to a third party for sale or distribution.
| Pattern Categories Browse the categories to help you find the patterns you're looking for. |
||
    
|
|
|


Navigation

All contents © 2003-2026 Purple Kitty LLC. All rights reserved.
Privacy Policy | FAQ | About Me