 |
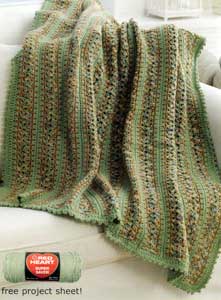
Red Heart Super Saver
Country Home Crochet Throw LW1767
Skill Level: Intermediate
Designed by Glenda Winkleman.
Throw measures 50" x 63".
RED HEART® "Super Saver®": 2 skeins each 336 Warm Brown A, 661 Frosty Green Band 4 skeins 305 Aspen Print C.
Crochet Hook: 6.5 mm (US K-10 ½).
Yarn needle.
GAUGE: Dc, shell st, dc = 2"; 4 rows = 3". CHECK YOUR GAUGE: Use any size hook to obtain gauge given.
Strip
(Make 13).
With C, ch 9.
Row 1: Work (2 dc, ch 3, 2 dc) in 6th ch from hook, skip next 2 ch, dc in last ch, turn.
Rows 2-85: Ch 3 (counts as first dc), skip next 2 dc, (2 dc, ch 3, 2 dc) in ch-3 space, skip next 2 dc, dc in top of beginning ch, turn. Fasten off.
Side Border
Work Side Border along each long edge of each Strip.
With right side facing, join A in last st to work along one long edge of each Strip.
Row 1: Ch 1, 2 sc in first row, [ch 1, sc] in each row to last row, 2 sc in last row, turn.
Row 2: Ch 1, sc in each of first 2 sc, *ch 1, skip next ch-1 space, sc in next sc; repeat from * across to last sc, sc in last sc. Fasten off.
Strip Border
Work Strip Border around each Strip.
With right side facing, join B in beginning st to work along one long edge of each Strip.
Rnd 1: Ch 1, sc in first 2 sc, *[work 2 hdc in each corresponding ch-1 space 2 rows below (Row 1 of Side Border) pulling st up to current level] across to last 2 sc, sc in last 2 sc, ch 2, 2 sc in edge of Row 2 of Side Border, 2 sc in edge of Row 1 of Side Border, turn to work along short end of Strip, skip next 2 dc, 2 sc in next ch-3 space, skip next 2 dc, turn to work along opposite long edge of Strip, 2 sc in edge of Row 1 of Side Border, 2 sc in edge of Row 2 of Side Border, ch 2; repeat from *, join with a slip st to beginning sc.
Assembly
With right side facing and holding 2 Strips together along long edges, join B in one corner with a slip st.
Row 1: Working in back loops only and working through sts of both Strips, slip st across to opposite corner to join Strip together.
Repeat to join all Strips.
Border
With right side facing, join B in top right-hand corner ch-2 space with a slip st.
Rnd 1: Ch 3 (counts as first dc), 2 dc in corner ch-2 space, dc in each st and each ch-space around, working 3 dc in each corner ch-2 space, join with a slip st to beginning ch.
Rnd 2: Ch 1, sc in first 2 sts, (ch 3, slip st in last ch for picot), *sc in next 2 sts, (ch 3, slip st in last ch); repeat from * around, join with a slip st to beginning sc.
Fasten off. Weave in ends.
ABBREVIATIONS: A = Color A; B = Color B; C = Color C; ch = chain; dc = double crochet; hdc = half double crochet; mm = millimeters; rnd = round; sc = single crochet; st(s) = stitch(es); * = repeat whatever follows the * as indicated; [ ] = work directions in brackets the number of times specified.
Pattern © by Coats & Clark Inc. Reproduced with permission from Coats & Clark Inc. PurpleKittyYarns.com is not endorsed by Coats & Clark Inc. It is not permissible to contract production of projects made from designs published by Coats & Clark to a third party for sale or distribution.
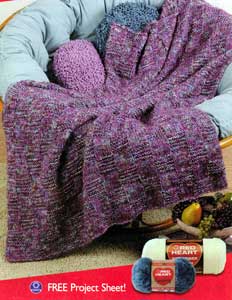
Block Afghan LW1437
Skill Level: Beginner
Designed by Mary Jane Protus.
Afghan measures approximately 39" wide x 54" long.
RED HEART® "Symphony™", Art N391 (3.5 ounce/310 yard ball): 3 Balls No. 4907 Magenta CA.
RED HEART® "Super Saver™", Art E300 (8 ounce /452 yard solid color or 6 ounce/1348 yard multicolor skein): 18 Ounces No. 0310 Monet CB.
Circular Knitting Needle: 9mm [US 13] - 29".
Yarn needle.
GAUGE: 11 sts = 4"; 16 rows = 4" in pat with CA and CB held together. CHECK YOUR GAUGE. Use any size needle to obtain the gauge.
NOTE: Work with one strand each of CA and CB held together as one throughout.
Cast on 107 sts. Do not join but work back in forth in rows as follows:
Row 1 (Right Side): Knit.
Rows 2, 4, 6, 8, 10: K1, P7, * K7, P7; rep from * to last st; K1.
Row 3 AND EVERY RIGHT SIDE ROW: Knit.
Rows 12, 14, 16, 18, 20: K8, * P7, K7; rep from * to last st; K1.
Repeat Rows 1-20 for pat until approximately 54" from beginning, end Row 1 or 11.
On Wrong Side, bind off loosely in K. Fasten off. Weave in ends.
ABBREVIATIONS: CA, CB = Color A, Color B; K = knit; mm = millimeters; P = purl; pat = pattern; rep = repeat; st(s) = stitch (es); * = repeat whatever follows the * as indicated.
Pattern © by Coats & Clark Inc. Reproduced with permission from Coats & Clark Inc. PurpleKittyYarns.com is not endorsed by Coats & Clark Inc. It is not permissible to contract production of projects made from designs published by Coats & Clark to a third party for sale or distribution.
Princess Crown and Scepter WR1918
RED HEART® "Super Saver®": 1 skein 324 Bright Yellow, or desired color.
Susan Bates® Knitting Knobby, Art 14075 or Small French Knitter, Art 14102
Susan Bates® 2-inch Steel Yarn Needle, Art 14081
2-12" pipe cleaners, any color for crown 1-12" pipe cleaners, any color for scepter
1 10" wooden dowel, 3/16 inch diameter
Assorted beads and ribbons for decoration

CROWN
Leave at least a 12" tail at the beginning.
Bend the wire ends of the pipe cleaner under by wrapping the end around the pointed end of the tool included with the Knitting Knobby.
Work until tube measures about 1 inch. Insert pipe cleaner into tube, being careful not to push the pipe cleaner end beyond the end of the tube. Continue working until the pipe cleaner is totally covered by the knit tube. Bind off per instructions leaving a 12" tail.
Repeat with second pipe cleaner. Find the center of the tube and bend. This will be the point of the crown. Make two more triangle shapes on either side of the center point. Using an extra piece of yarn and the yarn needle, attach the points to the first tube.
You can use the tails to secure the ends of the points.
Tie knots in the ends of the tails on the first tube.
SCEPTER
Leave at least a 12" tail at the beginning.
Work until tube measures about 1 inch. Insert wooden dowel into tube, being careful not to push the dowel end beyond the end of the tube. Continue working until the dowel is totally covered by the knit tube. Bind off per instructions leaving a 12" tail.
For Star: Leave at least a 12" tail at the beginning.
Bend the wire ends of the pipe cleaner under by wrapping the end around the pointed end of the tool included with the Knitting Knobby.
Work until tube measures about 1 inch. Insert pipe cleaner into tube, being careful not to push the pipe cleaner end beyond the end of the tube. Continue working until the pipe cleaner is totally covered by the knit tube. Bind off per instructions leaving a 12" tail.
Bend the tube into 5 points to make a star and close the star by securing the 2 ends together.
Sew star securely to the end of the dowel.
Pattern © by Coats & Clark Inc. Reproduced with permission from Coats & Clark Inc. PurpleKittyYarns.com is not endorsed by Coats & Clark Inc. It is not permissible to contract production of projects made from designs published by Coats & Clark to a third party for sale or distribution.
Jack-O-Lantern Pin WR2001
Designed by Kim Kotary
Skill Level: Beginner
Pin measures 3 ½" in diameter.
RED HEART® "Super Saver®": 1 skein each 256 Carrot or 254 Pumpkin A, 389 Hunter Green B, 312 Black C.
Crochet Hook: 5.5mm [US I-9]
Safety pin or other pin back, stitch marker, yarn needle.
GAUGE: 12 single crochet = 4"; 16 rows = 4". CHECK YOUR GAUGE. Use any size hook to obtain the gauge. Gauge is not essential for this project but will affect finished size.

PUMPKIN
With A, chain 2.
Round 1: Work 6 single crochet in 2nd chain from hook - 6 single crochet. Working in continuous rounds, place marker for beginning of round.
Round 2: Work 2 single crochet in each stitch around - 12 single crochet.
Round 3: Work [2 single crochet in next stitch, single crochet in next stitch] 6 times - 18 single crochet.
Round 4: Work [2 single crochet in next stitch, single crochet in next 2 stitches] 6 times - 24 single crochet.
Round 5: Work [2 single crochet in next stitch, single crochet in next 3 stitches] 6 times - 30 single crochet. Fasten off.
STEM
Join B with a slip stitch in any stitch.
Row 1: Chain 1, single crochet in next 2 stitches, slip stitch in next stitch.
Row 2: Chain 1, turn, slip stitch in slip stitch, single crochet in each single crochet across.
Repeat Rows 1 & 2 once more.
Fasten off.
FINISHING
Weave in ends. With C and straight stitches, embroider face on Front. Attach a pin to Back.
ABBREVIATIONS: A, B, etc= color A, B, etc; mm = millimeters; [ ] = work directions in brackets the number of times specified.
Pattern © by Coats & Clark Inc. Reproduced with permission from Coats & Clark Inc. PurpleKittyYarns.com is not endorsed by Coats & Clark Inc. It is not permissible to contract production of projects made from designs published by Coats & Clark to a third party for sale or distribution.
Aran Toggle Wrap LW1771
Skill Level: Easy
Designed by Nazanin S. Fard.
RED HEART® Super Saver™: 6 balls 631 Light Sage.
Crochet Hook: 6 mm [US J-10].
Two 1 ¾" toggle buttons.
Stitch markers.
Yarn needle.
GAUGE: 13 dcs = 4" in Mock Seed Stitch. CHECK YOUR GAUGE. Use any size hook to obtain the gauge given.
Shawl Width 47". Shawl Length 23".
NOTE: Shawl is worked from side to side.
RIGHT SIDE
Ch 149.
Row 1 (WS): Dc in 3rd ch from hook, dc in each ch across, turn.
Row 2: Ch 2 (counts as st here and throughout), *Fpdc in next st, Bpdc in next st; repeat from * across, turn - 148 sts.
Row 3: Ch 2, *Bpdc in next st, Fpdc in next st, repeat from * across, turn.
Row 4-17: Repeat Row 2-3 for Mock Seed st.
Row 18: Repeat Row 2.
Row 19: Ch 1, sc in every st across row, turn. Place marker after 74th st for center of Shoulder.
Row 20: Ch 3 (count as dc), dc in next st, *skip next 3 sts, tr in next st, dc in each skipped st working behind tr just made; repeat from * to marker for Front, [skip next st, dc in next 3 sts, working in front of 3 dc just made, tr in skipped st] to last 2 sts, dc in 2 sts for Back, turn.
Row 21: Ch 3, dc in next st, [skip next st, dc in each of next 3 dc, working behind 3 dc just made, tr in skipped st] across to marker for Back, [skip next 3 sts, tr in next st, dc in each of the 3 sts skipped in front of the tr just made] to last 2 sts, dc in 2 dc, turn.
Row 22: Ch 3 (count as dc), dc in each st across, turn.
Row 23: Ch 1, sc in next 2 sts, *bobble in next st, sc in next 3 sts; repeat from * to last 2 sts, bobble in next st, sc in last st, turn.
Row 24: Ch 3 (count as dc), dc in each st across, turn.
Row 25: Ch 1, sc in next 4 sts, *bobble in next st, sc in next 3 sc; repeat from * turn.
Row 26-29: Repeat Rows 22-25.
Row 30-31: Ch 1, sc in each st across, turn.
Row 32-33: Repeat Rows 20-21.
Row 34: Ch 1, sc in each st, across, turn.
Row 35: Ch 3, dc in each st, turn.
Row 36, 37: Repeat Rows 2 and 3.
Row 38: Repeat Row 2.
Shape Back Neck
Row 39: Work Row 3 on next 70 sts, turn.
Row 40-44: Working on 70 sts only for Back, repeat Rows 2-3. Do not fasten off.
RIGHT FRONT
Row 1: Skip next 32 sts along Row 38. Join second ball of yarn in next st, ch 1, sc in next st, hdc in next st, *Bpdc in next st, Fpdc in next st; repeat from * across, turn - 46 dc.
Rows 2, 4 and 6: Work as established to last 2 sts before hdc, hdc in next st, sc in next st, turn.
Rows 3, 5 and 7: Slip st in next st, sc in next st, hdc in next st, work as established across, turn.
Fasten off.
LEFT FRONT
Ch 38.
Row 1: Slip st in first 2 chs, sc in next ch, hdc in next ch, dc in each of the next 34 sts, turn.
Rows 2 and 4: Ch 2, *Fpdc in next dc, Bpdc in next dc; repeat from * to last hdc, Fpdc in hdc, Bpdc in sc, hdc in next slip st, sc in last slip st, turn.
Rows 3 and 5: Ch 4, slip st in first 2 chs, sc in next ch, hdc in next ch, Bpdc in next sc, Fpdc in next hdc, *Bpdc in next st, Fpdc in next st; repeat from * across, turn.
Row 6: Ch 2, *Fpdc in next dc, Bpdc in next dc; repeat from * to last hdc, Fpdc in hdc, Bpdc in sc, hdc in next slip st, sc in last slip st, ch 2 - 46 sts.
Fasten off.
LEFT SIDE
Return to Row 44 of Back Neck to work across all sts and join for Left Side.
Row 45: Work as established for 70 sts, ch 32, work across 46 sts of Left Front, turn.
Row 46: Work as established, working dc in each ch, across, turn - 148 sts. Place marker after 74th st for center of Shoulder.
Row 47: Ch 2, *Bpdc in next st, Fpdc in next st; repeat from * across, turn.
Row 48: Ch 2, *Fpdc in next st, Bpdc in next st; repeat from * across, turn.
Row 49-50: Ch 1, sc in each st, turn.
Row 51: Ch 3 (count as dc), dc in next st, *skip next 3 sts, tr in next st, dc in each skipped st working behind tr just made; repeat from * to marker for Front, [skip next st, dc in next 3 sts, working in front of 3 dc just made, tr in skipped st] to last 2 sts, dc in 2 sts for Back, turn.
Row 52: Ch 3, dc in next st, [skip next st, dc in each of next 3 dc, working behind 3 dc just made, tr in skipped st] across to marker for Back, [skip next 3 sts, tr in next st, dc in each of the 3 sts skipped in front of the tr just made] to last 2 sts, dc in 2 dc, turn.
Row 53: Ch 3 (count as dc), dc in each st across, turn.
Row 54 (WS): Ch 1, sc in next 2 sts, *bobble in next st, sc in next 3 sc; repeat from * to last 2 sts, bobble in next st, sc in top of beginning ch, turn.
Row 55: Ch 3 (count as dc), dc in each st across, turn.
Row 56: Ch 1, sc in next 4 sts, *bobble in next st, sc in next 3 sc; repeat from * across, turn.
Rows 57-60: Repeat Rows 54-56.
Rows 61-62: Ch 1, sc in each st, turn.
Rows 63-64: Repeat Rows 51-52.
Row 65: Ch 1, sc in each st, turn.
Row 66: Ch 2, *Fpdc in next st, Bpdc in next st; repeat from * across, turn.
Row 67: Ch 2, *Bpdc in next st, Fpdc in next st; repeat from * across, turn.
Row 68-83: Repeat Rows 66-67. Fasten off.
FINISHING
Neckband
Row 1: With wrong side facing, join yarn to front edge of Left Front and work in sc evenly around front edge, Back neck and Right Front edge, turn.
Rows 2-4: Ch 1, sc in each sc around, turn.
Round 5 (Buttonhole Row): Work in sc to beginning of neck shaping on Right Front edge, ch 3, skip next 3 sc, sc in each of next 5 sc, ch 3, skip next 3 sc, sc to the end, turn to work along bottom edge and sc evenly around bottom and side edges, join with a slip st to first st.
Round 6: Ch 1, sc in each st around, join with a slip st to first st.
Round 7: Work reverse sc in each st around join with a slip st to first st.
Fasten off.
Sew buttons opposite buttonholes. Weave in ends.
ABBREVIATIONS: ch = chain; dc = double crochet; Bpdc = Back post double crochet; Fpdc = Front post double crochet; hdc = half double crochet; mm = millimeters; sc = single crochet; st(s) = stitch(es); tr = triple or treble crochet; yo = yarn over needle; [ ] = work directions in brackets the number of times specified; * or ** = repeat whatever follows the * or ** as indicated.
Special Abbreviations:
Bobble: [Yo, draw up a loop, yo, pull through 2 loops] 4 times in same st, yo, draw through all loops on hook, ch 1. Ch 1 does not count as a stitch. Do not work any stitches in the ch-1 of Bobble.
Pattern © by Coats & Clark Inc. Reproduced with permission from Coats & Clark Inc. PurpleKittyYarns.com is not endorsed by Coats & Clark Inc. It is not permissible to contract production of projects made from designs published by Coats & Clark to a third party for sale or distribution.
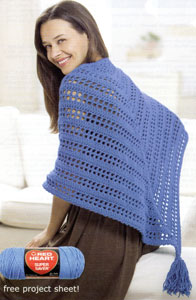
Crochet Triangle Shawl LW1698
Skill Level: Easy
Designed by Drew Emborsky.
Shawl measures 35" at center without tassel.
RED HEART® "Super Saver®": 2 Skeins 885 Delft Blue.
Crochet Hook: 6mm [US J-10].
Susan Bates® Crystalites® Tassel Tool, Art. 14110.
Yarn needle.
GAUGE: Rows 1-6 = 4" from beginning to center point.
CHECK YOUR GAUGE. Use any size hook to obtain the gauge.
Note: Ch 2 at beginning of hdc rows does NOT count as a stitch. Ch 3 at beginning of dc rows DOES count as a stitch.
Ch 3; join with a slip st to first ch to form ring; slip st into ring.
Row 1 (Right Side): Ch 1, 5 sc in ring; turn.
Row 2: Ch 2, hdc in first sc, [ch 1, hdc in next sc] 4 times; turn.
Row 3: Ch 3, dc in first hdc, [dc in next ch-1 space, dc in next hdc] 3 times, dc in next space, 2 dc in last hdc; turn - 11 sts.
Row 4: Ch 3, dc in first dc, ch 1, [dc in next dc, ch 1] 4 times, (dc, ch 2, dc) all in next dc to form center point, [ch 1, dc in next dc] 4 times, ch 1, 2 dc in top of ch-3; turn.
Row 5: Ch 3, dc in first dc, [ch 1, dc in next dc] 6 times, (2 dc, ch 2, 2 dc) all in ch-2 space, [dc in next dc, ch 1] 6 times, 2 dc in top of ch-3; turn.
Row 6: Ch 1, working in front loops only, 2 sc in first dc, sc in each dc and space to center ch-2 sp; 3 sc in ch-2 space, sc in front loop of each dc and space to last st; 2 sc in top of ch-3; turn.
Row 7: Ch 2, 2 hdc in first sc, hdc in each sc to center sc of 3-sc group at point; (hdc, ch 2, hdc) all in center (2nd) sc at point, hdc in each sc to last sc; 2 hdc in last sc; turn.
Row 8: Ch 3, dc in first hdc, ch 1, skip next hdc, * dc in next hdc, ch 1, skip next hdc; repeat from * to center space; (2 dc, ch 2, 2 dc) all in ch-2 space, ch 1, skip next hdc, ** dc in next hdc, ch 1, skip next hdc; repeat from ** to last hdc; 2 dc in last hdc; turn.
Row 9: Ch 3, dc in first dc, * ch 1, dc in next dc; repeat from * to center ch-2 space; (2 dc, ch 2, 2 dc) all in ch-2 space, ** dc in next dc, ch 1; repeat from * to last st; 2 dc in top of ch-3; turn.
Rows 10-41: Repeat Rows 6-9.
Row 42: Repeat Row 6; do not turn but work sc evenly across row ends of long edge, taking care to keep work flat; join with a slip st to first sc; turn.
EDGING-Rnd 1: Ch 1, sc in first sc, ch 1, * sc in front loop of sc just made, ch 1, skip next sc, sc in next sc, ch 1; repeat from * around entire shawl; join with a slip st to first sc. Fasten off. Weave in ends.
FINISHING: Using Tassel Tool, create a 5 ½" tassel. Securely attach to center point of shawl.
ABBREVIATIONS: ch = chain; dc = double crochet; hdc = half double crochet; mm = millimeters; sc = single crochet; st(s) = stitch (es); * or ** = repeat whatever follows the * or ** as indicated; [ ] = work directions in brackets the number of times specified.
Pattern © by Coats & Clark Inc. Reproduced with permission from Coats & Clark Inc. PurpleKittyYarns.com is not endorsed by Coats & Clark Inc. It is not permissible to contract production of projects made from designs published by Coats & Clark to a third party for sale or distribution.
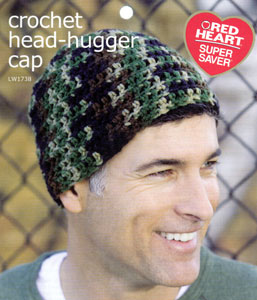
Crochet Head-Hugger Cap LW1738
Skill Level: Beginner
Designed by Edie Eckman
RED HEART® "Super Saver™": 1 skein 971 Camouflage
Crochet Hook: 5.5 mm (US I-9)
Yarn needle.
To fit 22-23" head
GAUGE: 11 double crochet = 4"; 7 rows = 4" in double crochet.
CHECK YOUR GAUGE. Use any size hook to obtain the specified gauge.
Finished Circumference 21".
HAT
Chain 4, join with slip stitch to form ring.
Round 1: Chain 3 (counts as double crochet throughout), work, 11 double crochet into ring, slip stitch to first double crochet to join - 12 double crochet.
Round 2: Chain 3, double crochet in same st, 2 double crochet in each double crochet around, slip stitch to first double crochet to join - 24 double crochet.
Round 3: Chain 3, 2 double crochet in next double crochet, *double crochet in next double crochet, 2 double crochet in next double crochet; repeat from *, slip stitch to first double crochet to join - 36 double crochet.
Round 4: Chain 3, double crochet in next dc, 2 double crochet in next double crochet, *double crochet in next 2 double crochet, 2 double crochet in next double crochet; repeat from *, slip stitch to first double crochet to join - 48 double crochet.
Round 5: Chain 3, double crochet in next 4 double crochet, 2 double crochet in next double crochet, *double crochet in next 5 double crochet, 2 double crochet in next double crochet; repeat from *, slip stitch to first double crochet to join - 56 double crochet.
Rnds 6-14: Chain 3, double crochet in each double crochet around, slip stitch to first double crochet to join.
Fasten off.
FINISHING Weave in ends.
ABBREVIATIONS: mm = millimeters; * = repeat whatever follows the * as indicated.
Pattern © by Coats & Clark Inc. Reproduced with permission from Coats & Clark Inc. PurpleKittyYarns.com is not endorsed by Coats & Clark Inc. It is not permissible to contract production of projects made from designs published by Coats & Clark to a third party for sale or distribution.
Kid's Digs LW1433
Skill Level: Easy
Designed by Mary Jane Protus.
Afghan measures approximately 41" wide by 53" long.
RED HEART® "Bright & Lofty™", Art. E725 (4 ounce/95 yard skein): 22 Ounces No. 9911 Snowcone CA.
RED HEART® "Super Saver®", Art. E300 (8 ounce/452 yard skein): 10 Ounces No. 311 White CB.
Crochet Hooks: 10mm [US N-15] and 6.5mm [US K10.5].
Yarn needle.
GAUGES: 3 V-sts = 4 ½"; 5 rows = 5" with larger hook and CA; 5 rows = 3" with smaller hook and CB.
CHECK YOUR GAUGE. Use any size hooks to obtain the gauges.
With larger hook and CA, ch 85.
Row 1 (Wrong Side): (Dc, ch 1, dc) all in 5th ch from hook, skip next 2 ch; (dc, ch 1, dc) all in next ch - v-st made; * skip next 2 ch, v-st in next ch; rep from * to last 2 ch; skip next ch, dc in last ch; turn.
Rows 2-5: Ch 3, * v-st in ch-1 sp of next v-st; rep from * to last st; dc in top of ch; turn. At end of Row 5, change to smaller hook and CB.
Row 6: With smaller hook and CB, ch 3, dc in first dc, v-st in ch-1 sp of next v-st, * v-st between next two v-sts, v-st in ch-1 sp of next v-st; rep from * to last st; 2 dc in top of ch; turn.
Rows 7-10: Ch 3, dc in first dc, * v-st in ch-1 sp of next v-st; rep from * to last st; 2 dc in top of ch; turn. At end of Row 10, change to larger hook and CA.
Row 11: With larger hook and CA, ch 3, * v-st in ch-1 sp of next v-st **, skip next v-st; rep from * to last st, end at **; dc in top of ch; turn.
Rows 12-15: Rep Rows 2-5.
Rep Rows 6-15 five more times - 7 CA sections. Fasten off.
Edging: With wrong side facing and larger hook, attach CA in any corner; ch 1, * (sc, ch 1, sc) all in corner, work sc evenly across to next corner; rep from * around; join with a sl st to first sc. Fasten off. Weave in ends.
ABBREVIATIONS: CA, CB = Color A, Color B; ch = chain; dc = double crochet; mm = millimeters; rep = repeat; sc = single crochet; sl = slip; sp = space; st(s) = stitch (es); * or ** = repeat whatever follows the * or ** as indicated.
Pattern © by Coats & Clark Inc. Reproduced with permission from Coats & Clark Inc. PurpleKittyYarns.com is not endorsed by Coats & Clark Inc. It is not permissible to contract production of projects made from designs published by Coats & Clark to a third party for sale or distribution.
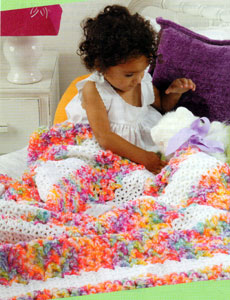
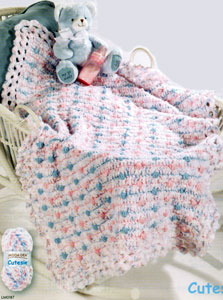
Crochet Baby Blanket LM0187
Skill Level: Easy
Designed by Denise Black.
Blanket measures approximately 32" wide x 42" long.
MODA-DEA™ "Cutesie™". Art. R129 (1.76 ounce/46 yard ball): 13 Balls No. 3730 Cotton Candy CA.
RED HEART® "Super Saver®", Art. E300 (7 ounce/364 yard skein): 3 Ounces No. 724 Baby Pink CB.
RED HEART® "Super Saver®", Art. E300 (7 ounce/364 yard skein): 3 Ounces No. 381 Light Blue CC.
Crochet Hook: 6.5mm [US K-10.5].
Yarn needle.
GAUGE: 10 sts = 4"; 9 rows = 4" in pat.
CHECK YOUR GAUGE. Use any size hook to obtain the gauge.
SPECIAL ABBREVIATION:
CL (Cluster): [yarn over and draw up a lp, yarn over and draw through 2 lps] 5 times all in st indicated, yarn over and draw through all 6 lps on hook; ch 1. Push CL to the right side of the fabric.
NOTE: To Change Color: With color in use, work last st of row until 2 lps remain on hook, drop color in use; with next color to be used yarn over and draw through 2 lps remaining on hook. Continue working with new color.
With CA, ch 73.
Row 1 (Right Side): Sc in 2nd ch from hook and each ch across; turn - 72 sc.
Row 2: With CA, ch 3 (counts as a dc on this and following rows), skip first sc, dc in next sc and in each sc across, changing to CB in last dc; turn. Cut CA.
Row 3: With CB, ch 1, sc in first 3 dc, CL in next dc, * sc in next 9 dc, CL in next dc; rep from * to last 8 sts; sc in next 7 dc, sc in top of ch-3 changing to CA; turn. Cut CB.
Row 4: With CA, ch 3, skip first sc, dc in next sc and in each sc and each CL across, changing to CC in last dc; turn. Cut CA.
Row 5: With CC, ch 1, sc in first 8 dc, CL in next dc, * sc in next 9 dc, CL in next dc; rep from * to last 3 sts; sc in next 2 dc, sc in top of ch-3 changing to CA. Cut CC.
Row 6: With CA, ch 3, skip first sc, dc in next sc and in each sc and each CL across, changing to CB in last dc; turn. Cut CA.
Rows 7 through 78: Rep Rows 3 through 6 eighteen times.
Rows 79 and 80: Rep Rows 3 and 4. At end of last row do not change color. Do NOT cut CA, but turn to work next (right side) round.
Edging-Rnd 1 (Right Side): With CA, ch 1, 3 sc in first dc, sc in each dc to last st; 3 sc in top of ch-3; working along next side in ends of rows, work 1 sc in each sc row and work 2 sc in each dc row; working along lower edge in unused lps of beg ch, 3 sc in first lp, sc in each lp to last lp; 3 sc In last lp; working along next side edge in ends of rows, work 1 sc in each sc row and work 2 sc in each dc row: join with a sl st in first sc - 396 sc.
Rnd 2: Ch 1, sc in same st as joining, ch 4, skip next 2 sc, * sc in next sc, ch 4, skip next 2 sc; rep from * around; join in first sc - 132 ch-4 sps.
Rnd 3: Sl st in first ch-4 sp, ch 1, * (sc, hdc, dc, hdc, sc) all in sp; rep from * around: join in first sc.
Rnd 4: Sl st to next dc, ch 1, * sc in dc, ch 4; rep from * around; join in first sc.
Rnd 5: Sl st in first ch-4 sp, ch 1, * (sc, hdc, dc, hdc, sc) all in sp; rep from * around; join in first sc. Fasten off. Weave in all ends.
ABBREVIATIONS: CA = Color A; CB = Color B; CC = Color C; ch = chain; dc = double crochet; hdc = half double crochet; lp(s) = loop (s); mm = millimeters; pat = pattern; rep = repeat; rnd (s) = round(s); sc = single crochet; sl = slip; sp(s) = space (s); st(s) = stitch (es); * = repeat whatever follows the * as indicated.
Pattern © by Coats & Clark Inc. Reproduced with permission from Coats & Clark Inc. PurpleKittyYarns.com is not endorsed by Coats & Clark Inc. It is not permissible to contract production of projects made from designs published by Coats & Clark to a third party for sale or distribution.
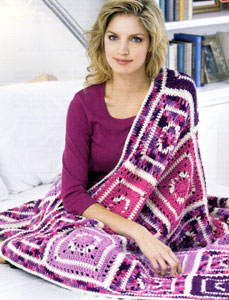
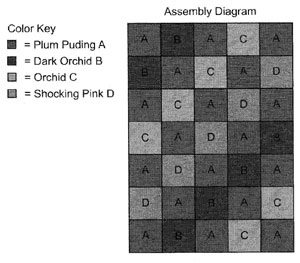
Passionate About Purple Throw LW1766
Skill Level: Easy
Designed by Elaine Bartlett.
Throw measures 45" x 66".
RED HEART® "Super Saver®": 4 skeins 940 Plum Pudding A; 2 skeins 313 Aran E; 1 skein each 776 Dark Orchid B, 530 Orchid C and 718 Shocking Pink D.
Crochet Hook: 6 mm (US J-10).
Yarn needle.
GAUGE: Square = 9".
CHECK YOUR GAUGE: Use any size hook to obtain gauge given.
THROW
Square
(Make 35 total; 18 squares with A as MC, 6 squares each with B or C as MC, and 5 squares with D as MC.)
With MC, ch 4, join with sl st to form ring.
Round 1 (right side): Ch 3 (counts as first dc now and throughout), work 11 dc in ring, join with slip st to top of beginning ch - 12 dc.
Round 2: Ch 4 (counts as first dc and ch-1 space), *dc in next dc, ch 1; repeat from * around, join with slip st to 3rd ch of beginning ch - 12 dc, 12 ch-1 spaces.
Fasten off.
Round 3: With right side facing, join E with sc in any dc, ch 1, *hdc in next dc, (dc, ch 2, dc) in next ch-1 space, hdc in next dc, ch 1, sc in next dc, ch 1, repeat from * twice, hdc in next dc, (dc, ch 2, dc) in next ch-1 space, hdc in next dc, ch 1, join with slip st first sc.
Fasten off.
Round 4: With right side facing, join MC with sc in ch-1 space before a sc, ch 3 (counts as first dc), dc in sc, dc in next ch-1 space, ch 1, skip next hdc, *dc in next dc, (2 dc, ch 2, 2 dc) in corner ch-2 space, dc in next dc, ch 1, skip hdc, dc in ch-1 space, dc in next sc, dc in ch-1 space, ch 1, skip hdc; repeat from * twice, dc in next dc, (2 dc, ch 2, 2 dc) in corner ch-2 space, dc in next dc, ch 1, skip hdc, join with slip st to top of beginning ch.
Round 5: Ch 3, dc in each dc and each ch-1 space around, working (2 dc, ch 1, 2 dc) in each corner ch-2 space, join with slip st to top of beginning ch - 60 dc; 15 sts on each side.
Fasten off.
Round 6: With right side facing, join E in any corner ch-1 space, hdc in same space, ch 3, hdc in same space, hdc in each dc around, working (hdc, ch 3, hdc) in each corner space, join with slip st to first hdc.
Fasten off.
Round 7: With right side facing, join MC in any corner ch-3 space, ch 3 (counts as first dc), dc in same ch-3 space, ch 2, 2 dc in same space, dc in each dc around, working (2 dc, ch 2, 2 dc) in each corner space, join with slip st to top of beginning ch - 84 dc; 21 sts on each side.
Round 8: Ch 4, (counts as first dc and ch-1 space), [skip next dc, dc in next dc, ch 1] around, working (dc, ch 2, dc) in each corner space, join with slip st to top of beginning ch.
Fasten off.
Round 9: With right side facing, join E with in any corner ch-2 space, 2 sc in same ch-2 space, sc in each dc around, working 3 sc in each space around, join with slip st to first sc.
Fasten off.
FINISHING
Arranging squares in diagonal rows or as desired, sew Squares together.
Edging
Round 1: With right side facing, join E with in any st, sc in each st around, working 3 sc in the middle sc in each corner, group, join with slip st to first sc. Fasten off.
Round 2: With right side facing, join A in any sc, ch 3 (counts as first dc), dc in each sc around ,working 3 dc in the middle sc of each corner group, join with slip st to first sc.
Round 3: Ch 3 (counts as first dc), dc in each dc around, working 3 dc in the middle dc of each corner group, join with slip st to first sc.
Fasten off.
Round 4: With right side facing, join E in any st, sc in each dc around, working 3 sc in the middle dc of each corner group, join with slip st to first sc. Fasten off.
Weave in ends.
ABBREVIATIONS: A = Color A; B = Color B; C = Color C; ch = chain; D = Color D; dc = double crochet; hdc = half double crochet; MC = Main Color; mm = millimeters; sc = single crochet; st(s) = stitch(es); * = repeat whatever follows the * as indicated; [ ] = work directions in brackets the number of times specified.
Pattern © by Coats & Clark Inc. Reproduced with permission from Coats & Clark Inc. PurpleKittyYarns.com is not endorsed by Coats & Clark Inc. It is not permissible to contract production of projects made from designs published by Coats & Clark to a third party for sale or distribution.
| Pattern Categories Browse the categories to help you find the patterns you're looking for. |
||
    
|
|
|


Navigation

All contents © 2003-2026 Purple Kitty LLC. All rights reserved.
Privacy Policy | FAQ | About Me