 |
Red Heart Super Saver
Crochet Pumpkin Hat Pattern LW2830
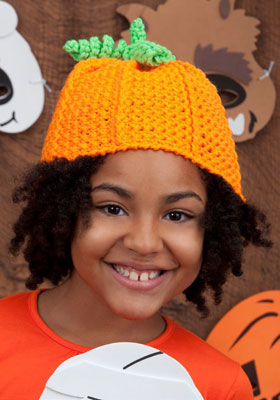
This cute pumpkin hat will crochet up so quickly you can make it for all the kids and create your own pumpkin patch! Pattern includes baby and adult sizes too, so everyone can be a pumpkin head.
Skill Level: EASY
Designed by Kathleen Sams.
Directions are for Baby hat; changes for child, adult, large adult hats are in parentheses.
To Fit Head: 14 (16, 20, 22)".
RED HEART® Super Saver®: 1 skein each 254 Pumpkin A and 672 Spring Green B.
Crochet Hook: 5.5mm [US-I 9].
Yarn needle, stitch markers.
GAUGE: 14 sts = 4"; 15 rounds = 4" in sc. CHECK YOUR GAUGE. Use any size hook to obtain the gauge.
Special Abbreviation
Fphdc (front post half double crochet) = yo and insert hook from front to back to front around the post of indicated stitch and draw yarn through, yo and draw through 3 loops on hook.
Special Technique
Reverse Sc: Ch 1, insert hook in last st worked and draw through a loop, yo and draw through 2 loops on hook, * insert hook in next st to the right and draw through a loop, yo and draw through 2 loops on hook; repeat from * across.
HAT
Hat-Stem
With B, ch 2; 4 sc in 2nd ch from hook; do not join but work in continuous rounds unless otherwise noted. Place marker for end of round and move up each round.
Rounds 1-5: Sc in each sc around - 4 sc.
Round 6: 2 sc in each sc around; join with a slip st in next st - 8 sc.
Round 7: Ch 1, sc in same sc as joining, ch 1, [sc in next sc, ch 1] 7 times; join in first sc changing to A - 8 sc, 8 ch-1 spaces.
Pumpkin
Round 8: With A, ch 1, 2 sc in same sc as joining, dc in ch-1 space, [2 sc in next sc, dc in next ch-1 space] 7 times; join to first sc - 24 sts.
Round 9: Ch 1, 2 sc in same sc as joining, 2 sc in next sc, Fphdc around post of next dc, [2 sc in each of next 2 sc, Fphdc around post of next dc] 7 times; join - 40 sts.
Round 10: Ch 1, sc in same st as joining and next sc, 2 sc in next sc, sc in next sc, Fphdc around next Fphdc, [sc in next 2 sc, 2 sc in next sc, sc in next sc, Fphdc around next Fphdc] 7 times; join - 48 sts.
Round 11: Ch 1, 1 (2, 2, 2) sc in same st as joining, sc in next 3 sc, 1 (2, 2, 2) sc in next sc, Fphdc around next Fphdc, [1 (2, 2, 2) sc in next sc, sc in next 3 sc, 1 (2, 2, 2) sc in next sc, Fphdc around next Fphdc] 7 times; join; TURN - 48 (64, 64, 64) sts.
Round 12 (Wrong Side): Ch 1, sc in same sc as joining, * ch 1, skip Fphdc **, sc in next 5 (7, 7, 7) sc; repeat from * to last 4 (6, 6, 6) sc, end at **; sc in last 4 (6, 6, 6) sc; join; TURN.
Round 13 (Right Side): Ch 1, 1 (1, 1, 2) sc in same sc as joining, sc in next 4 (6, 6, 5) sc, [2 sc in next sc] 0 (0, 0, 1) time, Fphdc around next Fphdc 2 rows below, * 1 (1, 1, 2) sc in next sc, sc in next 4 (6, 6, 5) sc, [2 sc in next sc] 0 (0, 0, 1) time, Fphdc around next Fphdc 2 rows below; repeat from * around; join; TURN - 48 (64, 64, 80) sts.
Baby (Child, Adult) Only: Repeat Rounds 12 and 13 until 6 (7, 8)" from beginning, end Round 13; do NOT turn.
Large Adult Only-Round 14: Ch 1, sc in same sc as joining, * ch 1, skip Fphdc **, sc in next 9 sc; repeat from * to last 8 sc, end at **; sc in last 8 sc; join; TURN.
Round 15: Ch 1, sc in same sc as joining, sc in next 8 sc, Fphdc around next Fphdc 2 rows below, [sc in next 9 sc, Fphdc around next Fphdc 2 rows below] 7 times; join; TURN.
Repeat Rounds 14 and 15 until 9" from beginning, end Round 15; do NOT turn.
All Sizes-Edging Round: Ch 1, work Reverse sc in each st around. Fasten off. Weave in ends.
Curly Leaves (Make 3)
Ch 17; 5 sc in 2nd ch from hook, 3 sc in each ch across. Fasten off. Weave in ends. Sew around stem as desired.
ABBREVIATIONS: A, B = color A, B; ch = chain; dc = double crochet; hdc = half double crochet; mm = millimeters; sc = single crochet; st(s) = stitch(es); yo = yarn over; * or ** = repeat whatever follows the * or ** as indicated; [ ] = work directions in brackets the number of times specified.
Pattern © by Coats & Clark Inc. Reproduced with permission from Coats & Clark Inc. PurpleKittyYarns.com is not endorsed by Coats & Clark Inc. It is not permissible to contract production of projects made from designs published by Coats & Clark to a third party for sale or distribution.
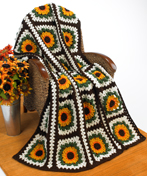
Crochet Sunflower Afghan WR1028
Skill Level: Intermediate
Designed by Mary Jane Protus.
Afghan measures approximately 50" x 64".
RED HEART® "Super Saver®": 16 Ounces No. 365 Coffee CA, 3 ounces No. 254 Pumpkin CB, 5 ounces No. 321 Gold CC, 10 ounces No. 406 Med. Thyme CD, and 20 ounces No. 313 Aran CE.
Crochet Hook: 6mm [US J-10].
Yarn needle.
GAUGE: Square measures approximately 10½ " x 10½". CHECK YOUR GAUGE. Use any size hook to obtain the gauge.
SPECIAL ABBREVIATIONS:
PST (Puff Stitch): [Yo and draw up a lp] 3 times all in the same st, yo and draw through all 7 lps on hook.
Tr3tog: * [Yo] twice, draw up a lp in sp indicated, [yo and draw through 2 lps on hook] twice; rep from * twice more, yo and draw through 4 lps remaining on hook.
Trpc (Tr Popcorn): Work 4 tr in same st, drop lp from hook, insert hook in top of first tr or ch 4 and into dropped lp, pull lp through.
VST: (dc, ch 1, dc) all in same st.
SQUARE (Make 24): With CA, ch 5; join with a sl st to form a ring.
Rnd 1: Ch 1, 12 sc in ring; join with a sl st in first sc.
Rnd 2: Ch 4, skip first sc, [PST in next sc, ch 1, dc in next sc, ch 1] 5 times, PST in next sc, ch 1; join with a sl st in 3rd ch of ch-4. Fasten off.
Rnd 3: Join CB in any PST; ch 1, * (sc, ch 3, sc) all in PST, sc in next ch-1 sp, (sc, ch 3, sc) all in next dc, sc in next ch-1 sp; rep from * around; join with a sl st in first sc. Fasten off.
Rnd 4: Join CC in any ch-3 sp; ch 1, [(sc, ch 4, Tr3tog, ch 4, sc) all in ch-3 sp] 12 times; join. Fasten off.
Rnd 5: Join CD in any Tr3tog; ch 1, [sc in Tr3tog, ch 5] 12 times; join.
Rnd 6: Ch 1, [sc in sc, (3 sc, ch 2, 3 sc) all in ch-5 sp] 12 times; join.
Rnd 7: Ch 1, [sc in sc, ch 4, Trpc in ch-2 sp, ch 4] 12 times; join. Fasten off.
Rnd 8: Join CE in first ch-4 sp of Rnd 7; ch 1, * sc in sp, ch 3 (corner sp), sc in next sp, ch 2, VST in next sc, ch 2, [sc in next sp, ch 1, sc in next sp, ch 2, VST in next sc, ch 2] twice; rep from * around; join.
Rnd 9: (Sl st, ch 3, 2 dc, ch 2, 3 dc) all in first ch-3 sp, * 3 dc in ch-1 sp of next VST, [3 dc in next ch-1 sp, 3 dc in ch-1 sp of VST] twice **, (3 dc, ch 2, 3 dc) all in corner ch-3 sp; rep from * around, end at **; join in top of ch-3.
Rnd 10: (Sl st, ch 3, 2 dc, ch 2, 3 dc) all in first ch-2 sp, * [3 dc between 3-dc groups] 6 times **, (3 dc, ch 2, 3 dc) all in corner sp; rep from * around, end at **; join. Fasten off.
Rnd 11: Join CA in ch-2 sp of any corner; ch 3, (2 dc, ch 2, 3 dc) all in same sp, * [3 dc between 3-dc groups] 7 times **, (3 dc, ch 2, 3 dc) all in corner sp; rep from * around, end at **; join. Fasten off.
MIDDLE STRIP (Make 3): With CE, ch 233.
Row 1: Sc in 2nd ch from hook, ch 2, skip 2 ch, sc in next ch, [sc in next ch, ch 2, skip 2 ch, sc in next ch] 57 times - 58 ch- 2 sps; do NOT turn but now work around as follows:
Rnd 1 (Right Side): Ch 5 (counts as a dc and ch-2), working over the last sc, (3 dc, ch 2, 3 dc) in the last ch-2 sp made, * 3 dc in next ch-2 sp; rep from * across to last sp; working over the first sc of Row 1, (3 dc, [ch 2, 3 dc] twice) all in last sp; working on opposite side of Row 1 rep from * to last ch-2 sp; 2 dc in last sp; join with a sl st in 3rd ch of ch-5. Fasten off.
Rnd 2: Join CA in first ch-2 sp made on Rnd 1 (part of ch-5); ch 3, (2 dc, ch 2, 3 dc) all in same sp, (3 dc, ch 2, 3 dc) in next ch-2 sp, * 3 dc between 3-dc groups; rep from * across to ch-2 sp of next corner; [(3 dc, ch 2, 3 dc) in ch-2 sp] twice; rep from * across; join in top of ch 3. Fasten off.
FINISHING: Sew squares together in 4 strips of 6 squares each. Sew Middle Strips between Sunflower Strips matching 3-dc groups along side of squares and one 3-dc group over the seam area between squares.
EDGING-Rnd 1: With right side facing, join CA in ch-2 corner sp of square at upper right corner; ch 5, 3 dc in same sp, * work 3 dc between 3-dc groups and work 3 dc in each sp before and after seams; rep from * to ch-2 sp of next corner; ** (3 dc, ch 2, 3 dc) all in ch-2 corner sp, work 3 dc between 3-dc groups to next corner ***; (3 dc, ch 2, 3 dc) all in corner sp; rep from * around, end at ***; 2 dc in first sp; join in 3rd ch of ch-5.
Rnd 2: (Sl st, ch 1, sc, ch 2, sc) all in first sp, ch 1, skip next dc, sc in next dc, * ch 1, sc between 3-dc groups, ch 1, skip next dc, sc in next dc; rep from * to next ch-2 corner sp; (sc, ch 2, sc) all corner sp; rep from * around; join. Fasten off. Weave in ends.
ABBREVIATIONS: CA, CB, CC, etc = Colors A, B, C, etc.; ch = chain; dc = double crochet; lp = loop; mm = millimeters; rep = repeat; rnd = round; sc = single crochet; sl = slip; sp = space; st(s) = stitch (es); tr = treble crochet; yo = yarn over; * or ** = repeat whatever follows the * or ** as indicated; [ ] = work directions in brackets the number of times specified.
Pattern © by Coats & Clark Inc. Reproduced with permission from Coats & Clark Inc. PurpleKittyYarns.com is not endorsed by Coats & Clark Inc. It is not permissible to contract production of projects made from designs published by Coats & Clark to a third party for sale or distribution.
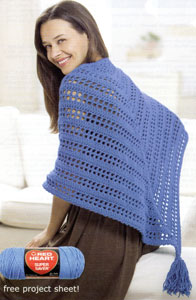
Crochet Triangle Shawl LW1698
Skill Level: Easy
Designed by Drew Emborsky.
Shawl measures 35" at center without tassel.
RED HEART® "Super Saver®": 2 Skeins 885 Delft Blue.
Crochet Hook: 6mm [US J-10].
Susan Bates® Crystalites® Tassel Tool, Art. 14110.
Yarn needle.
GAUGE: Rows 1-6 = 4" from beginning to center point.
CHECK YOUR GAUGE. Use any size hook to obtain the gauge.
Note: Ch 2 at beginning of hdc rows does NOT count as a stitch. Ch 3 at beginning of dc rows DOES count as a stitch.
Ch 3; join with a slip st to first ch to form ring; slip st into ring.
Row 1 (Right Side): Ch 1, 5 sc in ring; turn.
Row 2: Ch 2, hdc in first sc, [ch 1, hdc in next sc] 4 times; turn.
Row 3: Ch 3, dc in first hdc, [dc in next ch-1 space, dc in next hdc] 3 times, dc in next space, 2 dc in last hdc; turn - 11 sts.
Row 4: Ch 3, dc in first dc, ch 1, [dc in next dc, ch 1] 4 times, (dc, ch 2, dc) all in next dc to form center point, [ch 1, dc in next dc] 4 times, ch 1, 2 dc in top of ch-3; turn.
Row 5: Ch 3, dc in first dc, [ch 1, dc in next dc] 6 times, (2 dc, ch 2, 2 dc) all in ch-2 space, [dc in next dc, ch 1] 6 times, 2 dc in top of ch-3; turn.
Row 6: Ch 1, working in front loops only, 2 sc in first dc, sc in each dc and space to center ch-2 sp; 3 sc in ch-2 space, sc in front loop of each dc and space to last st; 2 sc in top of ch-3; turn.
Row 7: Ch 2, 2 hdc in first sc, hdc in each sc to center sc of 3-sc group at point; (hdc, ch 2, hdc) all in center (2nd) sc at point, hdc in each sc to last sc; 2 hdc in last sc; turn.
Row 8: Ch 3, dc in first hdc, ch 1, skip next hdc, * dc in next hdc, ch 1, skip next hdc; repeat from * to center space; (2 dc, ch 2, 2 dc) all in ch-2 space, ch 1, skip next hdc, ** dc in next hdc, ch 1, skip next hdc; repeat from ** to last hdc; 2 dc in last hdc; turn.
Row 9: Ch 3, dc in first dc, * ch 1, dc in next dc; repeat from * to center ch-2 space; (2 dc, ch 2, 2 dc) all in ch-2 space, ** dc in next dc, ch 1; repeat from * to last st; 2 dc in top of ch-3; turn.
Rows 10-41: Repeat Rows 6-9.
Row 42: Repeat Row 6; do not turn but work sc evenly across row ends of long edge, taking care to keep work flat; join with a slip st to first sc; turn.
EDGING-Rnd 1: Ch 1, sc in first sc, ch 1, * sc in front loop of sc just made, ch 1, skip next sc, sc in next sc, ch 1; repeat from * around entire shawl; join with a slip st to first sc. Fasten off. Weave in ends.
FINISHING: Using Tassel Tool, create a 5 ½" tassel. Securely attach to center point of shawl.
ABBREVIATIONS: ch = chain; dc = double crochet; hdc = half double crochet; mm = millimeters; sc = single crochet; st(s) = stitch (es); * or ** = repeat whatever follows the * or ** as indicated; [ ] = work directions in brackets the number of times specified.
Pattern © by Coats & Clark Inc. Reproduced with permission from Coats & Clark Inc. PurpleKittyYarns.com is not endorsed by Coats & Clark Inc. It is not permissible to contract production of projects made from designs published by Coats & Clark to a third party for sale or distribution.
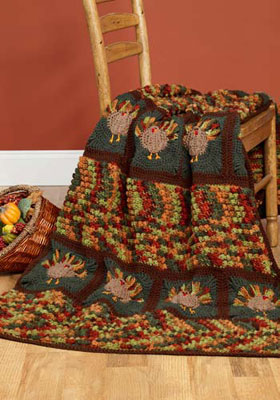
Crochet Turkey Talk Afghan WR1043
Skill Level: Intermediate
Designed by Michele Thompson
Afghan measures approximately 51" x 61½" before edging.
RED HEART® "Super Saver®": 4 Ounces No. 360 Cafe CA; 42 ounces No. 981 Fall CB; 9 ounces No.633 Dark Sage CC; 10 ounces No. 365 Coffee CD; 5 yards each No. 254 Pumpkin CE and No.376 Burgundy CF.
Crochet Hook: 6mm [US J-10].
Yarn needle.
GAUGES: Turkey square = 8 1/2" x 8 1/2". 16 sts = 5"; 16 rows = 5" in texture pat. CHECK YOUR GAUGE. Use any size hook to obtain the gauges.
NOTE: Afghan is made in strips of squares sewn together, then textured pattern is worked on both sides of two strips and sewn to center strip.
TURKEY SQUARE (Make 18): With CA, ch 3; join with a sl st to join to form a ring.
BODY REAR-Rnd 1: Ch 1, 8 sc in ring; join with a sl st in first sc.
Rnd 2: Ch 1, 2 sc in each sc around; join - 16 sc.
Rnd 3: Ch 1, [sc in sc, 2 sc in next sc] 8 times; join-24 sc.
Rnd 4: Ch 1, [sc in 2 sc, 2 sc in next sc] 8 times; join with CB in top of first sc - 32 sc. Fasten off CA.
Rnd 5A-FEATHERS: With CB, [ch 6; sc in 2nd ch from hook and next 4 ch, sl st into next sc] 16 times. Fasten off CB.
Rnd 5B: With right side facing, attach CC in same sc as last sl st; ch 3, 2 dc in next sc, [dc in next sc, 2 dc in next sc] 7 times; TURN - 24 sts.
Rnd 5C (Wrong Side): Ch 3, skip first dc, dc in next dc, 2 dc in next dc, [dc in next 2 dc, 2 dc in next dc] 7 times working last dc in top of ch-3; turn - 32 sts.
Rnd 6 (Right Side): Ch 1, [sc in 3 dc, 2 dc in next dc] 8 times working last sc in top of ch-3 - 40 sc; [2 sc across top of feather, ch 1, 2 sc across top of feather] 8 times - 40 sts over feathers = 80 sts total; join with a sl st to top of first sc.
Rnd 7: (Note: "st" = sc or ch.) Ch 1, sc in first 4 sc, hdc in next 2 sc, dc in next 2 sc, tr in next sc, (2 dtr, ch 2) all in next sc, * 2 dtr in next st, tr in next st, dc in next 2 sts, hdc in next 2 sts **, sc in next 8 sts, hdc in next 2 sts, dc in next 2 sts, tr in next st, (2 dtr, ch 2) all in next st; rep from * to last 4 sts, end at **; sc in last 4 sts; join. Fasten off.
Rnd 8: Attach CD in any corner ch-2 sp; (ch 3, dc, ch 1, 2 dc) all in corner sp, * dc in each st to next corner ch-2 sp **, (2 dc, ch 1, 2 dc) all in corner sp; rep from * around, end at **; join with a sl st in top of ch-3. Fasten off.
BODY FRONT (Make 18): With CA, ch 9; sc in 2nd ch from hook and in each ch across; turn - 8 sc.
Rnd 1: Beg at top of head, ch 1, 2 sc in first sc, sc in next 4 sc, hdc in next sc, dc in next sc, 3 dc in next sc; working on opposite side of beginning ch, 3 dc in first ch, dc in next ch, hdc in next ch, sc in next 4 ch, 2 sc in next ch; join with a sl st in first sc. Fasten off.
Sew Body Front onto Body Rear at center of square. Embroider legs and beak with CE. Wattle: With CF, ch 1. Fasten off. Attach to face as shown. Make 2 French knot eyes with CD.
STRIPS: Sew squares together to form 3 horizontal strips of 6 squares each.
Top Edging-On all 3 strips -Row 1: With right side facing, attach CD at top right-hand corner; ch 1, 28 sc across first square, [27 sc across next square] 5 times; turn - 163 sts.
Row 2: Ch 1, sc in each sc across. Fasten off.
Bottom Edging: Work same as for Top Edging across bottom of each strip.
TEXTURE PAT-On 2 strips only-Row 1 (Right Side): With right side facing, attach CB in first st of Edging; ch 1, sc in each sc across; turn.
Row 2: Ch 1, sc in first sc, * tr in next sc, sc in next sc; rep from * across; turn.
Row 3: Ch 1, sc in each st across; turn.
Row 4: Ch 1, sc in first 2 sc, * tr in next sc, sc in next sc; rep from * to last sc; sc in last sc; turn.
Row 5: Rep Row 3.
Rep Rows 2-5 until there are a total of 29 rows. Fasten off.
Rep Texture Pat on bottom of same 2 strips. Sew strip of squares with Edgings only in between strips with textured sections as pictured.
OUTSIDE EDGING: With right side facing, attach CD at top right-hand corner; ch 1, work sc evenly around all 4 sides and work 3 sc in each corner; join with a sl st in first sc; TURN. Repeat last rnd on the wrong side. Fasten off. Weave in ends.
ABBREVIATIONS: CA, CB, CC, etc = Colors A, B, C, etc.; ch = chain; dc = double crochet; dtr = double treble crochet; hdc = half double crochet; mm = millimeters; rep = repeat; rnd = round; sc = single crochet; sl = slip; sp = space; st(s) = stitch (es); tr = treble crochet; yo = yarn over; * or ** = repeat whatever follows the * or ** as indicated; [ ] = work directions in brackets the number of times specified
Pattern © by Coats & Clark Inc. Reproduced with permission from Coats & Clark Inc. PurpleKittyYarns.com is not endorsed by Coats & Clark Inc. It is not permissible to contract production of projects made from designs published by Coats & Clark to a third party for sale or distribution.
Cupcake Bag LW2813
First you make the cake, then you crochet the frosting and before you know it you have a fun cupcake bag. This project was designed for Halloween, but it works for birthday parties and other happy occasions.
Skill Level: EASY
Designed by Michele Wilcox.
Bag: 12" x 11" (excluding handles)
Red Heart® Super Saver®: 1 skein each 0706 Perfect Pink A, 0360 Cafe B, 0316 Soft White C, and 0319 Cherry Red D.
Crochet Hook: 5mm [US H-8]
Stitch marker, Yarn needle.
GAUGE: 13 sc = 4"; 13 rows = 4" in back loop only. 20 sc = 4"; 15 rows = 4" in both loops. CHECK YOUR GAUGE. Use any size needles to obtain the gauge.
NOTE: The cake is worked side to side. The Frosting is worked bottom up.
SPECIAL STITCHES:
Sc2tog = [draw up a loop in next st] twice, yarn over and draw through all 3 loops on hook.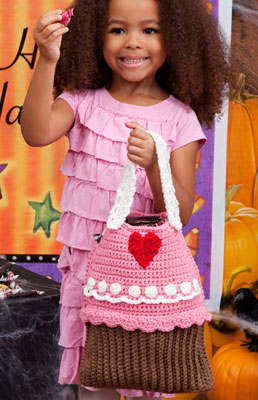
BAG
Cake (make 2)
With B, ch 21.
Row 1 (Right Side): Sc in 2nd ch from hook and in each remaining ch across; turn - 20 sc.
Rows 2-32: Ch 1, working in back loops only sc in each sc across; turn. After row 32, do not fasten off. Continue to Frosting.
FROSTING
Row 1: With B, ch 1, sc in sides of each row. Fasten off B, place marker in last st; turn - 32 sc. Rotate piece so this row becomes the Frosting of the cupcake.
Row 2: Join A with sc in first sc, 2 sc in next sc, sc to last 2 sc, 2 sc in next sc, sc in last sc; turn - 34 sc.
Row 3: Ch 1, working in back loops only, (sc in next sc, 2 sc in next sc) across; turn - 50 sc.
Row 4: Ch 1, working in both loops, (sc in next sc, sc2tog over next 2 sc) across; turn - 34 sc.
Row 5: Ch 1, (skip 1 sc, 4 hdc in next sc, skip 1 sc, slip st in next sc) across to last st, 4 hdc in last sc, slip st in side of row - 36 hdc. Fasten off.
Row 6: Join A with sc in first unused loop of Row 2, sc in each loop across; turn - 34 sc.
Rows 7 and 8: Ch 1, sc in each sc across; turn.
Row 9: Ch 1, sc in first sc, sc2tog over next 2 sc, sc to last 3 sc, sc2tog over next 2 sc, sc in last sc; turn - 32 sc.
Row 10: Ch 1, sc in back loop of first sc, (sc in both loops of next 3 sc, sc in back loop of next sc) 7 times, sc in next 2 sc, sc in back loop of last sc; turn - 32 sc.
Rows 11-15: Ch 1, sc in both loops of each sc across; turn.
Row 16: Repeat row 9-30 sc.
Row 17: Ch 1, sc in each sc across; turn.
Rows 18-21: Repeat rows 16 and 17 twice. Place marker in final st of Row 19.
Row 22: Repeat row 16-24 sc.
Rows 23-27: Repeat Row 9-14 sc. Fasten off.
Edging
Join B with sc in marked st of Frosting Row 1, sc around cupcake matching colors and putting 3 sc in each bottom corner, changing to A, continue with A sc in side of each row and in top of each st of Frosting.
Heart: (make 2)
With D ch 7, slip st in 2nd ch from hook, sc in next ch, hdc in next ch, dc in next ch, (4 tr, ch 3, slip st) in next ch, slip st in last ch, ch 3, (4 tr) in underside of first ch of foundation ch, dc in next ch, hdc in next ch, sc in next ch, slip st last ch. Fasten off leaving a long tail for sewing heart in place on top center of cupcake.
White chain: Join C with sc in first unused loop on Row 9 on Frosting, *ch 5, sc in next unused loop; repeat from *across. Fasten off.
Dots (Make 16)
With C ch 2, work 6 sc in 2nd ch from hook; join with slip st in first sc. Fasten off, leaving long tail for sewing. With yarn needle, sew one dot above each white chain loop.
FINISHING
Holding wrong sides together and matching sts, join A with sc in marked st of Frosting Row 19, sc thru back loops only of both pieces down left side, at Frosting Row 1, change to B and continue working toward bottom corner, 3 sc in bottom corner, sc across to next corner, 3 sc in next corner, sc up the sides, switching to A to sc in sides of rows of Frosting, continue until Row 19 of Frosting. Fasten off.
Handle (Make 2)
With C ch 36.
Round 1: Sc in 2nd ch from hook and in next 33 chs, 3 sc in last ch, working in underside of foundation chs, work sc in each of next 33 chs, 2 sc in last ch - 72 sc.
Round 2: Sc in first sc, (ch 3, skip 1 sc, sc in next sc) around; join with slip st in first sc. Fasten off. With yarn needle and C, sew one strap in place on each side of bag.
Abbreviations: A, B, C = Color A, B, C; ch = chain; dc = double crochet; dec = decrease; hdc = half double crochet; inc = increase; mm = millimeters; sc2tog = single crochet decrease; sc = single crochet; st(s) = stitch(es); tr = treble crochet; * or ** = repeat whatever follows the * or ** as indicated.
Pattern © by Coats & Clark Inc. Reproduced with permission from Coats & Clark Inc. PurpleKittyYarns.com is not endorsed by Coats & Clark Inc. It is not permissible to contract production of projects made from designs published by Coats & Clark to a third party for sale or distribution.
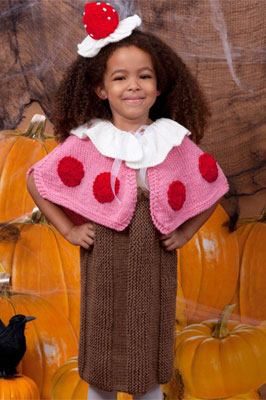
Cupcake Cutie LW2823
It's a cupcake kind of year. This popular dessert gets reinvented into a costume sure to please any little miss from 2 to 8.
Designed by Carolyn Christmas.
Skill Level: INTERMEDIATE
Directions are for size 2 years; changes for sizes 4, 6 and 8 years are in parentheses.
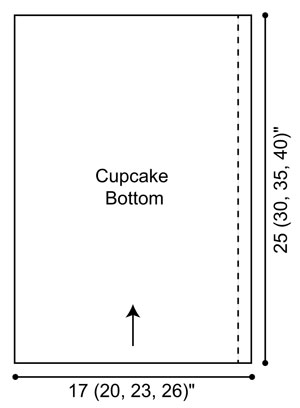
Cupcake Bottom Measurements
Chest: 20 (21, 22, 24)".
Bottom Width: 25 (30, 35, 40)".
Length from Shoulder: 19½ (23, 26, 30)".
Red Heart® Super Saver®: 2 Skeins 360 Cafe A; 1 Skein each 319 Cherry Red B, 706 Perfect Pink C, and 316 Soft White D.
Knitting Needles: 6mm [US 10].
1 yd elastic, ⅜” wide, 1 yd ribbon, ¼” wide, fiberfill, safety pin, stitch holders, stitch markers, yarn needle.
GAUGE: 14 sts = 4"; 24 rows = 4" in Garter st. CHECK YOUR GAUGE. Use any size needles to obtain the gauge.
NOTE: Cupcake Costume consists of Headband, Cupcake Bottom, and Cupcake Icing Topper. Cupcake Bottom is in one piece from side to side. Topper is worked from neck edge down to lower edge.
SPECIAL ABBREVIATIONS
K1-f/b: Knit 1 front and back (1 st inc) - Knit next st, then knit it tbl.
K2tog: (1 st dec) Knit 2 sts together.
K3tog: (2 st dec) Knit 3 sts together.
Ssk: (1 st dec) Slip next two stitches knitwise to right needle, insert point of left needle through front of sts, knit these sts together through back loop.
HEADBAND
Headband
Row 1: With A, cast on 5 sts. Knit until piece measures 16". Bind off.
Icing Fluff
With D, cast on 99 sts.
Knit 6 rows.
Change to work in St st until piece measures 3" from beginning, end with a wrong side row.
Decrease Row: [K3tog] across - 33 sts.
Cut yarn, leaving a long tail. Thread tail through remaining sts twice and pull to close. Knot to secure.
Strawberry
With B, cast on 24 sts.
Row 1 (Wrong Side): Purl.
Row 2: K1-f/b in each st across - 48 sts.
Row 3: P24, place marker, purl to end.
Decrease Row: K2, k2tog, knit to 3 sts before marker, ssk, k2, k2tog, knit to last 4 sts, ssk, k2 - 44 sts.
Repeat Decrease Row every other row 8 times more - 12 sts on last row.
Cut yarn, leaving a long tail. Thread tail through remaining sts twice and pull to close. Knot to secure.
CUPCAKE BOTTOM
With A, cast on 60 (70, 80, 90) sts.
Row 1 (Wrong side): Slip 1, knit to last 5 sts, p1, k4.
Row 2: Slip 1, p3, k1, p4, knit to end.
Row 3: Slip 1, knit to last 5 sts, p1, k4.
Rows 4-21: Repeat Rows 2 and 3.
Row 22: Slip 1, p3, k1, purl to end.
Row 23: Slip 1, knit to last 5 sts, p1, k4.
Rows 24-30: Repeat Rows 21-22.
Repeat Rows 2-30 until piece measures 25 (30, 35, 40)" from beginning, end with Row 30.
Bind off.
Straps (Make 2)
With A, cast on 35 (42, 42, 56) sts.
Work in Garter stitch until piece measures 1½” from beginning.
Bind off.
CUPCAKE ICING TOPPER
Collar
With D, cast on 168 sts. Knit 6 rows.
Change to work in St st until piece measures 4" from beginning, end with a wrong side row.
Decrease Row: [K3tog] across - 56 sts.
Purl 4 rows.
Topper
Note: Wrong side of Collar will now be right side of Topper so both right sides will show when Collar is folded over.
Eyelet Row (Right Side): Change to C, k3, *yo, k2tog, k2; repeat from * across to last st, k1.
Row 1: K3, place marker, p11, [place marker, p14] twice, place marker, p11, k3.
Row 2: K3, k1-f/b, [knit to 2 sts before marker, k1-f/b, k2, k1-f/b] 3 times; knit to 1 st before last marker, k1-f/b, k3 - 64 sts; 8 sts increased.
Row 3: K3, purl to last 3 sts, k3.
Rep Rows 2-3 until piece measures 7" from Eyelet Row, end with Row 2.
Shape Scallops
Row 1 (Wrong Side): K3, *purl to 1 st before marker, k2; repeat from * to last st, k1.
Row 2: K3, k1-f/b, [knit to 3 sts before marker, k1-f/b, k4, k1-f/b] 3 times, knit to 1 st before last marker, k1-f/b, k3.
Row 3: K3, [purl to 3 sts before marker, k6] 3 times, purl to last 3 sts, k3.
Row 4: K3, k1-f/b, [knit to 4 sts before marker, k1-f/b, k6, k1-f/b] 3 times, knit to 1 st before last marker, k1-f/b, k3.
Row 5: K3, purl to 3 sts before marker, k3, leave remaining sts unworked.
First Scallop
Row 6: K3, k2tog, knit to last 5 sts, k2tog, k3.
Row 7: K3, purl to last 3 sts, k3.
Rows 8-13: Repeat Rows 6-7.
Row 14: Repeat Row 6.
Row 15: Knit.
Row 16: K3, k2tog, knit to last 5 sts, k2tog, k3.
Rows 17-20: Repeat Rows 15-16. Bind off.
Second Scallop
Row 5: Join yarn in next unworked st on Row 5, k3, purl to 3 sts before marker, k3, leave remaining sts
unworked.
Work as for First Scallop.
Third and Fourth Scallop
Work as for Second Scallop.
POLKA DOTS (Make 8)
With B, cast on 5 sts.
Rows 1-42: Knit.
Bind off, leaving a long tail.
FINISHING Headband
Sew short ends of Headband together.
Sew short ends of Icing Fluff together.
With D, sew French knots around Strawberry. Sew side seam of Strawberry closed, stuffing with fiberfill before closing. Sew Strawberry to center of Icing Fluff.
Sew both to Headband.
Weave in ends.
Cupcake Bottom
Sew cast-on and bind-off rows together to form a tube. Fold top edge to wrong side along marked stitch and sew in place, leaving an opening for inserting elastic, for casing. Cut a length of elastic, 20 (21, 22, 24)" long, or desired chest measurement. Thread elastic through casing. Overlapping ends, sew ends together. Sew opening closed. Measure and mark center 6 (7, 7, 8)" along top edge on Front and Back for Neck and Strap placement. Sew short edges of each Strap to wrong side of top edge of Front and Back where marked. Weave in ends.
Cupcake Icing Topper
Sew short edges of one Polka Dot together to make a loop. Thread yarn along inside long edge of loop and pull to gather and form center of dot. Knot to secure.
Repeat to make 8 Polka Dots.
Sew two Polka Dots on each scallop.
Weave ribbon through Eyelet Row for neck tie. Fold Collar to right side of Topper.
Weave in ends.
Abbreviations: A, B, C = Color A, B, C; k = knit; mm = millimeters; p = purl; St st = Stockinette stitch; st(s) = stitch(es); tog = together; yo = yarn over; [ ] = work directions in brackets the number of times specified; * or ** = repeat whatever follows the * or ** as indicated.
Pattern © by Coats & Clark Inc. Reproduced with permission from Coats & Clark Inc. PurpleKittyYarns.com is not endorsed by Coats & Clark Inc. It is not permissible to contract production of projects made from designs published by Coats & Clark to a third party for sale or distribution.
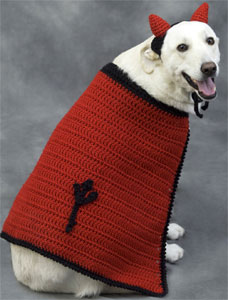
Devil Dog Costume WR1787
Designed by Darla Sims.
Skill Level: Easy
Directions are for size Small. Changes for sizes Medium and Large are in parentheses.
RED HEART® "Super Saver™": 1 skein each 319 Cherry Red A and 312 Black B.
Crochet Hook: 5.5mm [US I-9].
Yarn needle.
One button, ⅞" diameter.
Two 1" D-rings.
2 ½" square of cardboard.
GAUGE: 12 sts= 4". CHECK YOUR GAUGE. Use any size hook to obtain the specified gauge.
Finished Chest: 16-19 (20-25, 26-32)".
Finished Length: 10 (14, 17)".
NOTE: Sweater is worked from neck down.
COLLAR
With B, ch 38 (50, 62).
Row 1 (RS): Dc in 4th ch from hook and in each ch across, turn - 36 (48, 60) dc.
Row 2: Ch 3 (counts as dc), dc in each across. Fasten off.
BODY
Row 1: With right side facing, skip first 3 (5, 7) sts, join A in next st, ch 3, dc in next 29 (37, 45) dc, turn, leaving last 3 (5, 7) sts unworked - 30 (38, 46) dc.
Row 2: Ch 3, dc in first st, dc in next and each st to within last st, 2 dc in last st, turn - 32 (40, 48) sts.
Row 3: Ch 3, dc in each st across, turn.
Rows 4-16 (22, 28): Repeat Rows 2-3 for 7 (10, 13) times more - 46 (60, 74) sts.
Fasten off.
EDGING
Row 1: With right side facing, join B with sc at upper Body next to Collar, work 23 (33, 48) sc along side to corner, work 3 sc in corner, work 44 (58, 72) sc along lower edge, work 3 sc in corner, work 24 (34, 39) sc along side to upper Body, ending at lower Collar.
Row 2: Ch 1, work backwards sc in each st around.
Fasten off.
PITCHFORK
Center: With B, ch 13 (15, 17).
(Slip st, ch 5, slip st, ch 3, slip st) in 3rd ch from hook, slip st in each ch to end.
Fasten off.
Side Spokes: With B, ch 10 (12, 14).
Slip st in 3rd ch from hook, slip st in each ch across, ch 3, slip st in last ch.
Fasten off.
FINISHING
Following photo, sew Pitchfork to Back. Sew button to end of collar. Button slips between sts to close.
Horned Headpiece
Band
With B, ch 16, (18, 20).
Row 1: Sc in 2nd ch from hook and in each ch across, turn - 15 (17, 29) sc.
Rows 2-5: Ch 1, sc in each st across, turn. Fasten off.
Ties
With B, place slip knot on hook, working in edges of rows, pull slip knot through first st, [pull yarn through next st] 4 times, yo, pull yarn through all 5 loops on hook, Ch 35, (40, 45).
Slip st in 2nd ch from hook and in ch across. Fasten off.
Repeat at opposite end for second Tie.
Horns (Make 2)
With A, ch 2.
Round 1: Work 3 sc in 2nd ch from hook - 3 sc.
Round 2: Work 2 sc in each sc around - 6 sc.
Round 3: Sc in each sc around - 6 sc.
Round 4: [Sc in next sc, 2 sc in next sc] 3 times - 9 sc.
Round 5: Sc in each sc around - 9 sc.
Round 6: [Sc in next 2 sc, 2 sc in next sc] 3 times - 12 sc.
Rounds 7-7 (8, 9): Sc in each sc around. On last round, slip st to first st to join.
Fasten off.
Stuff each horn with small amount of A. Sew horns to Band.
ABBREVIATIONS: ch = chain; dc = double crochet; mm = millimeters; sc = single crochet; st(s) = stitch(es); yo = yarn over needle; [ ] = work directions in brackets the number of times specified; * or ** = repeat whatever follows the * or ** as indicated.
Pattern © by Coats & Clark Inc. Reproduced with permission from Coats & Clark Inc. PurpleKittyYarns.com is not endorsed by Coats & Clark Inc. It is not permissible to contract production of projects made from designs published by Coats & Clark to a third party for sale or distribution.
Diva Dog WR1785
Designed by Darla Sims
Skill Level: EASY
Directions are for size Small. Changes for sizes Medium and Large are in parentheses.
RED HEART® "Super Saver": 1 skein each 332 Ranch Red A, 400 Grey Heather B and 774 Light Raspberry C.
Crochet Hook: 5.5mm [US I-9].
Yarn needle.
GAUGE: 12 sts = 4". CHECK YOUR GAUGE. Use any size hook to obtain the specified gauge.
Finished Chest: 16-19 (20-25, 26-32)".
Finished Length: 10 (14, 17)".
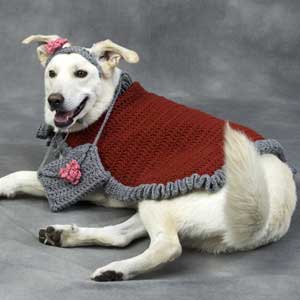
CAPE
With A, ch 20 (38, 50).
Row 1 (RS): Dc in 4th ch from hook and in each ch across, turn - 18 (36, 48) dc.
Row 2: Ch 3 (counts as dc), 2 dc in first st, dc to last st, 3 dc in last st, turn - 22 (40, 52) dc.
Rows 3-5: Repeat Row 2 - 34 (52, 64) dc.
Work 3 (2, 5) rows in dc.
Shape Upper Cape
Row 1: Ch 2, dc in next st (counts as dc2tog), dc to last 2 sts, dc2tog, turn - 32 (50, 62) dc.
Row 2: Ch 3, dc in each st across, turn.
Repeat Rows 1-2 for 5 (6, 8) more times - 22 (38, 46) dc.
Fasten off.
EDGING
Round 1: With right side facing, join A with sc in lower bottom right corner, sc in same st, work 32 (45, 54) sc to upper corner, work 3 sc in corner, work 20 (36, 42) sc across upper edge, work 3 sc in corner, work 32 (45, 54) sc to first sc, sc in same st as first 2 sc, slip st in first st to join.
Fasten off.
Round 2: Join B with slip st in first st of previous round, ch 3 (counts as dc), dc in each st around; slip st to top of beginning ch.
Round 3: *[Dc, ch 1, dc] 3 times around post of next dc, turn work to left, [ch 1, dc] 3 times around post of next dc, turn work to left, ch 1; repeat from * around; slip st to first st to join. Fasten off.
RIGHT TIE
Row 1: Join B with in 3rd (4th, 3rd) sc below neck corner on right side, sc in next 2 (3, 3) sts, turn - 3 (4, 4) sc. turn.
Row 2: Ch 1, sc in each st across, turn.
Repeat Row 2 until Tie measures 8 (9, 10)".
Fasten off.
LEFT TIE
Row 1: Join B in sc at upper neck edge on left side, sc in next 2 (3, 3) sts, turn - 3 (4, 4) sc.
Row 2: Ch 1, sc in each st across, turn.
Repeat Row 2 until Tie is same length as first Tie.
Fasten off.
VISOR
With B, ch 21.
Row 1 (RS): Sc in 2nd ch from hook and in each ch across, turn - 20 sc.
Row 2: Ch 1, sc in each st across.
Fasten off.
Row 3: With right side facing, skip first 3 sc, working in back loops only, join with sc in next st, sc in next st, hdc in next 2 sts, dc in next 2 sts, 2 dc in next 2 sts, dc in next 2 sts, hdc in next 2 sts, sc in next 2 sts, slip st in next st, turn.
Row 4: Ch 1, skip slip st, skip next sc, working in both loops, sc in next 6 sts, 2 sc in next 2 sts, sc in next 6 sts skip next sc, slip st in next st, turn.
Row 5: Ch 1, skip slip st, skip next sc, sc in next 14 sc, skip next sc, slip st in slip st from previous row. Fasten off.
Flower (Make 2)
With C, ch 2, [ch 7, slip st in 2nd ch from hook] 11 times.
Fasten off.
Sew one Flower to Visor.
Ties
Join yarn in end of Row 1 of Visor, ch 30 for Tie. Repeat at other end of Row.
Fasten off.
PURSE
With B, ch 13 (15, 17).
Row 1: Dc in 4th ch from hook and in each ch across, turn - 11 (13, 15) dc.
Rows 2-10 (12, 12): Ch 3 (counts as dc), dc in each dc across, turn. Do not fasten off.
Flap
Rows 1-3: Ch 2, dc in next dc (counts as dc2tog), dc in each st to last 2 sts, dc2tog, turn - 5 (7, 9) sts.
Do not fasten off. Mark center st.
Edging
Sc evenly around edge, working 2 sc in each lower corner, to 1 st before marked st, ch 7 to form loop, skip center st, sc around to first st, slip st to frist st to join.
Fasten off.
FINISHING
With wrong side facing, fold up bottom of Purse to beginning of Flap. Sew sides together through top loops of each sc.
Purse Strap
Join B with slip st in side seam st, make a ch 14 (18, 24)" or desired length, join with a slip st to opposite side seam.
Sew Flower to Front opposite loop.
Weave in ends.
ABBREVIATIONS: ch = chain; dc = double crochet; dc2tog = double crochet 2 sts together; hdc = half double crochet; mm = millimeters; sc = single crochet; st(s) = stitch(es); [ ] = work directions in brackets the number of times specified; * or ** = repeat whatever follows the * or ** as indicated.
Pattern © by Coats & Clark Inc. Reproduced with permission from Coats & Clark Inc. PurpleKittyYarns.com is not endorsed by Coats & Clark Inc. It is not permissible to contract production of projects made from designs published by Coats & Clark to a third party for sale or distribution.
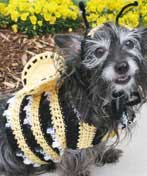
Dog's Crochet Bumble Bee Costume WR1094
Whimsical and fun, this adorable crochet bumble bee costume will keep your favorite pooch warm and in the spirit this Halloween.
Skill Level: Intermediate
Designed by Sharon Mann.
MATERIALS:
Red Heart® Super Saver®: 1 Skein each No. 0312 Black CA, No. 0932 Zebra CB and No. 0320 Cornmeal CC [solid colors – 7 oz (198 g), 364 yd (333 m); multi colors – 5 oz (141 g), 244 yd (223 m); flecks – 5 oz (141 g), 260 yd (238 m)].
Crochet Hook: 5.5mm [US I-9].
Yarn needle; two 3/4" buttons; four 12" black chenille stems.sizes
Directions are for size small; changes for medium and large are in parentheses.
To Fit Chest: 18 (23, 28)".
To Fit Neck: 16 (18, 20)".
To Fit Length: 10 (12, 16)".
GAUGE: 12 sts = 4"; Rows 1-9 = 4" in sc. CHECK YOUR GAUGE. Use any size hook to obtain the gauge
INSTRUCTIONS:
NOTE: The "ch 2" at the beginning of dc rows does NOT count as a stitch. Do not work into the "ch 2".
BODY: With CA, ch 50 (65, 74).
Row 1 (Right Side): Dc in 3rd chain from hook, * skip next ch, 2 dc in next ch; rep from * to last 1 (0, 1) ch; dc in last 1 (0, 1) ch; turn – 48 (63, 72) sts.
Row 2: With CB, ch 1, sc in first 2 dc; * [yo and draw up a lp, yo and draw through 2 lps] twice all in next dc, yo and draw through 3 lps on hook – dc cl made; sc in next 2 dc; rep from * to last dc; sc in last dc; turn.
Row 3: With CC, ch 1, sc in each st across; turn.
Row 4: With CC, ch 2, dc in first sc, * skip next sc, 2 dc in next sc; rep from * to last sc; dc in last sc; turn.
Row 5: With CC, ch 1, sc in each dc across; turn.
Row 6: With CA, ch 1, sc in each sc across; turn.
Row 7: With CA, rep Row 4.
Row 8: With CB, rep Row 2.
Rows 9-18 (9-24, 9-30): Rep Rows 3-8 one (2, 3) more times, then rep Rows 3-6 once more. Fasten off.
Row 19 (25, 31): With right side facing, skip first 6 (9, 12) sc, join CA in next sc; ch 2, dc in same sc, [skip next sc, 2 dc in next sc] 17 (22, 23) times, dc in next 1 (0, 1) sc; turn – 36 (45, 48) dc.
Row 20 (26, 32): Ch 1, sc in each dc across. Fasten off.
NECKBAND-Right Side-Row 1: With right side facing, join CC in first sc of last long row; ch 1, sc in 8 (10, 10) sc; turn.
Rows 2-12 (2-12, 2-16): Work in sc, working 3 more rows with CC, then 4 rows CA, then 4 rows CC, then 0 (0, 4) rows CA.
Buttonhole Row 13 (13, 17): Ch 1, sc in first sc, [ch 2, skip next 2 sc, sc in next 1 (2, 2) sc] twice, sc in last sc; turn.
Row 14 (14, 18): Ch 1, sc in first sc, [2 sc in sp, sc in next 1 (2, 2) sc] twice, sc in last sc. Fasten off.
Neckband-Left Side-Row 1: With right side facing, skip center 20 (25, 28) sc of last long row, join CC in next sc; ch 1, sc in last 8 (10, 10) sc; turn.
Rows 2-12 (2-12, 2-16): Work in sc and work 3 more rows with CC, then 4 rows CA, then 4 rows CC, then 0 (0, 4) rows CA. Fasten off.
Neck Edging: With right side facing, join CB to Right Neckband; ch 1, sc evenly around entire neck edge. Fasten off.
Sew buttons to Left Neckband to correspond to buttonholes. Sew body seam.
WINGS (Make 2): With CC, ch 4; join with a sl st to form a ring.
Rnd 1: 6 Sc in ring; do not join but work in continuous rnds.
Rnd 2: 2 Sc in each sc around – 12 sc.
Rnd 3: [Sc in sc, 2 sc in next sc] 6 times – 18 sc.
Rnd 4: [Sc in 2 sc, 2 sc in next sc] 6 times; TURN – 24 sc.
Shape Bottom of Wing-Row 5: Ch 1, skip first sc, [sc in next 3 sc, 2 sc in next st] 4 times, sc in next 3 sc; turn – 23 sc.
Row 6: Ch 1, skip first sc, sc in each sc to end; turn – 22 sc.
Row 7: Ch 2, dc in first 4 sc, [2 dc in next sc, dc in next 5 sc] 3 times; turn – 25 sc.
Size Small Only: Turn to work 12 sc evenly across bottom of wing. Fasten off.
Medium and Large-Row 8: Ch 2, hdc in first 6 dc, 2 hdc in next dc, [hdc in next 2 dc, 2 hdc in next dc] 4 times, hdc in last 6 dc – 30 hdc. Turn to work (14, 14) sc evenly across bottom of wing. Fasten off.
With wrong sides together, sew the bottoms of the 2 wings together. Weave a chenille stem through the sts of Row 7 or 8 on each wing. Trim and bend the tips of the chenille stems over at each end to secure in place. Sew the bottom edge of the wings to the center top of the sweater, 1" down from the neck edging.
HEAD BAND: With CC, ch 11.
Row 1 (Right Side): Sc in 2nd chain from hook, sc in each ch across; turn – 10 sc.
Row 2: Ch 1, sc in each sc across; turn. (10 sts)
Rows 3-12 (3-12, 3-16): Rep Row 2 working 2 more rows CC, then 4 rows CA, then 4 rows CC, then 0 (0, 4) rows CA. Fasten off.
Head Band Ear Flaps-First Half-Row 1: With right side facing, join CA to either end of head band; ch 1, sc in first 4 sc; turn.
Rows 2-10: Ch 1, sc to end; turn. Fasten off at end of Row 10.
Ear Flaps-2nd Half-Row 1: With right side facing, skip next 2 sc on same end of headband, join CA in next sc; ch 1, sc in last 4 sc; turn.
Rows 2-10: Ch 1, sc to end; turn.
Join Flaps-Row 11: Ch 1, sc in next 4 sc, bring First Half around and sc in each of the 4 sc of First Half; turn – 8 sc.
Row 12: Ch 1, sc to end.
Row 13: Ch 1, skip first sc, sc in next 5 sc, skip next sc, sc in last sc; turn – 6 sc.
Row 14: Ch 1, skip first sc, sc in next 3 sc, skip next sc, sc in last sc – 4 sc. Fasten off.
Rep Rows 1-14 on the opposite side of head band.
ANTENNA RINGS (Make 2): With CA, ch 2; 6 sc in 2nd ch from hook; join with a sl st in first sc. Fasten off.
Sew antenna rings to the top of the head band. Weave folded chenille stems in each of the antenna rings, twist the chenille stems together and curl the tips.
HEAD BAND TIE (Make 2): With CA and CB held together as one, ch 12. Fasten off. Sew to the end of each ear flap.
ABBREVIATIONS:
beg : beginning; CA, CB, etc : Color A, Color B, etc; ch : chain; cl : cluster; dc : double crochet; hdc : half double crochet; lp(s) : loop(s); mm : millimeters; rep : repeat; rnd : round; sc : single crochet; sl : slip; sp(s) : space(s); st(s) : stitch(es); yo : yarn over; [ ] : work directions in brackets the number of times specified; * or ** : repeat whatever follows the * or ** as indicated
Pattern © by Coats & Clark Inc. Reproduced with permission from Coats & Clark Inc. PurpleKittyYarns.com is not endorsed by Coats & Clark Inc. It is not permissible to contract production of projects made from designs published by Coats & Clark to a third party for sale or distribution.
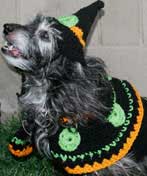
Dog’s Crochet Witch Costume WR1093
Whimsical and fun, this adorable crochet witch costume will keep your favorite pooch warm and in the spirit this Halloween.
Skill Level: Intermediate
Designed by Sharon Mann.
MATERIALS:
Red Heart® Super Saver®: 1 (1, 2) Skeins No. 0312 Black CA, 1 skein each No. 0254 Pumpkin CB and No. 0672 Spring Green CC [solid colors – 7 oz (198 g), 364 yd (333 m); multi colors – 5 oz (141 g), 244 yd (223 m); flecks – 5 oz (141 g), 260 yd (238 m)].
Crochet Hook: 5.5mm [US I-9].
Yarn needle; stitch markers.
Directions are for size small; changes for medium and large are in parentheses.
To Fit Chest: 18 (23, 28)".
To Fit Neck: 16 (18, 20)".
To Fit Length: 10 (12, 16)".
GAUGE: 11 sts = 4"; Rows 1-10 = 4" in dc. CHECK YOUR GAUGE. Use any size hook to obtain the gauge.
CAPE-Neckband: With CB, ch 5.
Row 1 (Right Side): Sc in 2nd ch from hook and in each ch across; turn – 4 sc.
Rows 2-47 (2-55, 2-61): Ch 1, sc in each sc across; turn. Fasten off.
Collar-Row 1: With right side facing, join CA to work across row ends of Neckband; ch 1, work 47 (55, 61) sc evenly across; turn.
Row 2: Sl st in first 10 (12, 14) sc, ch 2, hdc in next 27 (31, 33) sc; turn leaving remaining sc unworked – 27 (31, 33) hdc.
NOTE: The "ch 2" at the beginning of hdc and dc rows does NOT count as a stitch. Do not work into the "ch 2".
Row 3: Ch 1, 2 sc in first hdc, sc in each hdc across to last hdc; 2 sc in last hdc; turn – 29 (33, 35) sc.
Row 4: Ch 2, hdc in each sc across; turn.
Rows 5 and 6: Rep Rows 3 and 4 – 31 (35, 37) sts. Fasten off for Small Size.
Medium and Large Only-Row 7: Rep Row 3 changing to CC in last st – (37, 39) sc.
Row 8: With CC, rep Row 4. Fasten off.
Cape-Row 1: With wrong side facing, join CA on opposite side of neckband; ch 1, work 47 (55, 61) sc evenly across; turn.
Row 2: Ch 1, 2 sc in first sc, sc in each sc to last sc; 2 sc in last sc; turn – 49 (57, 63) sc.
Row 3: Ch 2, hdc in first 3 (0, 0) sc, [hdc in next 4 sc, 2 hdc in next sc] 8 (11, 12) times, hdc in last 6 (2, 3) sc – 57 (68, 75) hdc.
Row 4: Ch 1, 2 sc in first hdc, sc in each hdc across to last hdc; 2 sc in last hdc; turn – 59 (70, 77) sc.
Row 5: Ch 2, hdc in first 0 (3, 0) sc, [hdc in next 4 (3, 4) sc, 2 hdc in next sc] 11 (15, 15) times, hdc in last 4 (7, 2) sc changing to CC in last hdc – 70 (85, 92) hdc.
Row 6: With CC, ch 1, sc in each hdc across inc 0 (1, 0) st at center and changing to CA in last st; turn – 70 (86, 92) sc.
Row 7: With CA, ch 2, dc in first st, * skip next st, 2 dc in next st; rep from * to last st; dc in last st changing to CB; turn.
Row 8: With CB, rep Row 7. Fasten off.
TIE: With CA, make a chain the length of the neckband PLUS 12". Fasten off. Weave the chain through the center of the band.
CIRCULAR STARS-Make 6 (7, 8): With CC, ch 6; join with a sl st to form a ring.
Rnd 1: Ch 3; [yo and draw up a lp, yo and draw through 2 lps] twice all in ring, yo and draw through 3 lps on hook – 2 dc cl made; * ch 3; [yo and draw up a lp, yo and draw through 2 lps] 3 times all in ring, yo and draw through 4 lps on hook – 3 dc cl made; rep from * 3 more times; join with a sl st to top of ch-3. Fasten off.
Sew 5 (6, 7) circular stars evenly around the outside of the cape as pictured.
BODY (Start at Neck): With CA, ch 34 (36, 40).
Row 1 (Wrong Side): Sc in 2nd ch from hook, sc in each ch across; turn – 33 (35, 39) sc.
Row 2: Ch 2, dc in each sc across; turn.
Row 3: Ch 1, sc in each dc across; turn.
Rows 4-15 (4-19, 4-23): Rep Rows 2 and 3.
Row 16 (20, 24): Rep Row 2 changing to CC.
Row 17 (21, 25): With CC, ch 1, sc in each dc across changing to CA; turn.
Row 18 (22, 26): With CA, ch 2, dc in first sc, * skip next sc, 2 dc in next sc; rep from * across; turn.
Row 19 (23, 27): Ch 1, sc in each dc across changing to CB.
Row 20 (24, 28): With CB, rep Row 18 (22, 26) changing to CA.
Row 21 (25, 29): With CA, rep Row 3 changing to CB.
Row 22 (26, 30): With CB, rep Row 18 (22, 26). Fasten off.
CHEST PANEL: With CA, ch 16 (20, 24).
Row 1: Sc in 2nd ch from hook, sc in each ch across; turn – 15 (19, 23) sc.
Row 2: Ch 2, dc in each sc across; turn.
Row 3: Ch 1, sc in each dc across; turn.
Rows 4-15 (4-17, 4-21): Rep Rows 2 and 3. Fasten off. Sew to the sides of the body 1 1/2" below the neck.
HAT: With CA, ch 4; join with a sl st to form a ring. Mark the beg of each row.
Rnd 1: 6 Sc in ring; do not join but work in continuous rnds. Mark the beg of rnd with stitch marker.
Rnds 2 and 3: Sc in each sc around.
Rnd 4: Sc in first sc, [2 sc in next sc, sc in next sc] twice, 2 sc in last sc – 9 sc.
Rnd 5: Sc in each sc around.
Rnd 6: [Sc in next 2 sc, 2 sc in next sc] 3 times – 12 sc.
Rnd 7: Sc in each sc around.
Rnd 8: [Sc in next 3 sc, 2 sc in next sc] 3 times – 15 sc.
Rnd 9: Sc in each sc around.
Rnd 10: [Sc in next 2 sc, 2 sc in next sc] 5 times – 20 sc.
Rnd 11: Sc in each sc around.
Rnd 12: [Sc in next 2 sc, 2 sc in next sc] 6 times, sc in next 2 sc – 26 sc.
Rnd 13: Sc in each sc around.
Rnd 14: [Sc in next 2 sc, 2 sc in next sc] 8 times, sc in next 2 sc – 34 sc.
Rnd 15: Sc in each sc around changing to CB in last sc.
Rnd 16: With CB, sc in each sc around.
Rnd 17: Sc in each sc around changing to CA.
Rnd 18: With CA, sc in each sc around.
Rnd 19: Sc in each sc around; TURN.
Brim-Rnd 20: Ch 1, sc in each sc around; join with a sl st in first sc.
Rnd 21: Ch 2, [dc in next 3 sc, 2 dc in next sc] 8 times, dc in next 2 sc; join – 42 sts.
Rnd 22: Ch 1, [sc in next dc, 2 sc in next dc] 21 times; join – 63 sc. Fasten off. Sew star on the brim of the hat.
ABBREVIATIONS:
beg : beginning; CA, CB, etc : Color A, Color B, etc; ch : chain; cl : cluster; dc : double crochet; hdc : half double crochet; lp(s) : loop(s); mm : millimeters; rep : repeat; rnd : round; sc : single crochet; sl : slip; sp(s) : space(s); st(s) : stitch(es); yo : yarn over; [ ] : work directions in brackets the number of times specified; * or ** : repeat whatever follows the * or ** as indicated
Pattern © by Coats & Clark Inc. Reproduced with permission from Coats & Clark Inc. PurpleKittyYarns.com is not endorsed by Coats & Clark Inc. It is not permissible to contract production of projects made from designs published by Coats & Clark to a third party for sale or distribution.
| Pattern Categories Browse the categories to help you find the patterns you're looking for. |
||
    
|
|
|


Navigation

All contents © 2003-2026 Purple Kitty LLC. All rights reserved.
Privacy Policy | FAQ | About Me