 |
Red Heart Super Saver
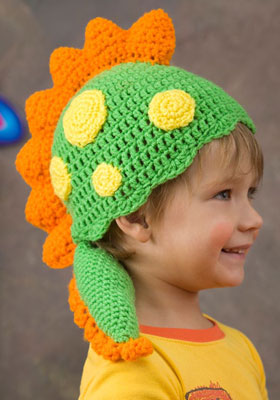
Dragon Hat Pattern LW2322
Skill Level: EASY
Designed by Michele Wilcox.
Hat measures 18" in circumference.
Fits Child's size 2-4 years.
RED HEART® Super Saver®: 1 skein each 672 Spring Green A, 254 Pumpkin B and 324 Bright Yellow C.
Crochet Hook: 4 mm [US G-6].
Polyfill Stuffing, Yarn Needle.
Gauge: 5 dc = 1½"; 3 Rounds dc = 1½". CHECK YOUR GAUGE. use any size hook to obtain the gauge.
SPECIAL ABBREVIATIONS
sc2tog: [Draw up a loop in next st] twice, yo and draw through all 3 loops on hook.
HAT
Beginning at top of hat with A, ch 4; join into a ring with slip st in first ch.
Round 1: Ch 3 (counts as dc here and throughout), 11 dc in ring; join with a slip st in top of beginning ch 3 - 12 dc.
Round 2: Ch 3, dc in first st, 2 dc in each dc around; join with a slip st in top of beginning ch 3 - 24 dc.
Round 3: Ch 3, 2 dc in next dc, *dc in next dc, 2 dc in next dc; repeat from * around, join with a slip st in top of beginning ch 3 - 36 dc.
Round 4: Ch 3, dc in next dc, 2 dc in next dc, *dc in next 2 dc, 2 dc in next dc; repeat from * around, join with a slip st in top of beginning ch 3 - 48 dc.
Round 5: Ch 3, dc in next 2 dc, 2 dc in next dc, *dc in next 3 dc, 2 dc in next dc; repeat from * around, join with a slip st in top of beginning ch 3 - 60 dc.
Rounds 6-13: Ch 3, dc in each dc around, join with a slip st in top of beginning ch 3.
Round 14: Ch 1, sc in same st as joining, *skip 2 dc, 5 sc in next dc, skip 2 dc, sc in next dc, repeat from * around, join with a slip st in top of beginning ch 3. Fasten off.
Hat Scales (make 2)
With B, ch 43.
Row 1: Sc in 2nd ch from hook and each ch across, turn - 42 sc.
Row 2: Ch 1, sc in next 6 sc, turn.
Row 3: Ch 1, sc2tog over next 2 sc, sc in next 2 sc, sc2tog over next 2 sc, turn.
Row 4: Ch 1, sc in each st across, turn.
Row 5: Ch 1, [sc2tog over next 2 sc] twice, turn.
Row 6: Ch 1, sc2tog over next 2 sc, work 4 sc evenly spaced down side of scale.
Row 7: Sc in next 6 sc in Row 1.
Repeat Rows 3-7 (5 times); then repeat Rows 3-6 once, turn.
Joining Row: With wrong sides of hat scales together, ch 1, working through double thickness, sc evenly across top of scales, working 3 sc in top of each scale, leaving bottom open. Stuff each scale very lightly then sew scales in place on top of hat.
Tail
With A, ch 2.
Round 1: 6 sc in 2nd ch from hook, do not join. Work in a spiral, marking beginning of each round, moving marker up as work progresses.
Round 2: Sc in each sc around.
Round 3: *Sc in next 2 sc, 2 sc in next sc; repeat from * around - 8 sc.
Round 4: *Sc in next 3 sc, 2 sc in next sc; repeat from * around - 10 sc.
Round 5: *Sc in next 4 sc, 2 sc in next sc; repeat from * around - 12 sc.
Round 6: Sc in each sc around.
Round 7: *Sc in next 3 sc, 2 sc in next sc; repeat from * around - 15 sc.
Rounds 8-9: Sc in each sc around.
Round 10: *Sc in next 4 sc, 2 sc in next sc; repeat from * around - 18 sc.
Rounds 11-12: Sc in each sc around.
Round 13: *Sc in next 5 sc, 2 sc in next sc; repeat from * around - 21 sc.
Rounds 14-27: Sc in each sc around. Fasten off.
Tail Scales
With B, ch 26.
Row 1: Slip st in 2nd ch from hook, ch 1, *3 dc in next ch, skip next ch, slip st in next ch**, ch 1; repeat from * across, ending last repeat at **. Fasten off. Sew to top center of tail. Stuff tail and sew in place.
Large Spot (make 2)
With C, ch 2.
Round 1: 6 sc in 2nd ch from hook, do not join, work in a spiral as before.
Round 2: 2 sc in each sc around - 12 sc.
Round 3: *Sc in next sc, 2 sc in next sc; repeat from * around - 18 sc.
Round 4: *Sc in next 2 sc, 2 sc in next sc; repeat from * around - 24 sc. Fasten off, leaving long sewing length.
Medium Spot (make 4)
Work same as Large Spot through Round 3. Fasten off, leaving long sewing length.
Small Spot (make 2)
Work same as Large Spot through Round 2. Fasten off, leaving long sewing length. Randomly arrange spots on each side of hat and sew in place.
ABBREVIATIONS: A, B, C = color A, B, C; ch = chain; dc = double crochet; mm = millimeters; sc = single crochet; st(s) = stitch(es); [ ] = work directions in brackets the number of times specified; * or ** = repeat whatever follows the * or ** as indicated.
Pattern © by Coats & Clark Inc. Reproduced with permission from Coats & Clark Inc. PurpleKittyYarns.com is not endorsed by Coats & Clark Inc. It is not permissible to contract production of projects made from designs published by Coats & Clark to a third party for sale or distribution.
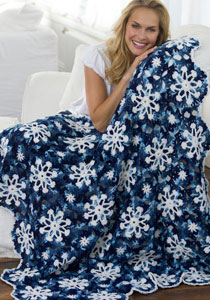
Dusty Snowflake Throw Pattern
Skill Level: INTERMEDIATE
Designed by Tammy Hildebrand.
Throw measures 45" x 52½".
RED HEART® "Super Saver®": 2 skeins 311 White A and 5 skeins 984 Shaded Dusk B.
Crochet Hook: 5.5mm [US I-9].
Yarn needle.
GAUGE: Motif = 7½ diameter. CHECK YOUR GAUGE. Use any size hook to obtain the gauge.
NOTE: After the first motif, all others are joined while working Rnd 7. Motifs are joined in 6 rows of 7 motifs.
MOTIF
With A ch 5; join with a slip st to form a ring.
Rnd 1: Ch 3, 15 dc in ring; join with a slip st to top of ch-3.
Rnd 2: Ch 1, sc in same st as joining, ch 7, skip next dc, [sc in next dc, ch 7, skip next dc] 7 times; join in first sc. Fasten off.
Rnd 3: Working in skipped dc of Rnd 1, behind ch-7 spaces, join B in any skipped dc; ch 3, 2 dc in same dc, [3 dc in next skipped dc] 7 times; join.
Rnd 4: Ch 3, * (dc, ch 1, dc) in next dc **, dc in next 2 dc; repeat from * to last dc, end at **; dc in last dc; join. Fasten off.
Rnd 5: Working in ch-1 spaces of Rnd 4 and ch-7 spaces of Rnd 2 at the same time, join A in any space; ch 3, 4 dc in same space, * ch 1, skip next 2 dc, slip st in space between sts, ch 1, skip next 2 dc **, 5 dc in next space; repeat from * around, end at **; join. Fasten off.
Rnd 6: Join B with a sc in back loop of center dc of any 5-dc group of Rnd 5, * working over slip st of previous rnd (tr, ch 1, tr, ch 2, tr, ch 1, tr) all in next space **, sc in back loop of center dc of next 5-dc group; repeat from * around, end at **; join in first sc.
FIRST MOTIF ONLY-Rnd 7: Ch 3, (dc, ch 1, 2 dc) in same st as joining, * sc in next ch-1 space, (2 dc, ch 3, 2 dc) all in next ch-2 space, sc in next ch-1 space **, (2 dc, ch 1, 2 dc) in next sc; repeat from * around, end at **; join. Fasten off.
Joining Rnd 7: Ch 3, (dc, ch 1, 2 dc) in same st as joining, sc in next ch-1 space, * 2 dc in next ch-3 space, ch 1, slip st in corresponding ch-3 space of previous motif, ch 1, 2 dc in same space on current motif, sc in next ch-1 space, 2 dc in next sc, slip st in corresponding ch-1 space on previous motif, 2 dc in same space on current motif, sc in next ch-1 space **; repeat from * to ** for each corresponding join, ***(2 dc, ch 1, 2 dc) in next sc, sc in next ch-1 space, (2 dc, ch 3, 2 dc) in next ch-3 space, sc in next ch-1 space; repeat from *** around; join. Fasten off.
NOTE: First 7 large motifs will have 3 joins. Beginning large motif of the next 5 rows will have 7 joins. Remaining large motifs will have 9 joins. After first row of 7 large motifs join 6 filler motifs between rows.
FILLER MOTIF
With A ch 4; join with a slip st to form a ring.
Rnd 1: Ch 4, [dc in ring, ch 1] 7 times; join in 3rd ch of ch-4. Fasten off.
Rnd 2: Join B with a sc in any dc, (dc, ch 1, dc) in next ch-1 space, [sc in next dc, (dc, ch 1, dc) in next ch-1 space] 7 times; join.
Joining Rnd 3: Slip st to next ch-1 space; ch 3, dc in same space, ch 1, slip st in corresponding ch-3 space of large motif, ch 1, 2 dc in same space on filler motif, * 2 dc in next space, slip st in next ch-1 space of large motif, 2 dc in same space on filler motif, 2 dc in next ch-1 space, ch 1, slip st in next ch-3 space of large motif, ch 1, 2 dc in same space on filler motif **; repeat from * to ** one time; (2 dc, ch 1, 2 dc) in next ch-1 space, (2 dc, ch 3, 2 dc) in next ch-1 space, (2 dc, ch 1, 2 dc) in next ch-1 space; join. Fasten off. Weave in ends.
Border
Rnd 1: Join A in ch 5 space at top right corner, ch 1, 5 sc in same space, *[skip next 2 sts, sc in next st, 3 sc in next ch space, skip next 2 sts, sc in next st, 5 sc in next ch space] 3 times, **5 sc in next ch space; rep from * across ending at **(left corner), rep from * to ** 2 times, 5 sc in next ch space; rep from * around.
Rnd 2: Join with slip stitch to beg sc, fasten off.
ABBREVIATIONS: A, B = color A, B; ch = chain; dc = double crochet; mm = millimeters; rnd = round; sc = single crochet; st(s) = stitch(es); tr = treble crochet; yo = yarn over; * or ** = repeat whatever follows the * or ** as indicated; [ ] = work directions in brackets the number of times specified.
Pattern © by Coats & Clark Inc. Reproduced with permission from Coats & Clark Inc. PurpleKittyYarns.com is not endorsed by Coats & Clark Inc. It is not permissible to contract production of projects made from designs published by Coats & Clark to a third party for sale or distribution.
Easy Friendship Bracelets

Make matching bracelets with a friend or make bracelets with different colors. Braid your bracelet then make a wish as you have your friend tie on your bracelet. Rumor has it, that if you wear the bracelet until it falls off by itself, your wish will come true.
RED HEART® Super Saver®: small amount of any 3 colors
Color combinations shown in photograph:
385 Royal, 311 White & 319 Cherry Red
672 Spring Green, 381 Light Blue & 368 Paddy Green
324 Bright Yellow, 254 Pumpkin & 706 Perfect Pink
Notions: Scissors, tape or clipboard, and ruler.
BRACELETS
Cut two 16” strands of each color of yarn.
Hold all 6 strands together and tie a knot at one end of the bundle. Secure knot end of yarn to a table or desk with tape or place in clipboard. Separate yarn strands into three different groups, with 2 different colors in each group.
While holding all three groups of yarn, braid the groups together as follows. Move the left hand group over the middle group to the center. Move the right hand group over the new middle to the center. Keeping the groups tight, continue to alternate moving the outermost groups over the middle groups to the center until you reach the end of the yarn. Tie off end with a knot.
Pattern © by Coats & Clark Inc. Reproduced with permission from Coats & Clark Inc. PurpleKittyYarns.com is not endorsed by Coats & Clark Inc. It is not permissible to contract production of projects made from designs published by Coats & Clark to a third party for sale or distribution.
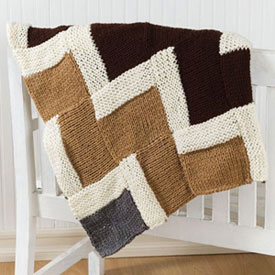
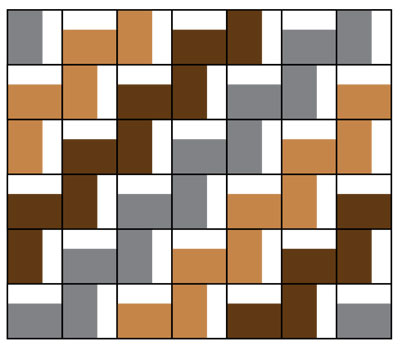
Easy Knit Zigzag Afghan WR1682
Skill Level: Easy
Designed by Jodi Snyder.
Afghan measures 48" by 56".
RED HEART® "Super Saver®": 3 Skeins 0313 Aran CA, 2 skeins each 0400 Grey Heather CB, 0336 Warm Brown CC and 0365 Coffee CD.
Knitting Needles: 10mm [US 15].
Yarn needle.
GAUGE: 10 sts = 4"; 12 rows = 4" in St st with double strand. CHECK YOUR GAUGE. Use any size needles to obtain the gauge.
NOTE: Use 2 strands of the same color held together throughout.
SQUARE 1 (Make 14): With CB, cast on 20 sts. Work in St st, begin K row, for 5", end P row. With CA, K 1 row. With CA, work in Rev St st for 3". Bind off.
SQUARE 2 (Make 14): Work same as Square 1, but use CC for 5" of St st.
SQUARE 3 (Make 14): Work same as Square 1, but use CD for 5" of St st.
FINISHING: Arrange squares in diagonal rows as shown in photograph, placing Rev St st at side and top of square. Sew together. Weave in ends.
ABBREVIATIONS: CA = Color A; CB = Color B; CC = Color C; CD = Color D; K = knit; mm = millimeters; St st = Stockinette st (knit 1 row, purl 1 row); Rev St st = Reverse stockinette stitch (purl on right side rows, knit on wrong side).
Pattern © by Coats & Clark Inc. Reproduced with permission from Coats & Clark Inc. PurpleKittyYarns.com is not endorsed by Coats & Clark Inc. It is not permissible to contract production of projects made from designs published by Coats & Clark to a third party for sale or distribution.
Eek! Mouse Halloween Headband WR1051
Skill Level: Easy
Designed by Julie Farmer. Each headband takes an hour or less to make.
Crochet these adorable headbands to compliment your child's (or your own) costume this Halloween season!
Red Heart® Super Saver®:1 Skein No. 341 Light Grey CA and No. 724 Baby Pink CB.
Crochet Hook: 5.5mm [US I-9].
Yarn needle, plastic headband.
GAUGE: 5 rounds = approximately 3.5". CHECK YOUR GAUGE. Use any size hook to obtain the gauge.

Ear Back (Make 2): With CA, ch 3; join with a sl st to form ring.
Rnd 1 (Right Side): Ch 1, 6 sc in ring; join with a sl st in first sc.
Rnd 2: Ch 1, 2 sc in each sc around; join - 12 sc.
Rnd 3: Rep Rnd 2 - 24 sc.
Rnd 4: Ch 1, * sc in next 2 sc, 2 sc in next sc; rep from * around; join - 32 sc.
Rnd 5: Ch 1, * sc in next 3 sc, 2 sc in next sc; rep from * around; join - 40 sc. Fasten off.
Ear Front (Make 2): With CB, work as for ear back through Rnd 4. Change to CA and complete Rnd 5. Fasten off.
FINISHING: With right sides together, sew ear front to ear back leaving approximately 1" open. Turn ears right side out. Checking placement, sew open part of ear to headband. Weave in ends.
ABBREVIATIONS: ch = chain; lp = loop; mm = millimeters; rep = repeat; rnd = round; sc = single crochet; sl = slip; st(s) = stitch(es); tog = together; * or ** = repeat whatever follows the * or ** as indicated.
Pattern © by Coats & Clark Inc. Reproduced with permission from Coats & Clark Inc. PurpleKittyYarns.com is not endorsed by Coats & Clark Inc. It is not permissible to contract production of projects made from designs published by Coats & Clark to a third party for sale or distribution.
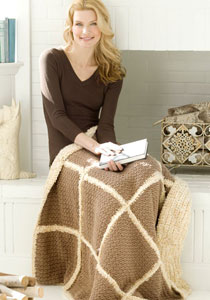
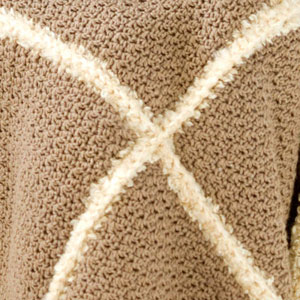
Faux Shearling Throw LW2167
Skill Level: EASY
Designed by Ellen K. Gormley
Throw measures 47" x 47".
RED HEART® "Eco-Ways®": 7 balls 3360 Mushroom A. (or RED HEART® "Super Saver®": 4 skeins 360 Cafe)
RED HEART® "Light & Lofty®": 9 skeins 9334 Cafe au Lait B.
Crochet Hooks: 6.5mm [US K-10.5] and 8mm [US L-11].
Yarn needle.
GAUGES: 11 sts = 4"; 10 rows = 4" in pattern with A and smaller hook; 9 sts = 4"; 9 rows = 4" in sc with B and larger hook. Squares = 11" x 11". CHECK YOUR GAUGE. Use any size hooks to obtain the gauges.
THROW
Square A (Make 16)
With smaller hook and A, ch 32.
Row 1 (Right Side): Sc in 2nd ch from hook, [dc in next ch, sc in next ch] 15 times; turn - 31 sts (16 sc, 15 dc).
Row 2: Ch 1, dc in first sc, [sc in next dc, dc in next sc] 15 times; turn.
Row 3: Ch 1, sc in first dc, [dc in next sc, sc in next dc] 15 times; turn.
Rows 4-27: Repeat Rows 2 and 3. Row 28: Repeat Row 2. Fasten off.
Square B (Make 16)
With larger hook and B, ch 25.
Row 1 (Right Side): Sc in 2nd ch from hook and in each ch across; turn - 24 sc.
Row 2: Ch 1, sc in each sc across; turn.
Rows 3-24: Repeat Row 2. Do not fasten off after Row 24, continue to joining.
Joining Round
With B and smaller hook, holding wrong sides of an A square together with a B square, the A square is designated as the right side; working through both thicknesses, * work 24 sc evenly spaced to corner, work 3 sc in corner; repeat from * around; join with a slip st in first sc. Fasten off. Weave in ends.
Repeat Joining Round for all 16 pairs of squares.
FINISHING
With smaller hook and B, sc squares together into 4 rows of 4 joined squares.
EDGING
With smaller hook, join B in any corner; ch 1, * 3 sc in corner, sc in each sc to next corner; repeat from * around; join with a slip st in first sc. Fasten off. Weave in ends.
ABBREVIATIONS: A, B = color A, B; ch = chain; dc = double crochet; mm = millimeters; sc = single crochet; st(s) = stitch(es); * = repeat whatever follows the * as indicated; [ ] = work directions in brackets the number of times specified.
Pattern © by Coats & Clark Inc. Reproduced with permission from Coats & Clark Inc. PurpleKittyYarns.com is not endorsed by Coats & Clark Inc. It is not permissible to contract production of projects made from designs published by Coats & Clark to a third party for sale or distribution.
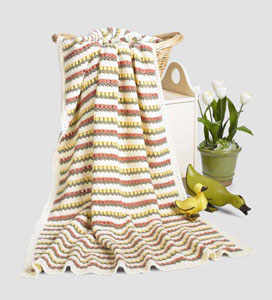
Flowers In A Row WR1002
EASY
Designed by Melissa Leapman.
Afghan Measures approximately 51" x 65".
RED HEART® "Super Saver": 25 Ounces No. 313 Aran CA, 8 ounces No. 633 Dark Sage CB, 5.5 ounces each No. 256 Carrot CC and No. 320 Cornmeal CD.
OR
TLC® "Essentials®": 25 Ounces No. 2313 Aran CA, 8 ounces No. 2673 Medium Thyme CB, 5.5 ounces each No. 2254 Persimmon CC and No. 2220 Butter CD.
Crochet Hooks: 6mm [US J-10] and 5.5mm [US I-9].
Yarn needle.
GAUGE: 14 sts = 4"; 12 rows = 4 ¾" in pat with larger hook. CHECK YOUR GAUGE. Use any size hook to obtain gauge.
SPECIAL ABBREVIATION:
Cl (cluster) = [yo and draw up a lp, yo and draw through 2 lps on hook] 3 times all in same sp, yo and draw through all 4 lps on hook.
To Change Color: Work last st before color change until 2 lps remain on hook, drop color in use, with next color to be used, yo and draw through 2 lps remaining on hook. Continue with new color.
With CA and larger hook, ch 169.
Row 1 (Right Side): Sc in 2nd ch from hook and in each ch across, changing to CB in last sc; turn.
Row 2: With CB, ch 3, skip first sc, * (dc, ch 1, dc) all in next sc, skip next 2 sc; rep from * to last 2 sts; (dc, ch 1, dc) all in next sc, dc in last sc changing to CC; turn.
Row 3: With CC, ch 3, skip first dc, * Cl in next ch-1 sp, ch 2; rep from * to last ch-1 sp; Cl in last ch-1 sp, dc in top of ch-3 changing to CA; turn.
Row 4: With CA, ch 1, sc in first dc, * sc in Cl, 2 sc in next ch-2 sp; rep from * to last 2 sts; sc in last Cl, sc in top of ch-3; turn.
Rows 5 and 6: Ch 1, sc in each sc across; turn.
Row 7: Rep Row 5 changing to CB in last sc; turn.
Row 8: With CB, rep Row 2 changing to CD in last dc.
Row 9: With CD, rep Row 3.
Rows 10-13: Rep Rows 4-7.
Rep Rows 2-13 for pat until approximately 62" from beg, end by working Row 10. Fasten off.
BORDER-Rnd 1: With right side facing and larger hook, attach CA in upper right hand corner; ch 1, * work an odd number of sc evenly across to next corner, work 3 sc in corner; rep from * around taking care to keep work flat; join with a sl st in first sc.
Rnds 2 and 3: Ch 1, sc in each sc around working 3 sc in each corner; join to first sc.
Rnd 4: Ch 4, skip first 2 sc, * dc in next sc, ch 1, skip next sc; rep from * to next corner sc; [dc, ch 1] 3 times all in corner sc, skip next sc; rep from * around; ** dc in next sc, ch 1, skip next sc; rep from ** to end; join in 3rd ch of ch-4. Change to smaller hook.
Rnd 5: Ch 1, * (sl st, ch 2, dc) all in next sp; rep from * around; join to first sl st. Fasten off. Weave in ends.
ABBREVIATIONS: beg = beginning; CA, CB, CC, CD = Colors A, B, C, D; ch = chain; dc = double crochet; lp(s) = loop(s); mm = millimeters; rep = repeat; rnd = round; sl = slip; sp = space; st(s) = stitch (es); yo = yarn over; * or ** = repeat whatever follows the * or ** as indicated; [ ] = work directions in brackets the number of times specified.
Pattern © by Coats & Clark Inc. Reproduced with permission from Coats & Clark Inc. PurpleKittyYarns.com is not endorsed by Coats & Clark Inc. It is not permissible to contract production of projects made from designs published by Coats & Clark to a third party for sale or distribution.
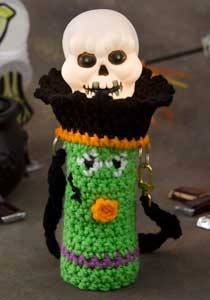
Frankenstein Flashlight Holder LW2356
Designed by Ellen Gormley.
Skill Level: INTERMEDIATE
Holder measures approximately 2 ½" wide x 7 ½" tall excluding strap.
RED HEART® "Super Saver": 1 skein each 672 Spring Green A, 528 Medium Purple B, 254 Pumpkin C, 312 Black D, and 311 White E.
Crochet Hook: 5mm [US H-8]
Yarn needle, two 1" metal rings, 1 swivel clasp.
GAUGE: 12 sts = 4"; 16 rows in sc = 4". CHECK YOUR GAUGE. Use any size hook to obtain the gauge.
NOTES
1. Rounds of body are turned.
2. Move the opening for the power switch depending on your individual flashlight.
3. Some are rounds that are joined, some are rows that are not joined. Read carefully.
4. Eyes are worked intarsia style, with one color being dropped and the new color being picked up, floating the unused color strand across the back.
HOLDER
With A, ch 4, join with slip st to form a ring.
Round 1: Ch 1, 6 sc in ring; join with slip st in first sc, do not turn - 6 sc.
Round 2: Ch 1, 2 sc in each st around; join with slip st in first sc, do not turn - 12 sc.
Round 3: Ch 1, *sc in first st, 2 sc in next st; repeat from * around; join with slip st in first sc, turn - 18 sc.
Round 4: Ch 1, sc in flp only of each sc around; join with slip st in first sc, turn - 18 sc.
Rounds 5-7: Ch 1, working in both loops of sts, sc in each st around; join with slip st in first sc - 18 sc. Drop A, join B.
Round 8: With B, ch 1, sc in each st around; join with slip st in first sc - 18 sc. Drop B, pick up A.
Rounds 9-13: With A, ch 1, sc in each st around; join with slip st in first sc - 18 sc.
Switch Opening
Work now progresses in rows.
Rows 14-18: Ch 1, sc in each st; do not join, turn - 18 st.
Work now progresses in rounds.
Round 19: Ch 1, sc in each of 18 sts, join with slip st in first sc- 18 sc.
Round 20: With A, ch 1, sc in each of next 7 sts; with E, sc next sts; with A, sc in next 2 sts; with E, sc in next sts; with A, sc in each of next 7 sts; join with slip st in first sc, turn - 18 sc.
Round 21: With A, ch 1, sc in each of next 6 sts; with E, sc in next st; with D, sc in next st; with E, sc in next 2 sts; with D, sc in next st; with A, sc in each of last 6 sts; join with slip st in first st - 18 sc.
Round 22: Repeat round 20.
Round 23: With A, ch 1, *sc in each of next 2 sts, 2 sc in next; repeat from * around; join with slip st in first st; turn - 24 sc. Drop A, pick up C.
Round 24: With C, ch 1, sc in each of next 5 sts, holding first ring to surface, sc over ring and each of next 2 sts, sc in each of next 10 sts, holding 2nd ring to surface, sc over ring and each of next 2 sts, sc in each of last 5 sts; join with slip st in first st; turn - 24 sc. Drop C, pick up D.
Rounds 25-26: With D, ch 1, sc in each sc around; join with slip st in first sc; turn - 24 sc.
Round 27: Ch 1, *sc in next 3 sts, 2 sc in next st; repeat from * around; join with slip st in first st; turn - 30 sc.
Rounds 28-29: Ch 1, sc in each sc around; join with slip st in first sc; turn - 30 sc.
Round 30: Ch 1, (sc, ch 4, sc) in first st, *skip 1 st, (sc, ch 4, sc) in next sc; repeat from * around, skip last st; join with slip st in first sc - 30 sc; 15 ch-4 loops. Fasten off.
NOSE
With C, ch 4, join with slip st in first st to form a ring.
Round 1: Ch 1, 6 sc in ring; join with slip st in first sc - 6 sc. Fasten off leaving a long tail for sewing.
With yarn needle and tail, sew nose onto body centered under eyes on round 15.
SCAR
With D and yarn needle, embroider scar onto face as pictured.
STRAP
With D, join with slip st in one ring on side of body, ch 40, slip st in clasp.
Row 1: Ch 1, turn; sc in each of next 40 ch, slip st in first ring, turn.
Row 2: Ch 1, sc in each of next 40 sts, slip st in clasp. Fasten off. Weave in ends.
ABBREVIATIONS: A, B, C, D, E = color A, B, C, D, E; ch = chain; mm = millimeters; flp= front loop; sc = single crochet; st(s) = stitch(es); * or ** = repeat whatever follows the * or ** as indicated.
Pattern © by Coats & Clark Inc. Reproduced with permission from Coats & Clark Inc. PurpleKittyYarns.com is not endorsed by Coats & Clark Inc. It is not permissible to contract production of projects made from designs published by Coats & Clark to a third party for sale or distribution.
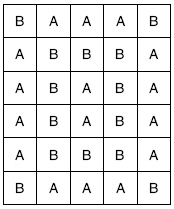
French Country Throw LW2130
Skill Level: Intermediate
Designed by Katherine Eng
Throw measures 45" x 55".
RED HEART® "Super Saver®": 1 skein each 320 Cornmeal A and 885 Delft Blue B; 2 skeins each 316 Soft White C and 996 French Country D.
Crochet Hook: 6mm [US J-10].
Yarn needle.
GAUGE: Rounds 1-5 = 5.5" across; Square = 8.5" x 8.5". CHECK YOUR GAUGE. Use any size hook to obtain the gauge.
Special Abbreviations
shell = (sc, 5 dc, sc) all in same space.
join = drop loop from hook, insert hook from right side into corresponding loop of completed square and draw loop through.
NOTE: Work all squares through Round 8, then arrange as on diagram and join while working Round 9.

THROW
Square A (Make 16)
With A, ch 4; join with a slip st to form a ring.
Round 1: Ch 1, 8 sc in ring; join with a slip st in first sc.
Round 2: [Ch 3, slip st in next sc] 7 times, ch 3, slip st in first sc of Round 1.
Round 3: Slip st in next ch-3 space, [ch 4, slip st in next ch-3 space] 7 times, ch 4, slip st in first slip st.
Round 4: Slip st in next ch-4 space, [ch 6, slip st in next ch-4 space] 7 times, ch 6, slip st in first slip st.
Round 5: [Shell in next ch-6 space, ch 1] 8 times; join in first sc. Fasten off.
Round 6: Join C in the back loop of the center dc of any shell; ch 1, sc in same dc, * ch 3, dc in next ch-1 space, ch 3, sc in back loop of center dc of next shell, ch 3, (tr, ch 4, tr) all in next ch-1 space for corner, ch 3 **, sc in back loop of center dc of next shell; repeat from * around, end at **; join.
Round 7: Ch 1, sc in first sc, * ch 3, sc in next dc, ch 3, sc in next sc, ch 3, sc in next tr, ch 2, (sc, ch 2, sc) all in ch-4 space for corner, ch 2, sc in next tr, ch 3 **, sc in next sc; repeat from * around, end at **; join.
Round 8: Ch 1, sc in first sc, * [ch 1, sc in next ch-3 space, ch 1, sc in next sc] 3 times, ch 1, sc in next ch-2 space, ch 1, (sc, ch 2, sc) all in corner ch- 2 space, ch 1, sc in next ch-2 space, ch 1, sc in next sc, ch 1, sc in next ch-3 space, ch 1 **, sc in next sc; repeat from * around, end at **; join. Fasten off.
Square B (Make 14)
Work same as Square A EXCEPT begin and work Rounds 1-5 with B.
Arrange squares as in diagram.
First Round 9: Join D in the first ch-1 space to the left of any corner ch-2 space; ch 1, (sc, ch 2, sc) all in same space, * [sc in next ch-1 space, (sc, ch 2, sc) all in next ch-1 space] twice, sc in next ch-1 space, ch 2, sc in next ch-1 space, (sc, ch 2, sc) all in next ch-1 space, [sc in next ch-1 space, (sc, ch 2, sc) all in next ch-1 space] twice, (sc, ch 4, sc) all in corner ch-2 space **, (sc, ch 2, sc) all in next ch-1 space; repeat from * around, end at **; join in first sc. Fasten off.
Work Joining Round 9 for all other squares, joining on 1 or 2 sides as required. Where corners are already joined, join in previous joining.
Joining Round 9: Join D in the first ch-1 space to the left of any corner ch-2 space; ch 1, (sc, ch 2, sc) all in same space, [sc in next ch-1 space, (sc, ch 2, sc) all in next ch-1 space] twice, sc in next ch-1 space, ch 2, sc in next ch-1 space, (sc, ch 2, sc) all in next ch-1 space, [sc in next ch-1 space, (sc, ch 2, sc) all in next ch-1 space] twice, (sc, ch 2, join, ch 2, sc) all in corner ch-2 space, (sc, ch 1, join, ch 1, sc) all in next ch-1 space, [sc in next ch-1 space, (sc, ch 1, join, ch 1, sc) all in next ch-1 space] twice, sc in next ch-1 space, ch 1, join, ch 1, sc in next ch-1 space, (sc, ch 1, join, ch 1, sc) all in next ch-1 space, [sc in next ch-1 space, (sc, ch 1, join, ch 1, sc) all in next ch-1 space] twice, (sc, ch 2, join, ch 2, sc) all in corner ch-2 space; (sc, ch 2, sc) all in next ch-1 space, * [sc in next ch-1 space, (sc, ch 2, sc) all in next ch-1 space] twice, sc in next ch-1 space, ch 2, sc in next ch-1 space, (sc, ch 2, sc) all in next ch-1 space, [sc in next ch-1 space, (sc, ch 2, sc) all in next ch-1 space] twice, (sc, ch 4, sc) all in corner ch-2 space **, (sc, ch 2, sc) all in next ch-1 space; repeat from * around, end at **; join in first sc. Fasten off.
Border
Round 1: With right side facing, join D in first ch-2 space to the left of any corner ch-4 space; ch 1, (sc, ch 2, sc) all in same space, ch 1, * (sc, ch 2, sc) all in next ch-2 space, ch 1; repeat from * to corner; (sc, ch 4, sc) all in corner ch-4 space, ch 1; repeat from * around; join.
Round 2: Slip st in next ch-2 space, ch 1, (sc, ch 2, sc) in same space, ch 1, * (sc, ch 2, sc) all in next ch-2 space, ch 1; repeat from * to corner; (sc, ch 2, sc, ch 3, sc, ch 2, sc) all in corner ch-4 space, ch 1; repeat from * around; join. Fasten off.
Round 3: With wrong side facing, join C in any ch-2 space along side edge; ch 1, sc in same space, * ch 3, sc in next ch-2 space **; repeat from * to corner; ch 3, (sc, ch 3, sc) all in corner ch-3 space; repeat from * around, end at **; ch 3; join; TURN.
Round 4: Slip st to center ch of next ch-3 space; ch 1, sc in same space, * 3 dc in next sc **, sc in next ch-3 space; repeat from * to corner; skip next sc, 5 dc in corner ch-3 space, sc in next ch-3 space; repeat from * around, end at **; join.
Round 5: Slip st in next 2 dc; ch 1, (sc, ch 2, sc) in same dc, * ch 1, (sc, ch 2, sc) all in center dc of next dc-group; repeat from * to corner; ch 1, (sc, ch 2, sc) all in first dc of corner dc-group, ch 1, skip next dc, (sc, ch 3, sc) all in next dc, ch 1, skip next dc, (sc, ch 2, sc) all in next dc; repeat from * around; ch 1; join. Fasten off. Weave in ends.
ABBREVIATIONS: A, B, etc. = color A, B, etc.; ch = chain; dc = double crochet; mm = millimeters; sc = single crochet; st(s) = stitch(es); tr = treble crochet; * or ** = repeat whatever follows the * or ** as indicated; [ ] = work directions in brackets the number of times specified.
Pattern © by Coats & Clark Inc. Reproduced with permission from Coats & Clark Inc. PurpleKittyYarns.com is not endorsed by Coats & Clark Inc. It is not permissible to contract production of projects made from designs published by Coats & Clark to a third party for sale or distribution.
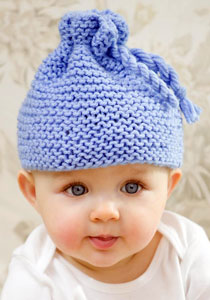
Garter Stitch Baby Hat WR2164
Skill Level: Beginner
Designed by Kathleen Sams
Hat circumference is 14".
RED HEART® "Super Saver®": 1 skein of 347 Light Periwinkle.
Knitting Needles: 5.5mm (US 9)
Yarn Needle
Gauge: 15 sts = 4", 30 rows = 4" in Garter stitch (knit every row). Squares = 7" x 7". CHECK YOUR GAUGE. Use any sized needle to obtain gauge given.
HAT
Square (Make 2)
Cast on 27 sts.
Row 1 (Right Side): Knit all sts.
Rows 2-42: Knit.
Bind off. Weave in ends.
Assembly
With right sides up, sew side seams; leave top and bottom edges open.
Make Twisted Cord using three 80" lengths of yarn. Weave the cord through the stitches about 1" down from the top edge of the hat. Pull ends of cord to gather fabric and secure with a knot.
Twisted Cord
Bring all six cut ends of yarn together and tie in a knot close to the end to form a large loop. Secure the knotted end to a stable surface or have someone hold it. Slip a knitting needle into the loop and hold the yarn just below the loop and needle. Hold the yarn taut, and twirl the needle, twisting the yarn, until the entire length is tightly twisted and begins to twist back on itself. Bring the loop end and the knotted end together; tie tightly so the cord will not untwist. Smooth out the kinks so the cord lies flat and twists evenly.
Pattern © by Coats & Clark Inc. Reproduced with permission from Coats & Clark Inc. PurpleKittyYarns.com is not endorsed by Coats & Clark Inc. It is not permissible to contract production of projects made from designs published by Coats & Clark to a third party for sale or distribution.
| Pattern Categories Browse the categories to help you find the patterns you're looking for. |
||
    
|
|
|


Navigation

All contents © 2003-2026 Purple Kitty LLC. All rights reserved.
Privacy Policy | FAQ | About Me